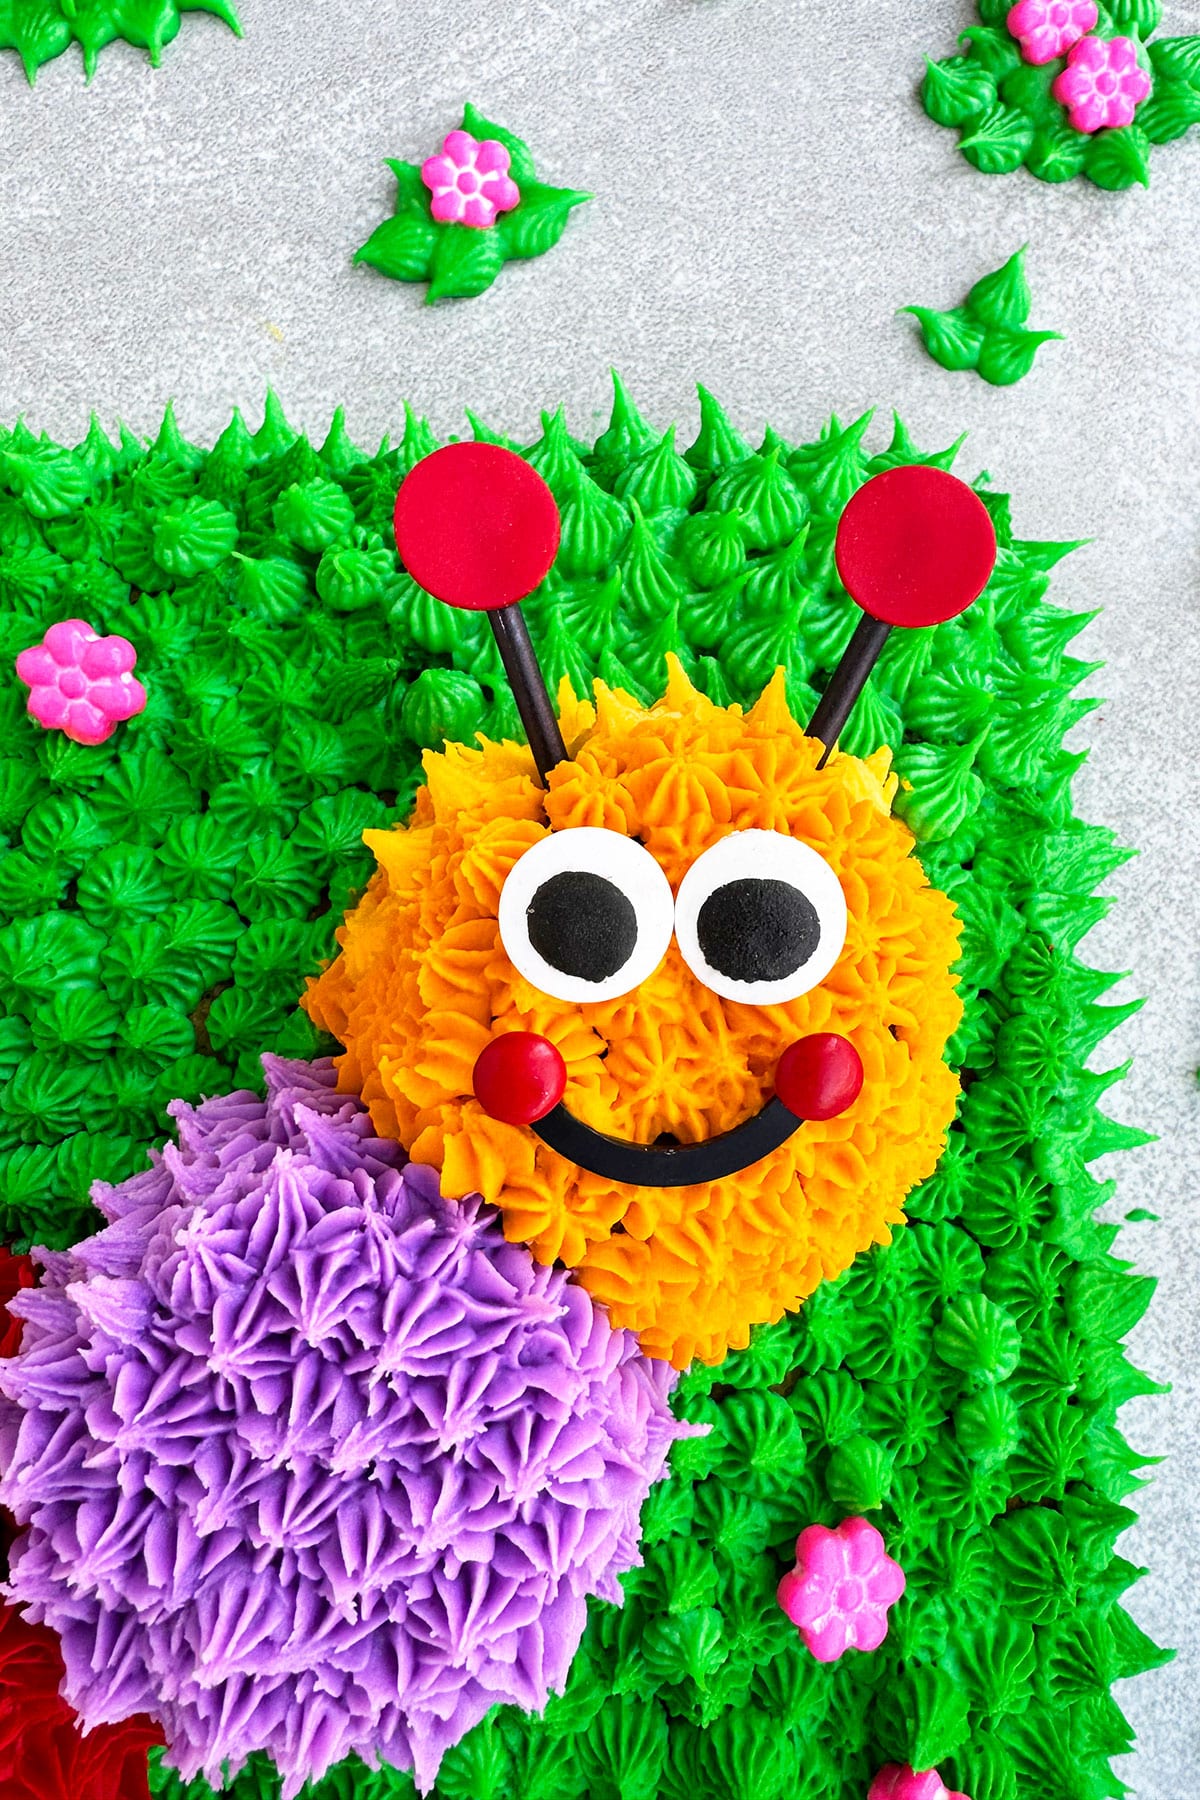
Easy caterpillar cake recipe and tutorial, homemade with simple ingredients. This kids birthday cake is decorated with colorful buttercream icing. Party details also included.

Want to Save This Recipe?
Enter your email & I'll send it to your inbox. Plus, get great new recipes from me every week!
By submitting this form, you consent to receive emails from CakeWhiz
Our kid finally turned 1 and we threw him the most most amazing party ever. The inspiration came from his Baby Einstein Caterpillar toys. Those were the first toys he enjoyed playing with and they are still his favorite. My tutorial today is easier than the Aldi version or even the British Colin version as well as the Hungry Caterpillar. For more fun cake inspiration, be sure to check out these Easy Cake Decorating Ideas (Beginners) and these Birthday Cake Ideas.
Table of contents
Key ingredients for DIY homemade caterpillar birthday cake
- Yellow sheet cake- This is a simple, easy cake that you can add sprinkles to for that Funfetti look.
- Chocolate cupcakes- There should be 5 of them, each frosted a different color.
- Buttercream frosting- Colored green, purple, red, yellow, orange, and blue.
- Black icing- This is used for some of the small details.
- Eyeball candies- You only need 2 of these, but a package is nice to have on hand for future baking.
- Mini M&Ms- You will want to use 2 of the red colored ones for the Caterpillar's cheeks.
- Flower candies- This is such a cute touch for the overall look and adds a pop of color.
Variations
- For a simple style- Bake a round layer cake, pipe grass with with green icing all over the cake. Add a fondant caterpillar topper on the top. Stick a few flower candies all over the cake and you are done.
- Try different colors of icing- For the caterpillar. You can even make a pastel version.
- Omit the sheet cake- And make 5 large dome cakes. Arrange them on a large sturdy board in the shape of a caterpillar and decorate in a similar manner.
- Use different frosting- I like the vanilla buttercream, because it is easy to color and stable, but you can also use Marshmallow Frosting, White Chocolate Buttercream Frosting, or thisi Sugar Free Frosting would be good options, too.
- Add sprinkles to the cake batter- To give it a Funfetti look and flavor. Both kids and adults alike love this.
- Poke holes in the cake- And fill with Caramel Sauce, Strawberry Jam, Raspberry Pie Filling, Chocolate Ganache, Whipped Cream, Lemon Curd, Dulce de Leche, or Homemade Vanilla Custard.
- Try a different cake flavor- You can make this Chocolate Sheet Cake, Pistachio Cake, or Texas sheet cake instead. In fact, you can even make one of my tiered cakes into a simple sheet pan cake, like this Red Velvet Cake, Vanilla Cake, Funfetti Cake or Easy Cherry Cake.
- Add extracts to the cake batter- To give it a different flavor, such as almond extract, lemon extract, maple extract, or coconut extract.
- Use fondant to decorate- Instead of frosting. It will have a different look, but it's a fun variation to the original. Marshmallow Fondant is a great option for this cake, by the way. Also, be sure to check out my posts on How to Color Fondant and How to Make Fondant Flowers for some helpful tips as well as this New Year's Cake.
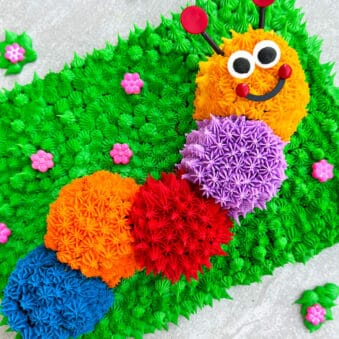
- Just make chocolate cupcakes- And decorate them like the caterpillar shown on top of the cake below (5 cupcakes makes 1 caterpillar). You'll end up with several caterpillars you can put on a large cake board. Guests can take a cupcake similar to this Football Cupcakes Cake. You'll likely want to make at least 2 dozen cupcakes.

How to make easy caterpillar cake with buttercream icing?
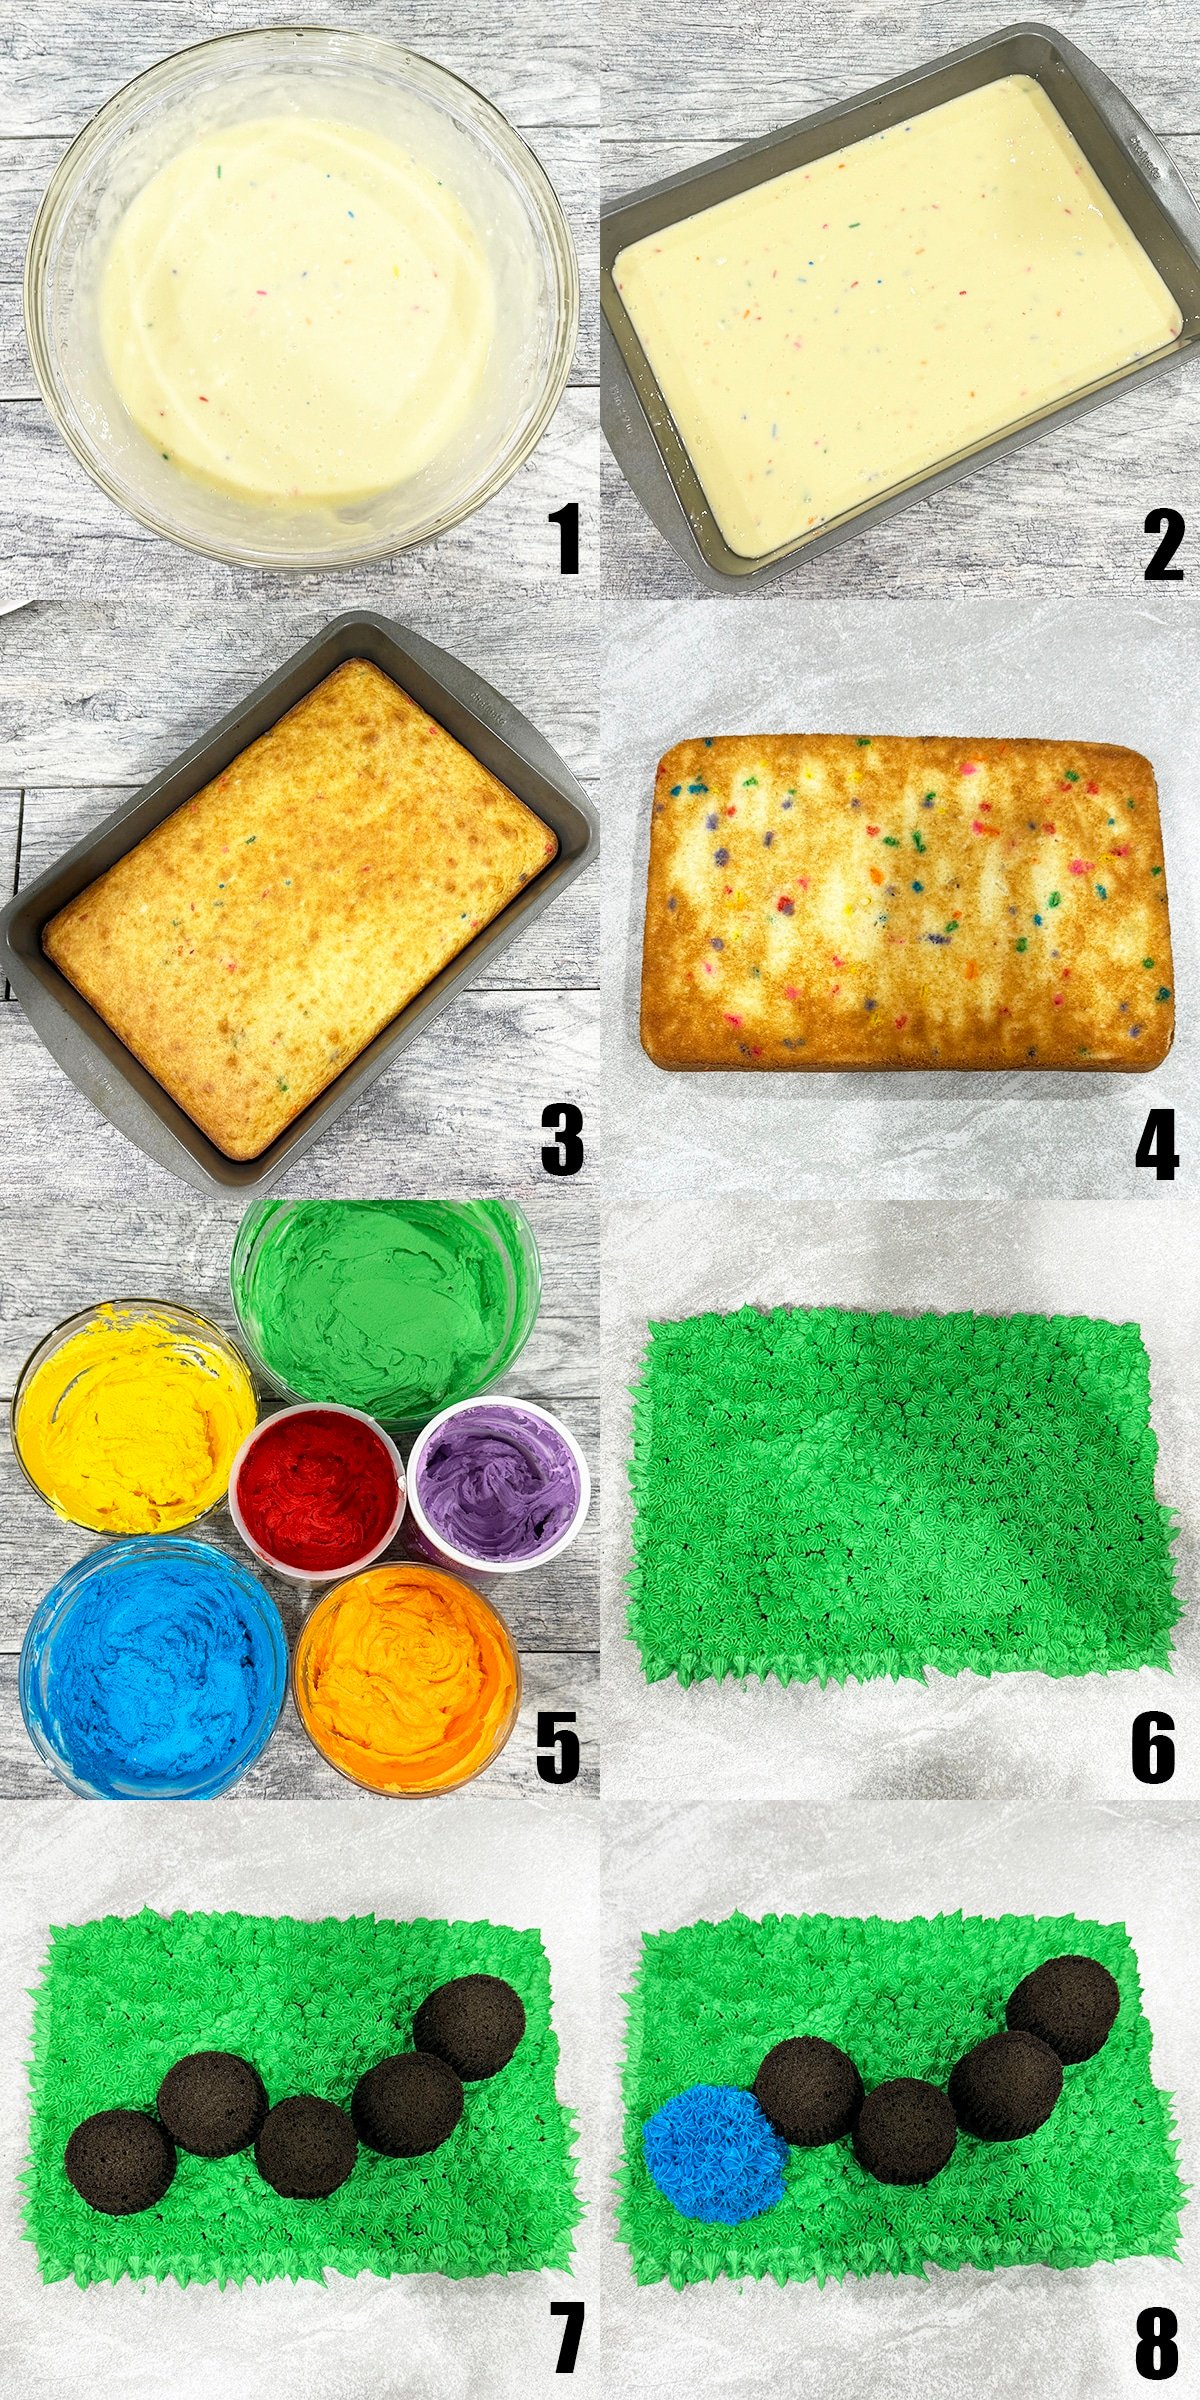
- Mix together ingredients- To make both the cake and cupcakes (Image 1).
- Pour batter into- Respective prepared pans (Image 2).
- Bake cake and cupcakes- And allow them to cool fully (Image 3).
- Remove cake from the pan- And place it on a cake board (Image 4).
- Prepare frosting- Then separate it into 5 bowls and tint with various food coloring (Image 5).
- Pipe little green stars- All over the cake until fully covered (Image 6).
- Remove liners from cupcakes- Place these on top in the form of a caterpillar (Image 7).
- Pipe blue frosting- In little star shapes all over the first cupcake (Image 8).
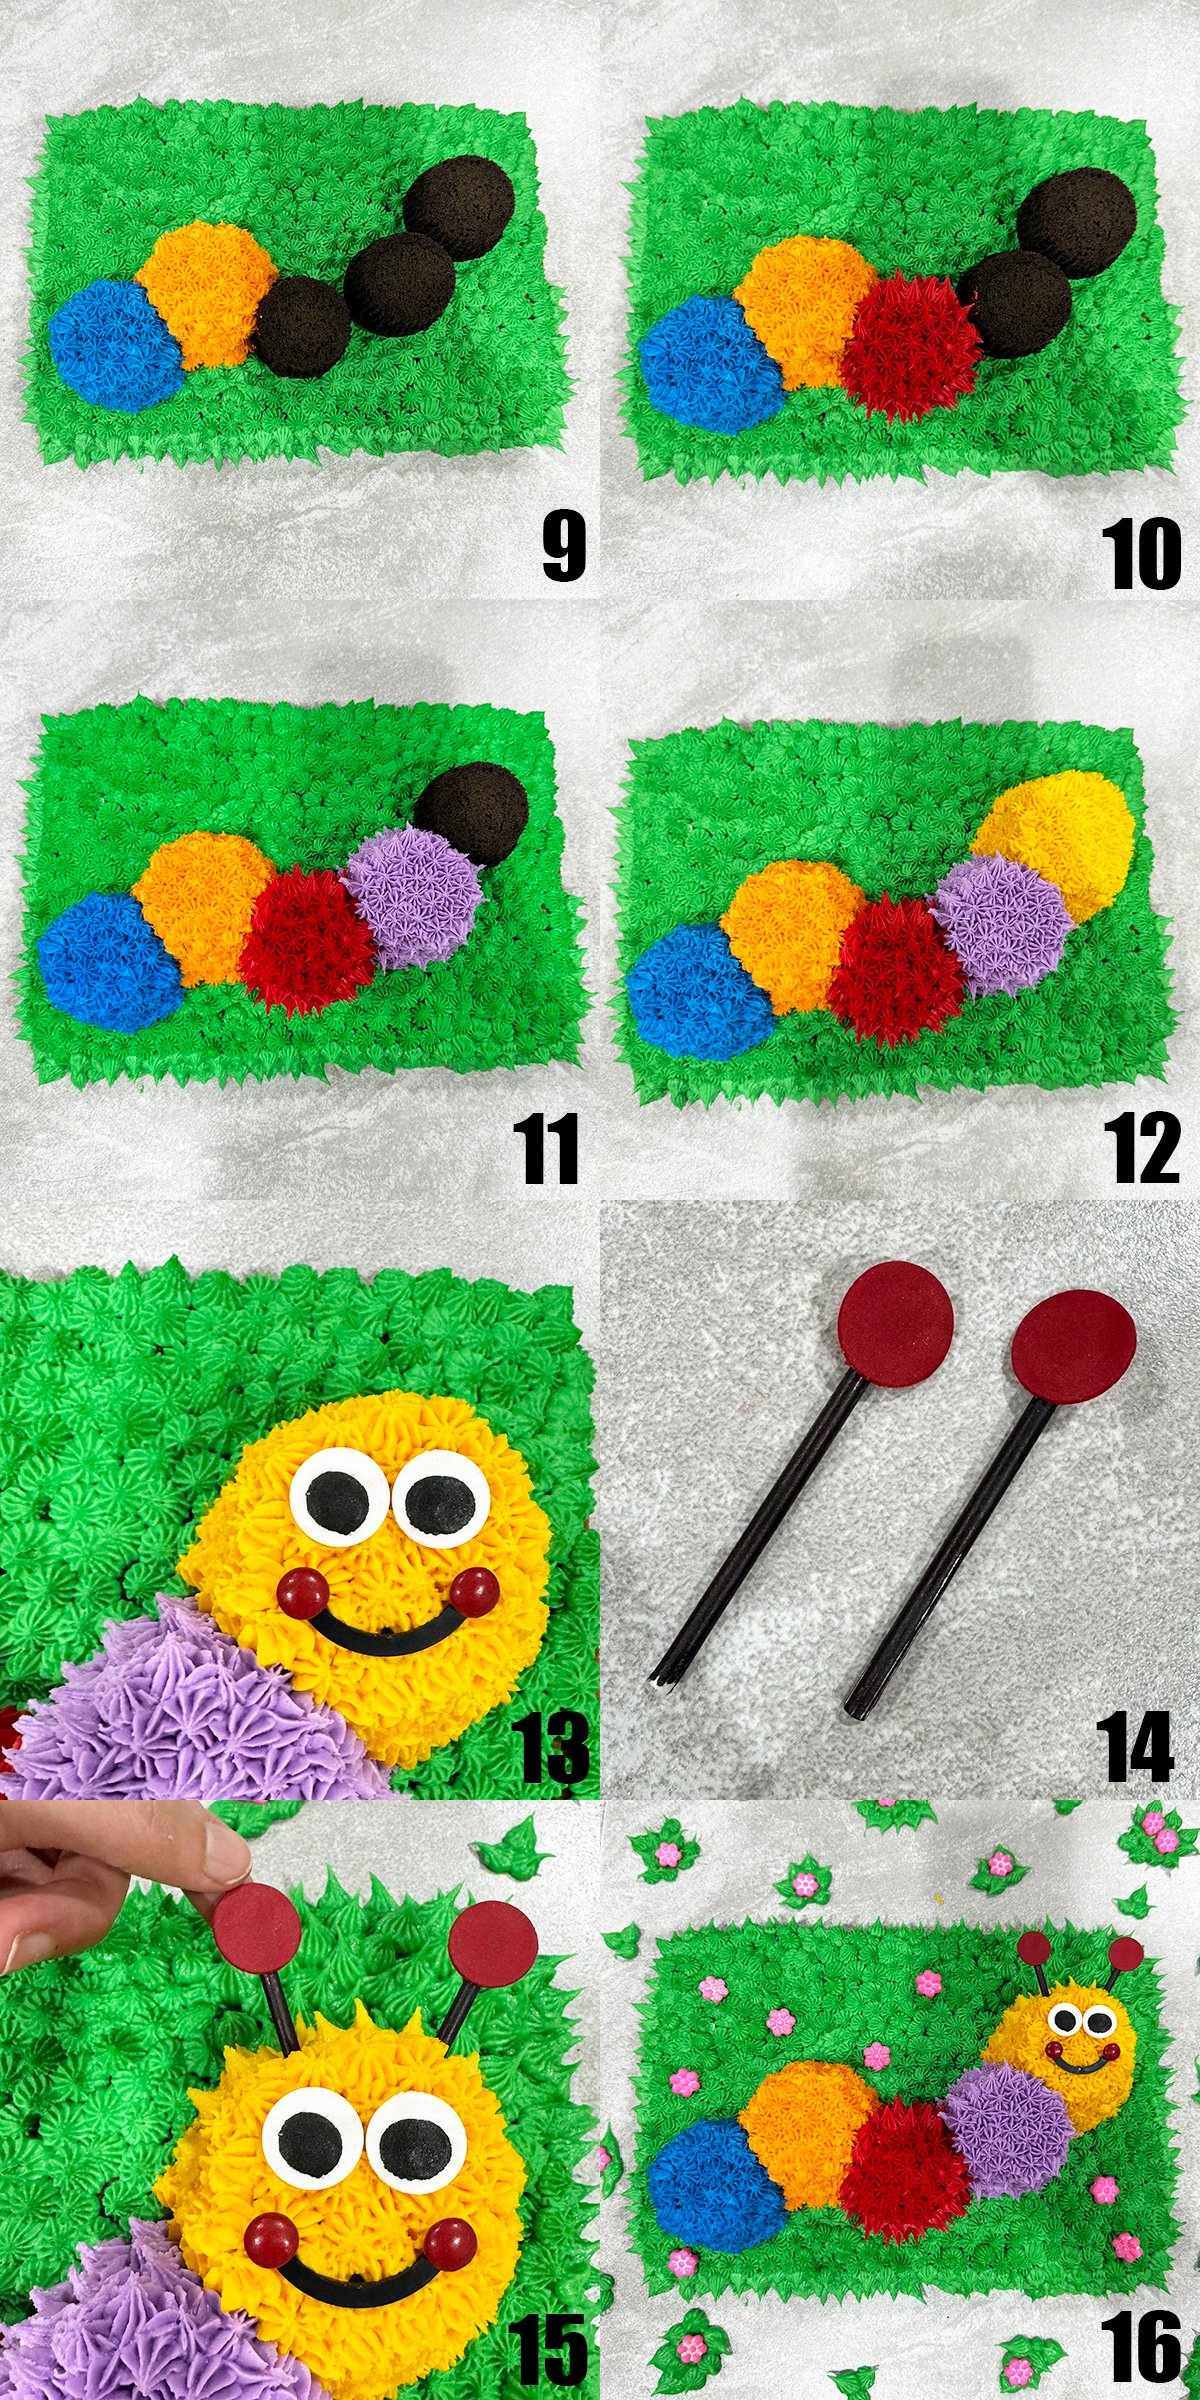
- Pipe yellow frosting- In little star shapes all over second cupcake (Image 9).
- Pipe little stars- Of red frosting all over the third cupcake (Image 10).
- Pipe little stars- Of purple frosting all over the fourth cupcake (Image 11).
- On the last cupcake- Pipe little yellow stars all over (Image 12).
- Stick two eyes- On top of the yellow cupcake (Image 13).
- Make a smile below the eyes- Then stick 2 red M&M candies on either side (Image 13).
- Cut out 2 small red circles- Out of thick cardstock and adhere each to a lollipop stick (Image 14).
- Push these sticks- On top of the yellow cupcake (Image 15).
- Pipe patches of green icing grass- On the empty space of the cake board (Image 16).
- Stick flower candies on- The cake as well as the cake board (Image 16).
Tips and techniques
- Don't forget to decorate the cake board- Use it to tell the whole story and create a scene.
- Don't decorate a warm cake- Because the frosting won't stick and you will end up with a gooey mess and a lot of frustration.
- First green layer doesn't have to be smooth- Because you will be covering it in frosting stars. This is just the basic first layer or crumb coat.
- Use a clean piping bag- For each frosting color so that the colors don't bleed into one another and dirty the nice clean-cut color.
- How to put together antennas- You can use a dab of frosting to stick the red cardstock to the sticks, hot glue, or clear tape.
- Use edible markers to color lollipop sticks- Because it will be inserted into the cake and you can’t use regular markers for that reason since it will come in contact with the cake.
- Large cake board options- I use large tiles from Home Depot. They come in various sizes and colors and patterns. Make sure to wash it first with soap and water before placing the cake on it. You can also order large cardboard cake boards online and cover those in grease proof paper. They come in beautiful designs now.
Recipe FAQs
This is very different than that one. This one is more of an American version. The British version was made of a chocolate sponge cake and chocolate buttercream with a hard chocolate shell. This one is more simple, made with a vanilla sheet cake, vanilla buttercream, and no hard shell. Then I use chocolate cupcakes for the caterpillar shape.
Yes. Instead of using buttercream frosting you can use fondant to cover the cake and cupcakes. You can even make fondant decorations, like the flowers and caterpillar features. Check out my posts about How to Color Fondant and How to Make Marshmallow Fondant for help. You can even look at my New Year's Cake for more fondant cake decorating tips.
Storage
- Make ahead instructions- This cake can be made up to 3 days a head and stored in the fridge in a sealed container. You can also make the cake and frosting, put them in separate containers, place them in the freezer for up to a month, thaw, and then decorate when ready,
- Room temperature- Unless you have a filling, this frosted cake can be out for 8-10 hours.
- Refrigerate- Leftovers can be stored in a sealed container in the fridge for up to 3 days.
- Freeze- The undecorated sheet cake and cupcakes can be stored in separate sealed containers for up to 1 month. You can also freeze the frosting in a sealed container for up to 1 month. You can either tint the frosting before and freeze in 5 separate containers or keep in one container until you are ready to thaw and tint them later. All should thaw in the fridge for at least 24 hours and then you can decorate your cake per instructions below.
More easy decorated cakes
- Easy Teddy Bear Cake (And Party)
- Pink Ombre Mother’s Day Cake (And Party)
- Summer Cake (Kids Backyard Summer Party)
- Easy Baby Cake
- Homemade Wedding Cake
- Easy Camping Cake
Party details
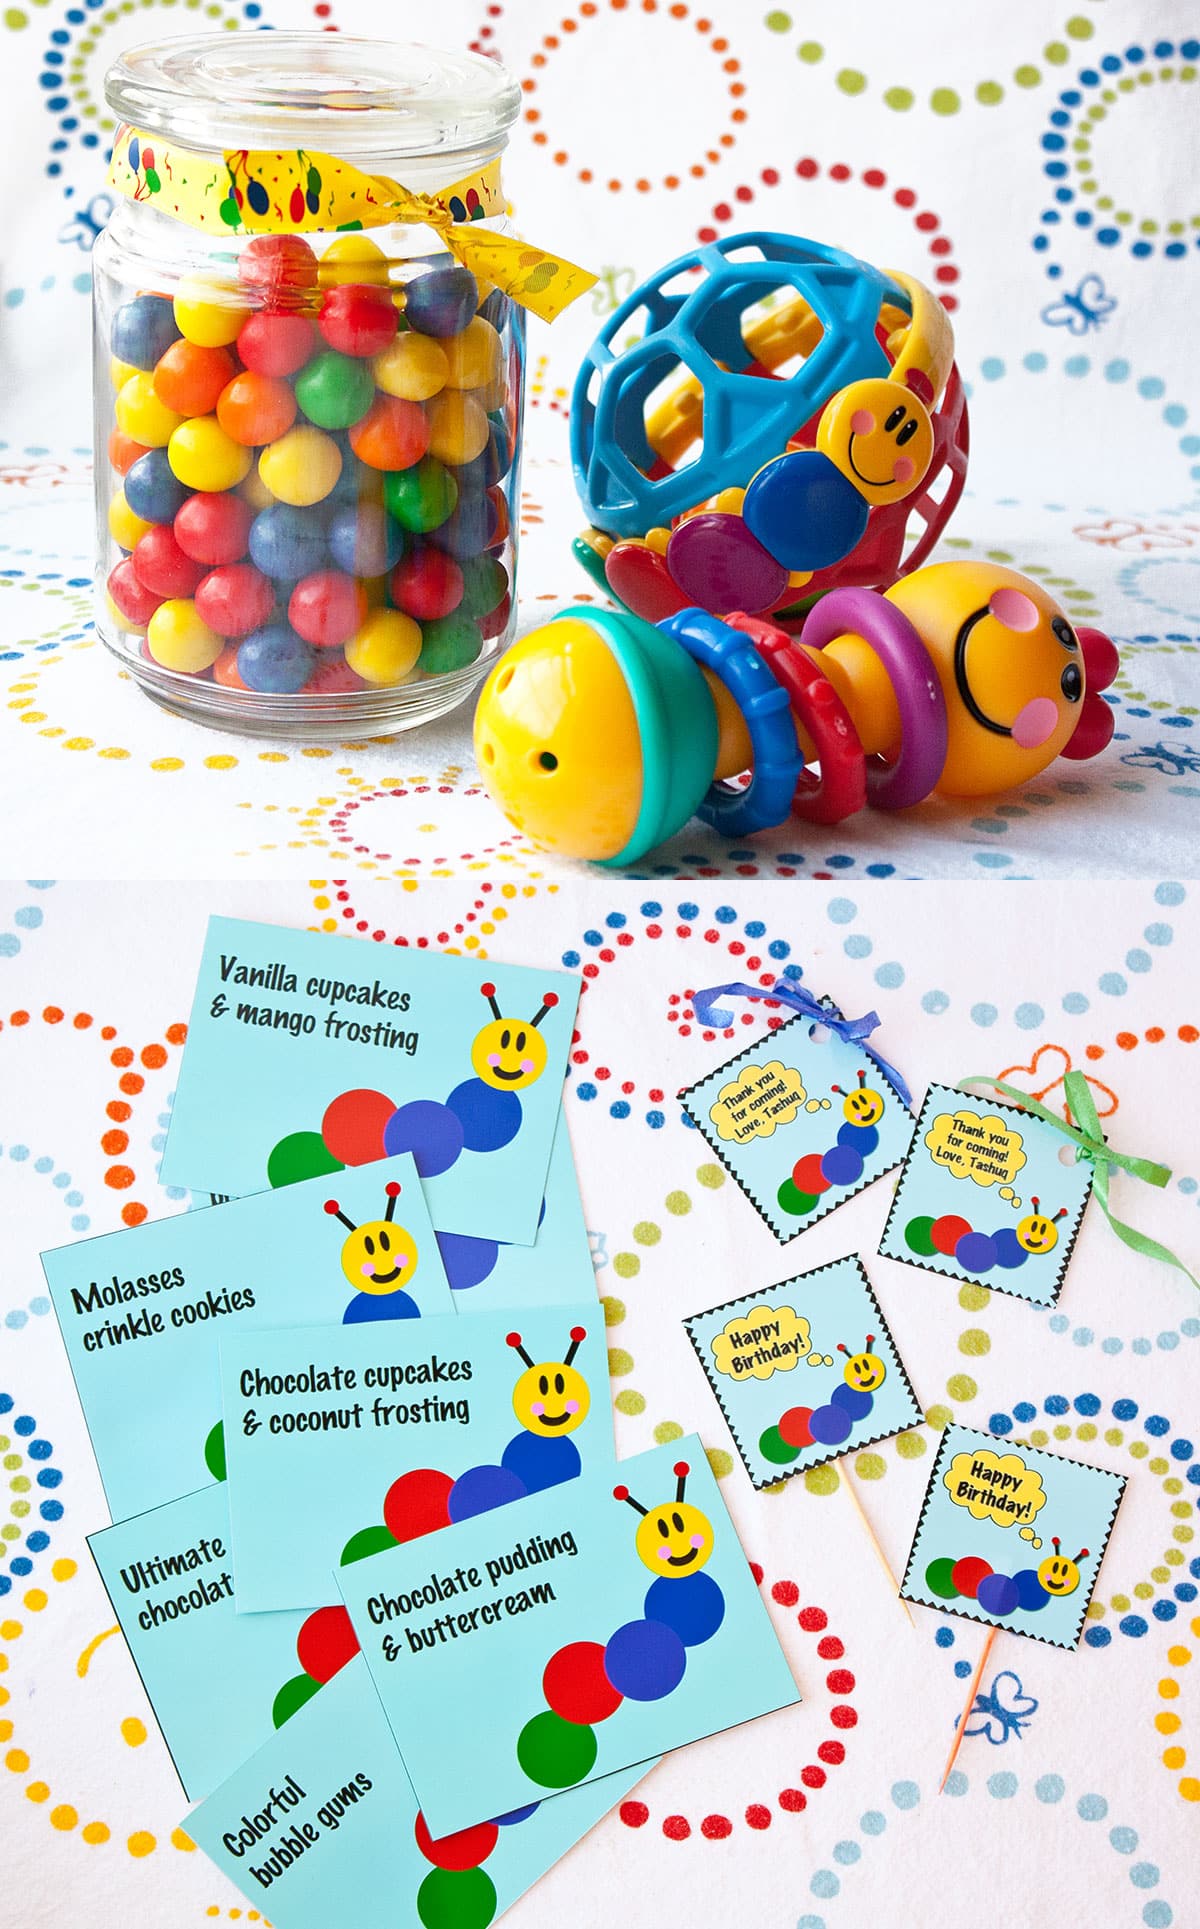
Once we had a theme in mind, I got started with the party invites. I was so happy with how they turned out. Making these was quite the learning experience. I figured out how to use many Photoshop tools that I had never used before. Since I was already making those invites, I used the same design to make cupcake toppers, party favor labels as well as labels for all the desserts.
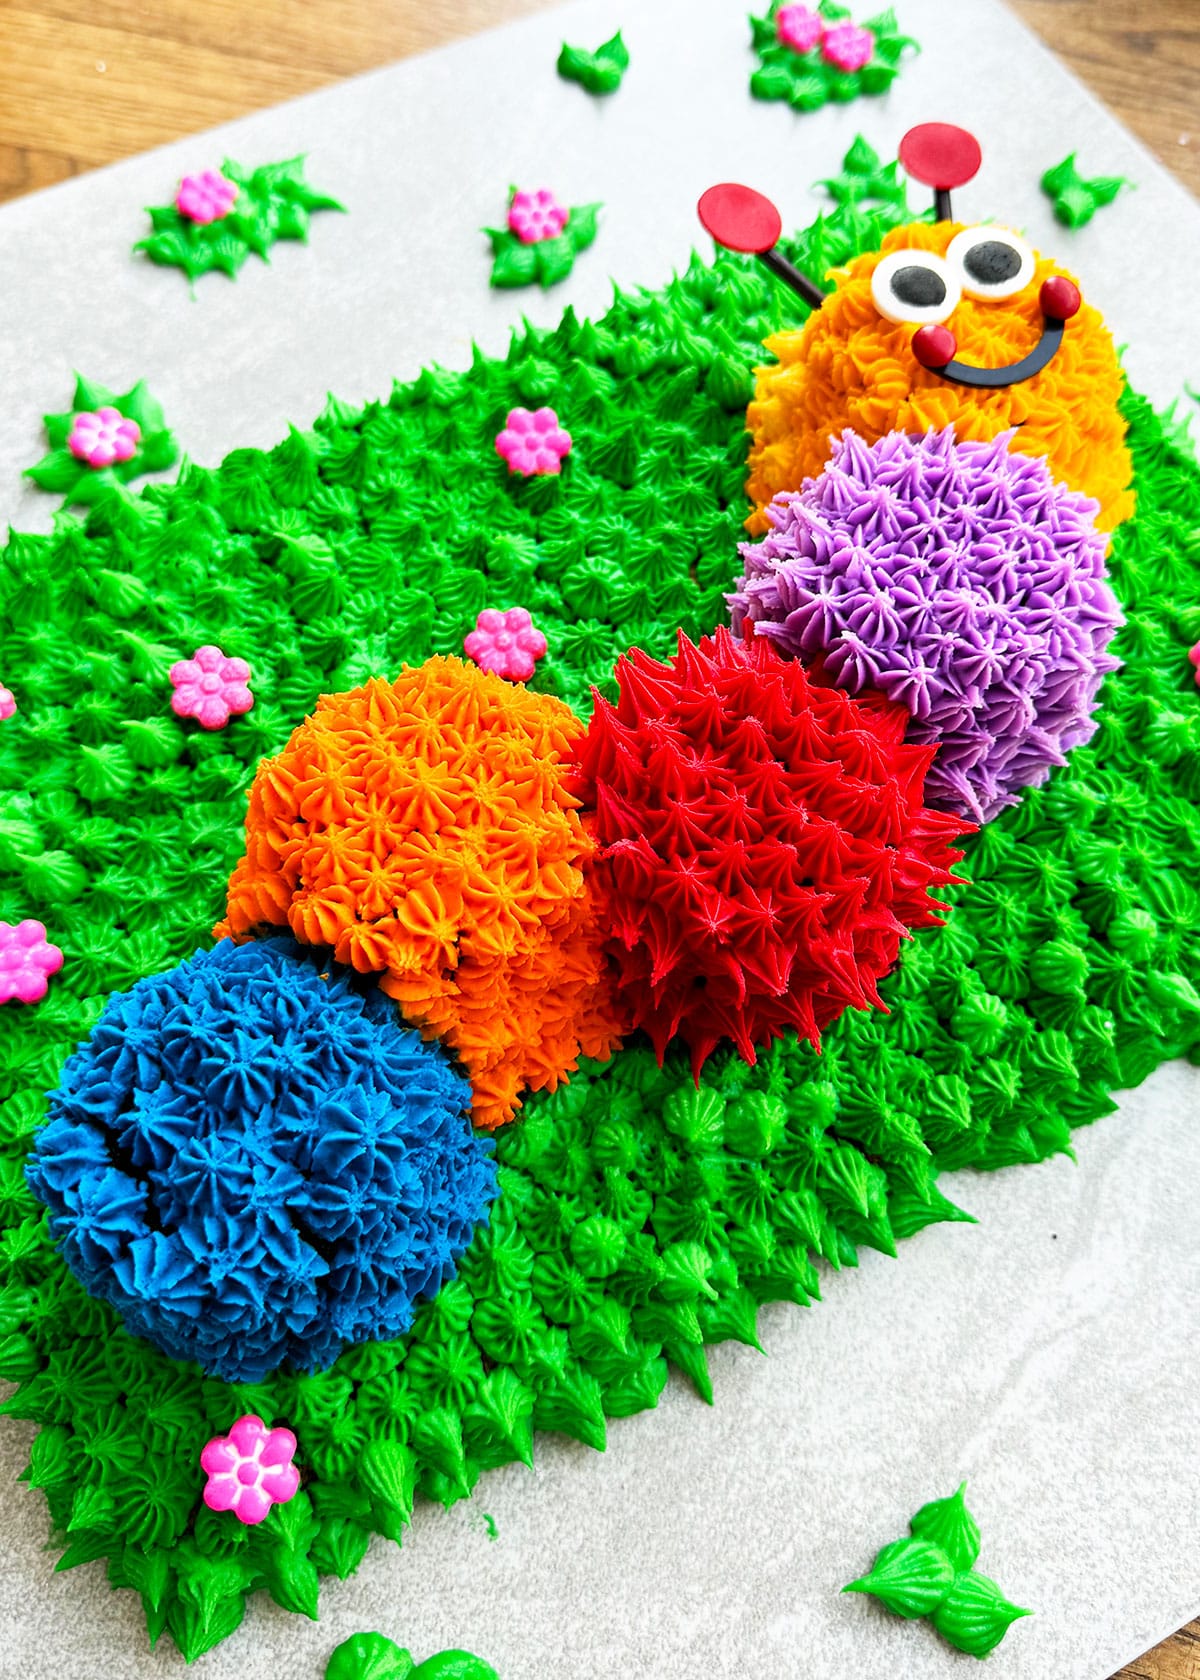
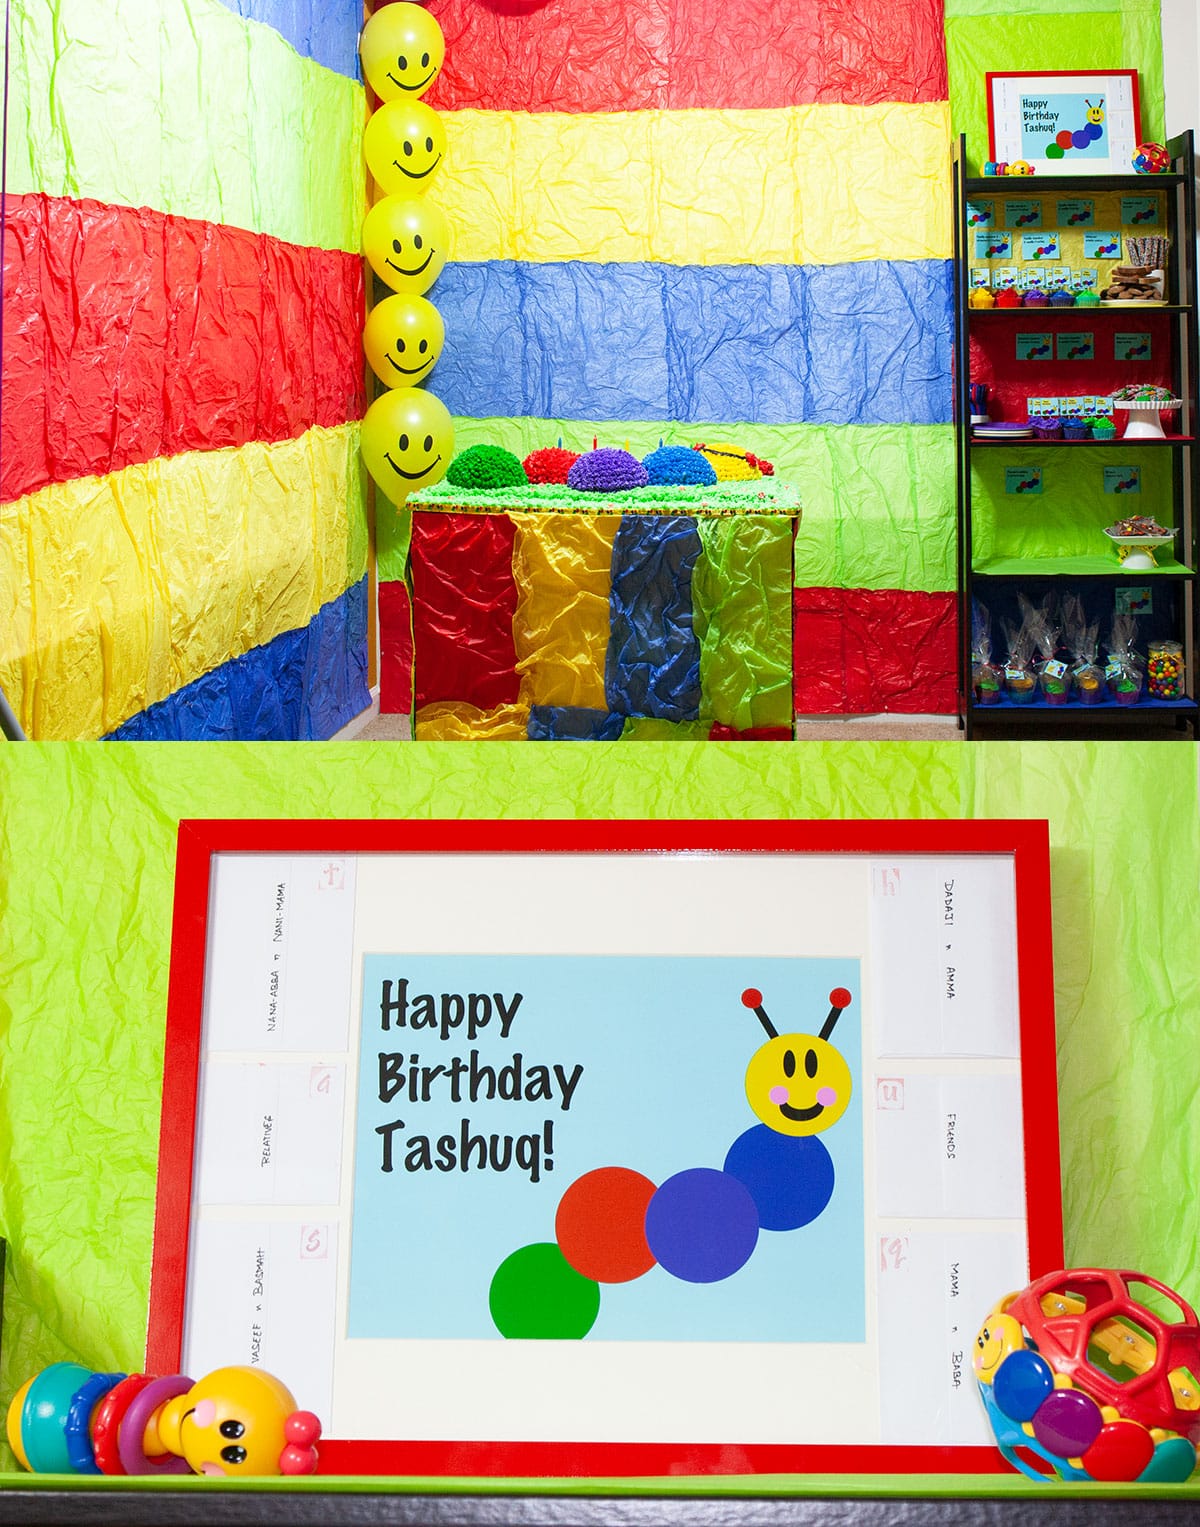
The theme was very colorful and fun. The walls around the food area were decorated with balloons and whimsical panels. The main cake was huge and about 30 inches wide but I made a similar but smaller version for my son's smash cake photoshoot. That's the tutorial that I have shared above.
Party food
Instead of a dessert table, I decided to set up a dessert shelf. The main reason for this was space. I simply didn't enough have space for a large table. At the end of the party, I gave everyone boxes and told them to pack whatever desserts they liked as a party favor.
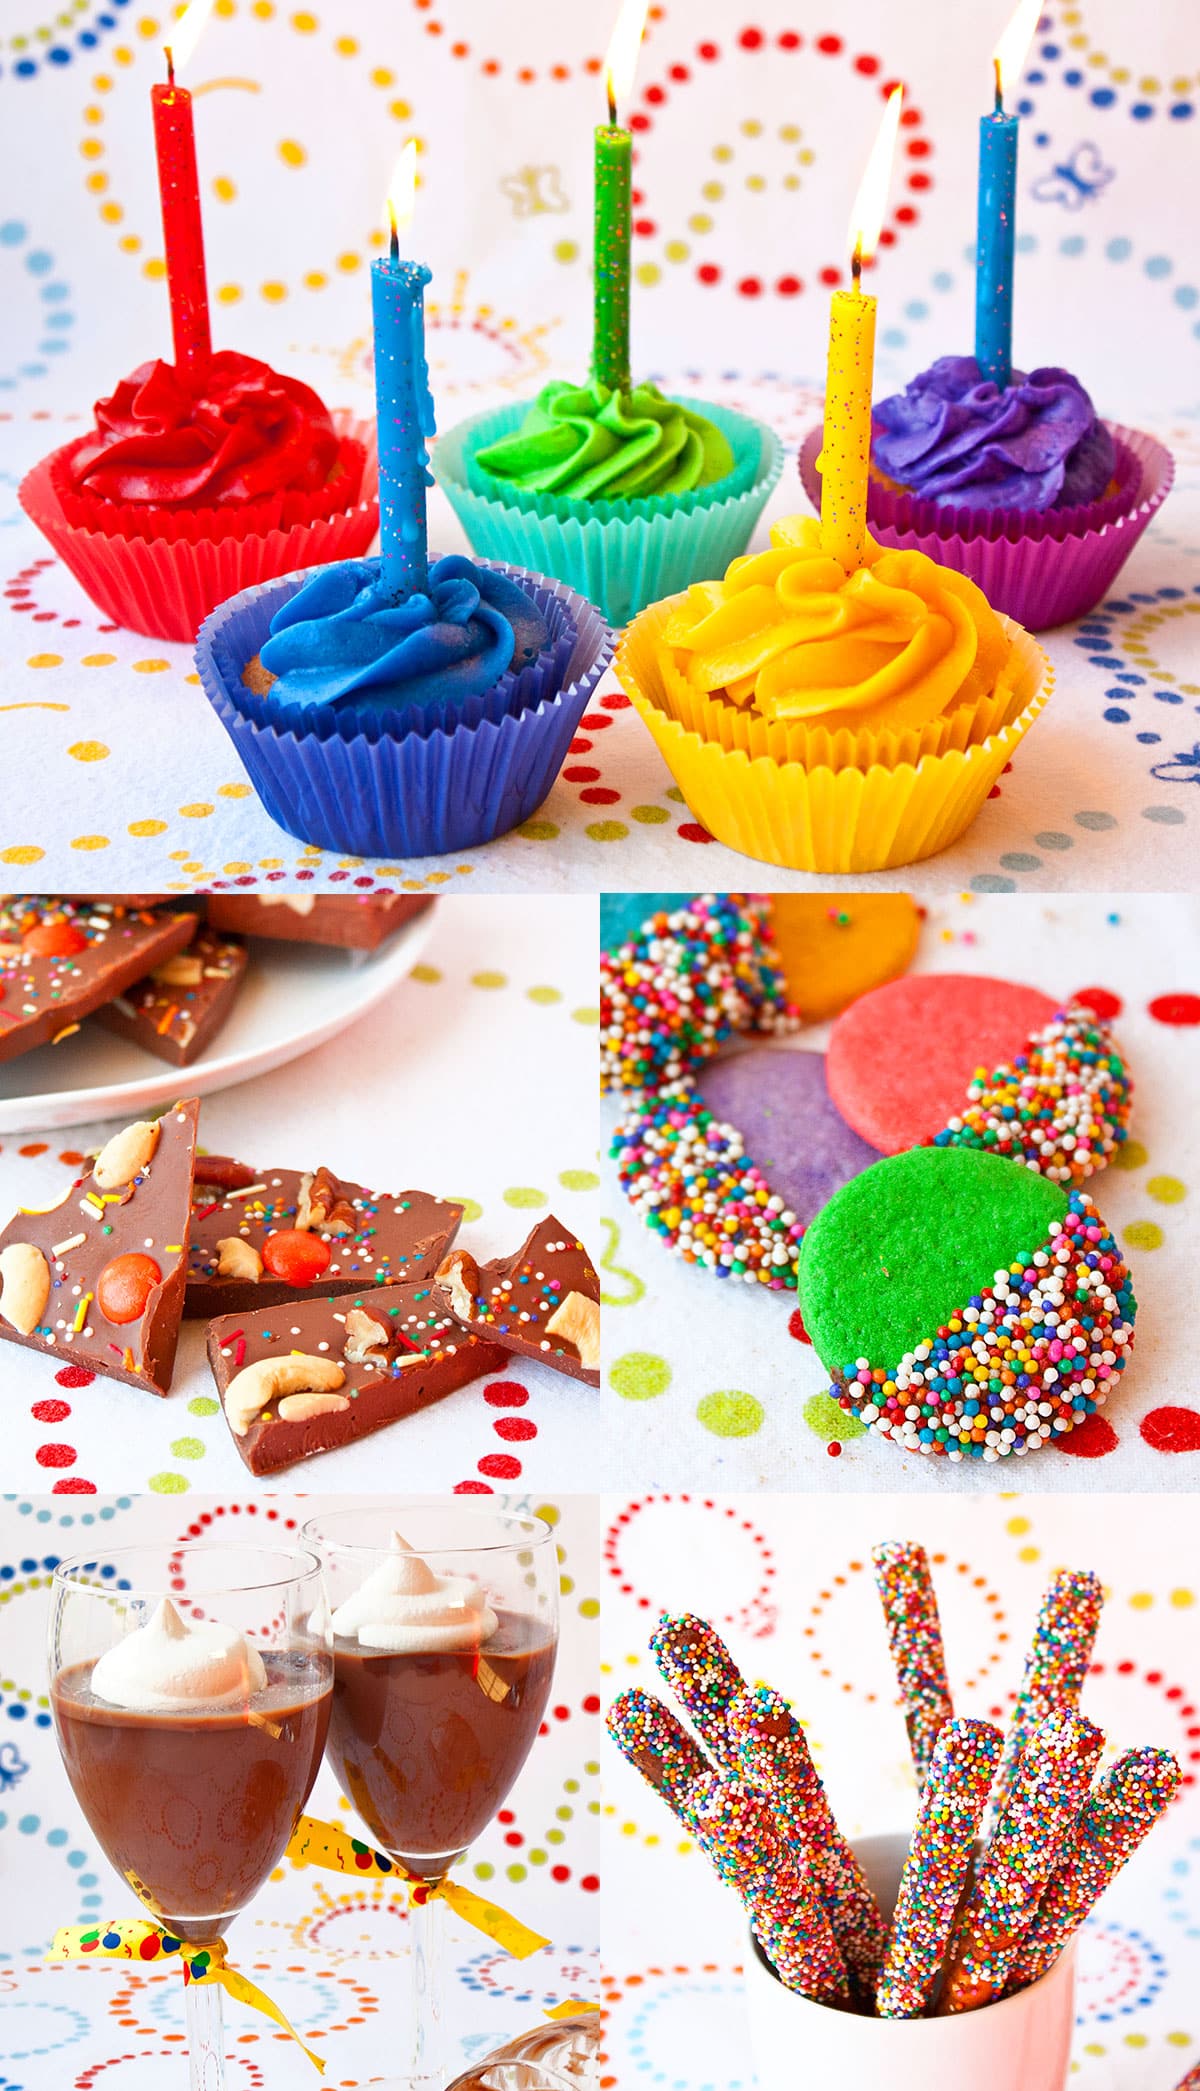
- Chocolate Covered Pretzels
- Vegan Chocolate Pudding (for my vegan guests)
- Rainbow Cookies (Sugar Cookies)
- Vegan Chocolate Cupcakes
- Vanilla Cupcakes
- Chocolate Bark
- Variety of candies
Party tips
- Plan ahead! You never know what trouble you can encounter.
- Get organized.
- Make lists for everything! Dinner, desserts, groceries, chores e.t.c.
- Know the exact number of guests that would be coming. That would help you figure out if a recipe needs to be doubled or tripled.
- Always have extra ingredients on hand. Halfway through decorating my cake, I ran out of green icing. I had to make another batch. Thankfully, I had all the ingredients on hand or else I would have had to make a trip to the grocery store and that would have been such a waste of time.
- Also, always have some extras for everything you have made (e.g. few extra cookies, few extra cupcakes e.t.c. You never know when an accident can occur).
- Food items like cookies, frostings and pretzels can be made a few days beforehand. Don't leave those till the last minute.
- Finally, expect the unexpected but don't forget to have fun!
Recipe
Easy Caterpillar Cake (With Buttercream Icing)
Want to Save This Recipe?
Enter your email & I'll send it to your inbox. Plus, get great new recipes from me every week!
By submitting this form, you consent to receive emails from CakeWhiz
Ingredients
- 1 Yellow sheet cake I also mixed in some sprinkles in the batter to make a funfetti version.
- 5 Chocolate cupcakes
- 6 cups American buttercream frosting Green, purple, red, yellow, orange, blue
- ¼ cup Black icing
- 2 Eyeball candy
- 2 Mini red m&m candies
- ¼ cup Flower candies
Instructions
- Bake the cake and cupcakes and allow them to cool fully.
- While they are baking and cooling, prepare the frosting and tint it with gel food coloring.
- Place the sheet cake on a large cake board.
- Use a spatula to spread a thin layer of green icing on the top and sides of the cake. It does not have to be smooth.
- Fill a piping bag with green icing and attach Wilton Tip # 21 (star).
- Pipe little stars all over the cake until fully covered.
- Remove liners from cupcakes. Place these cupcakes on top of the green icing in the formation of a caterpillar.
- Fill a piping bag with blue icing and attach Wilton Tip # 21 (star). Pipe little stars all over the first cupcake. This will be the caterpillar's rear end.
- Fill a piping bag with orange icing and attach Wilton Tip # 21 (star). Pipe little stars all over the second cupcake.
- Fill a piping bag with red icing and attach Wilton Tip # 21 (star). Pipe little stars all over the third cupcake.
- Fill a piping bag with purple icing and attach Wilton Tip # 21 (star). Pipe little stars all over the fourth cupcake.
- Fill a piping bag with yellow icing and attach Wilton Tip # 21 (star). Pipe little stars all over the fifth cupcake. This will be the caterpillar's face.
- Stick two eyes on top of the yellow cupcake.
- Fill a piping bag with black icing and attach a small round tip. Pipe a smile below the eyes. Stick two red m&m candies on both sides of the smile.
- For the antennas, cut out 2 small red circles out of thick cardstock paper and stick each to a lollipop stick. Push these sticks on top of the yellow cupcake.
- Pipe patches of green icing grass on the empty space of the cake board.
- Stick flower candies on the cake as well as the cake board. Enjoy!
Notes
- Try different colors of icing for the caterpillar. You can even make a pastel version.
- Don't decorate a warm cake.
- Omit the sheet cake and make 5 large dome cakes. Arrange them on a large sturdy board in the shape of a caterpillar and decorate in a similar manner.
- Read additional tips and variations above.
- Leftovers can be stored in a sealed container in the fridge for up to 3 days.
Nutrition
An automated tool is used to calculate the nutritional information. As such, I cannot guarantee the accuracy of the nutritional information provided for any recipe on this site.
Robin B
Oh my goodness, so glad I found you on Pinterest! Such helpful and exciting tips for my daughters birthday party! Thanks a million for sharing your wonderful ideas and keep them coming!
Abeer Rizvi
Awwww... thanks! A lot of love and effrot went into planning this birthday party. I hope it helps you plan your little one's birthday too
tya nelson
I love your site, and well done on your party! I love it! I am currently working on my own baby Einstein party for my little guy's first birthday and am making cupcakes with your strawberry frosting which is so yummy! I wondered if you'd be able to share the instructions you got from Gill at Jillybean Cake Couture to get that color of red frosting? I haven't been able to achieve it with out totally watering down the frosting with coloring!
thank you so much!
Abeer Rizvi
Hi Tya! Baby Eisntein parties are so much fun to plan out! For the red frosting, my friend suggested using a decent amount of both the red gel colorings from Wilton and the key is letting your frosting sit for a few hours. I let it sit for about 2 days in the fridge and it was a perfect red shade! Hope this helps