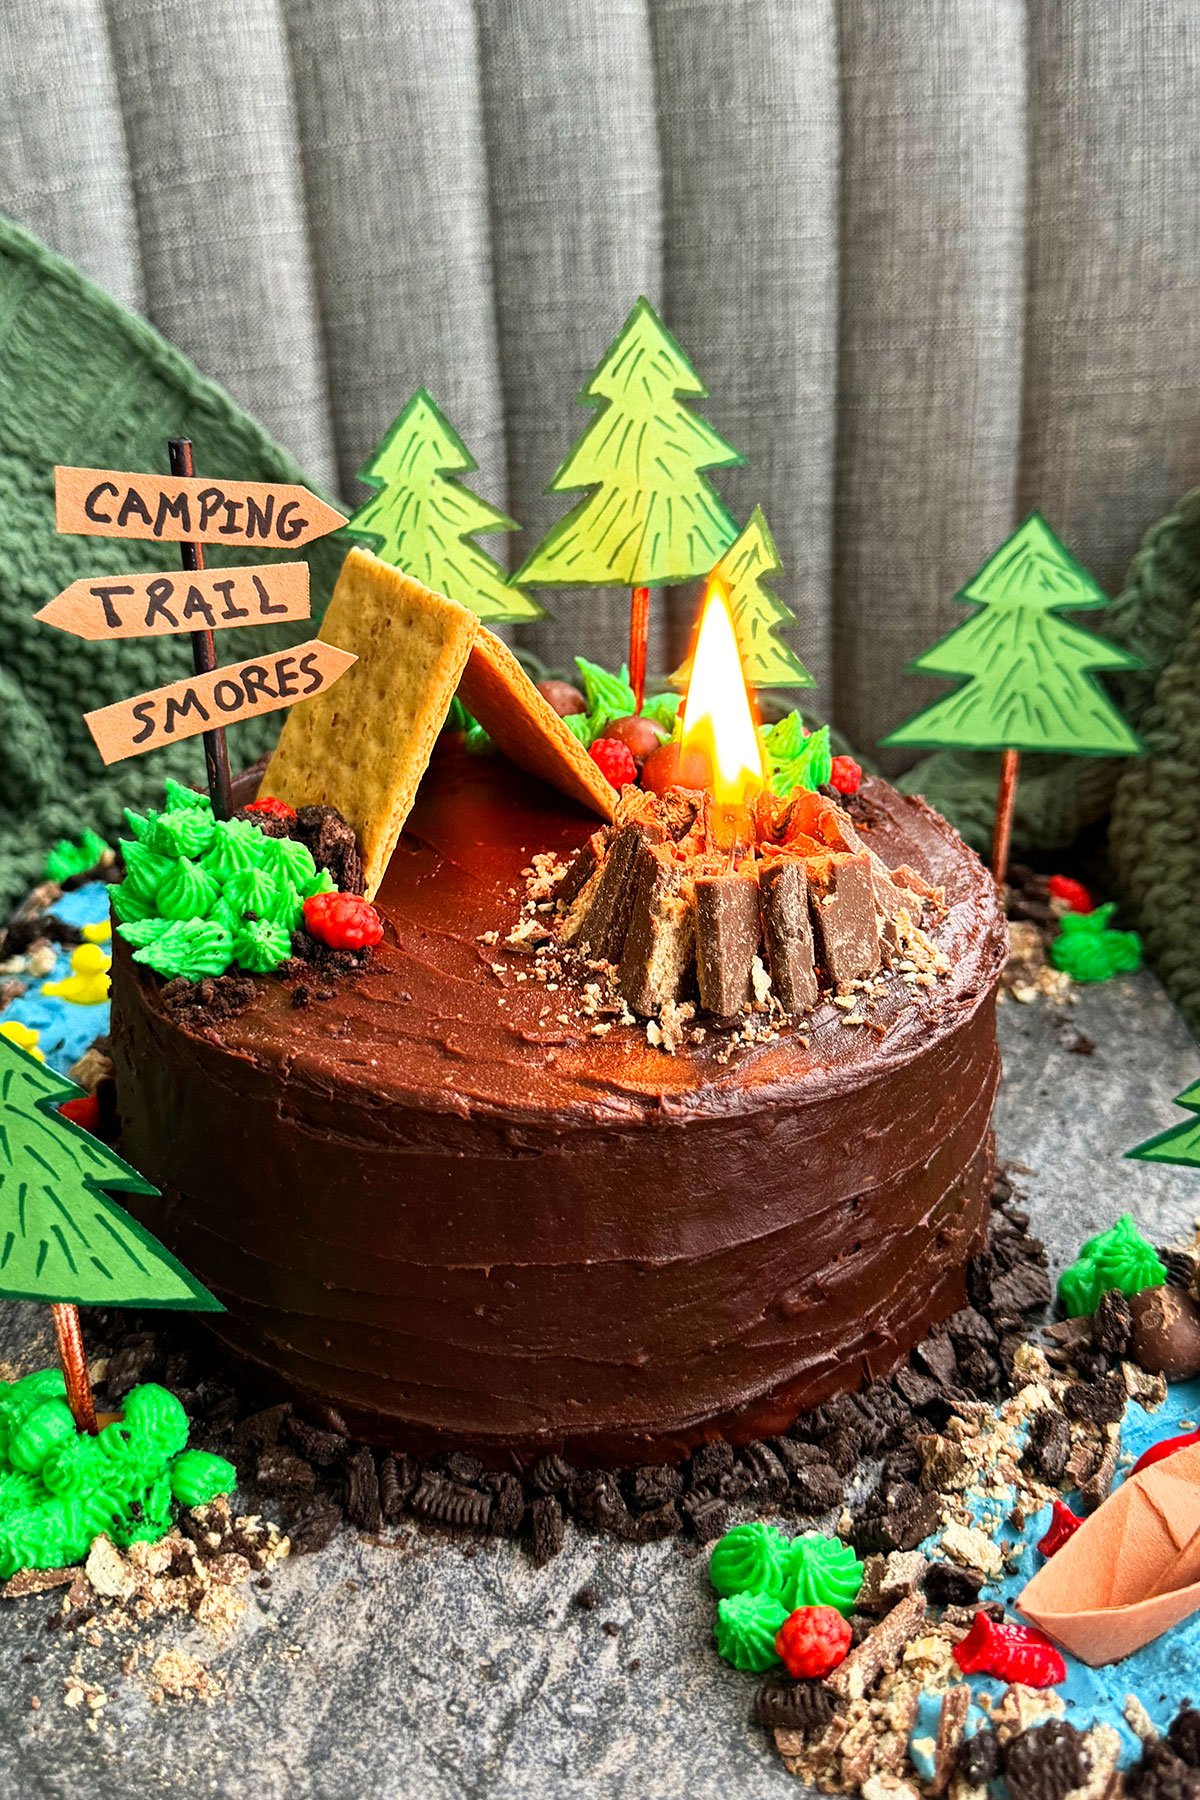
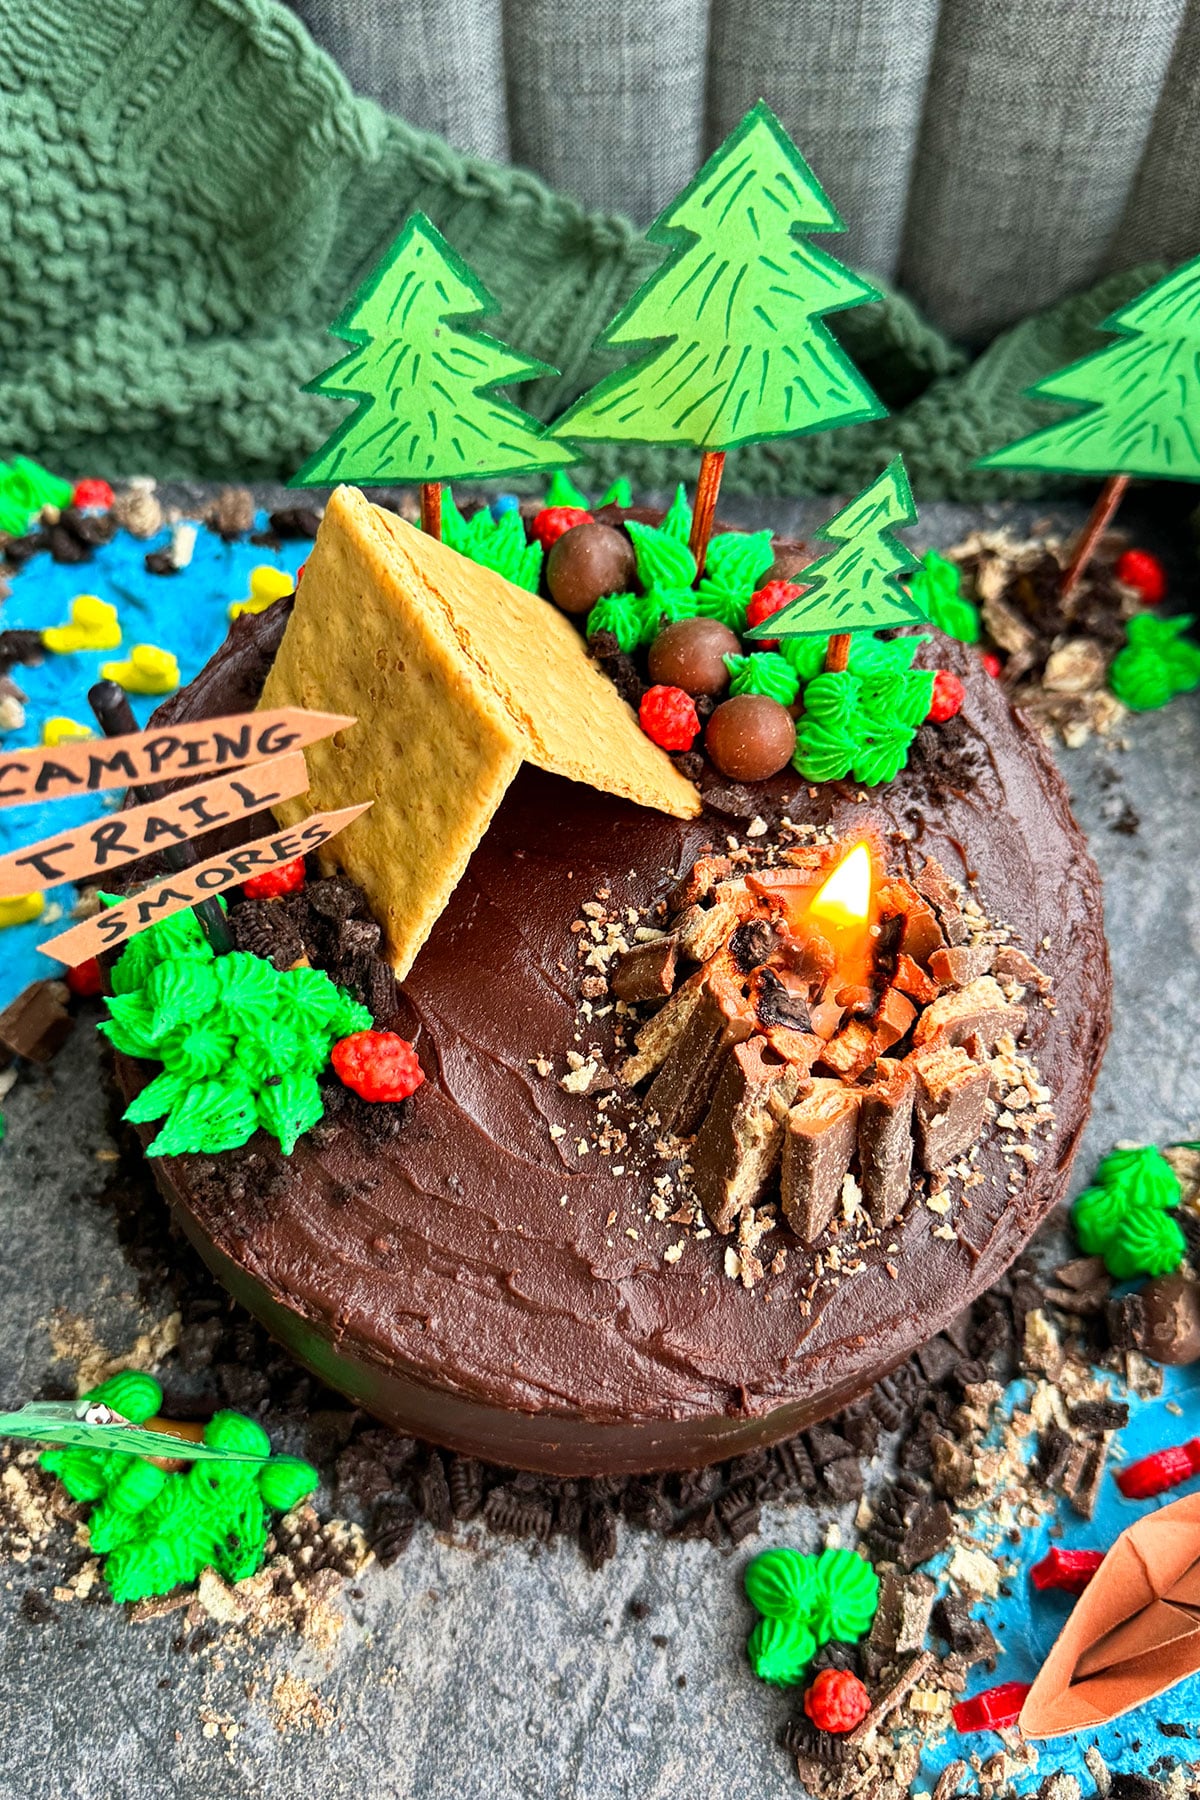
Easy camping cake recipe and tutorial with real camp fire or bonfire, homemade with simple ingredients. You can even use the fire from the candles from make mini s'mores. Decorated with chocolate buttercream icing and candies. Party details also included.
*Thank you Nestlé® Drumstick® S’mores for sponsoring today's post. As always, all content and opinions expressed here are all my own.*
Want to Save This Recipe?
Enter your email & I'll send it to your inbox. Plus, get great new recipes from me every week!
By submitting this form, you consent to receive emails from CakeWhiz
I love throwing parties, especially for my son. He has been asking to go camping for two months but it has been so cold here in Chicago that it's not possible to go just yet. Until the weather warms up, we are going to be camping indoors. I think this is a great theme for boys and girls parties. For more fun cake inspiration, be sure to check out these Easy Cake Decorating Ideas (Beginners) and these Birthday Cake Ideas.
Table of contents
Key ingredients for DIY camping birthday cake
- Coca Cola Cakes- This is a fun and simple cake to make.
- Graham crackers- These are used to make the cute tent on top of the cake.
- Soft caramel candies- Be sure they are the soft and not hard kind so that you can mold them.
- Whoppers- You can use other round chocolate candy balls, too.
- Red candy balls- There are many different options to choose from so have fun with it.
- Oreos- Be sure they are roughly chopped up.
- Kit Kats- Break them up into rough shaped sticks.
Variations
Use my Homemade Marshmallow Fondant- To make edible decorations like the trees, boat, and fish.
Buy little toys- Like bears, birds, trees, boats, ducks, and more to add around the cake and board. You can even add a little person, a mini sleeping bag in the tent, a hunting rifle if the person you are making the cake for is a hunter, and more.
Use different dirt options- Instead of using Oreos or Kit Kats you can also use chocolate and/or regular graham crackers, crunchy Chips Ahoy!, chocolate Animal Crackers, chopped nuts, or various other chocolate candies that are easily crumbled.
Try different frostings- You may want to try Chocolate Ganache Frosting, Chocolate Cream Cheese Frosting, or Healthy Coconut Cream Chocolate Frosting.
Make a winter scene- Not everyone likes to go winter camping in the snow...but some do! You can switch things up by using white icing like this American Buttercream Frosting, Cream Cheese Frosting, White Chocolate Buttercream Frosting, or Marshmallow Frosting. You could even dust the chocolate frosting with powdered sugar. Be sure to add a pit of white frosting to the edges of the trees and tent. The cookie dirt can be replaced with something like coconut flakes. You can make the pond look like ice with melted Jolly Ranchers or other rock candies like I did in these Window Cookies. Adding snowflake sprinkles, "trees" that look more bare, and more. Be creative!
Add a filling- Such as Chocolate Ganache, Homemade Vanilla Pudding, Chocolate Whipped Cream, Whipped Cream, or Strawberry Jam.
Make another cake flavor- Like Red Velvet Cake, Best Vanilla Cake, Moist Lemon Cake, or get fancy with something like Pink Champagne Cake or Easy Spice Cake.
Keep it simple- And use a 9x13 baking pan, then decorate it as much or as little as you'd like.
Take it up a notch- By adding on more tiers for a taller cake. Simply repeat the steps of adding frosting, then a cake on top of it until you read the last layer.
Make cupcakes- And decorate each one with various camping decorations. You can even make a "cupcake cake" by putting all the cupcakes together, frosting them as one, and making the full picture like I did for this Football Cupcake Cake.
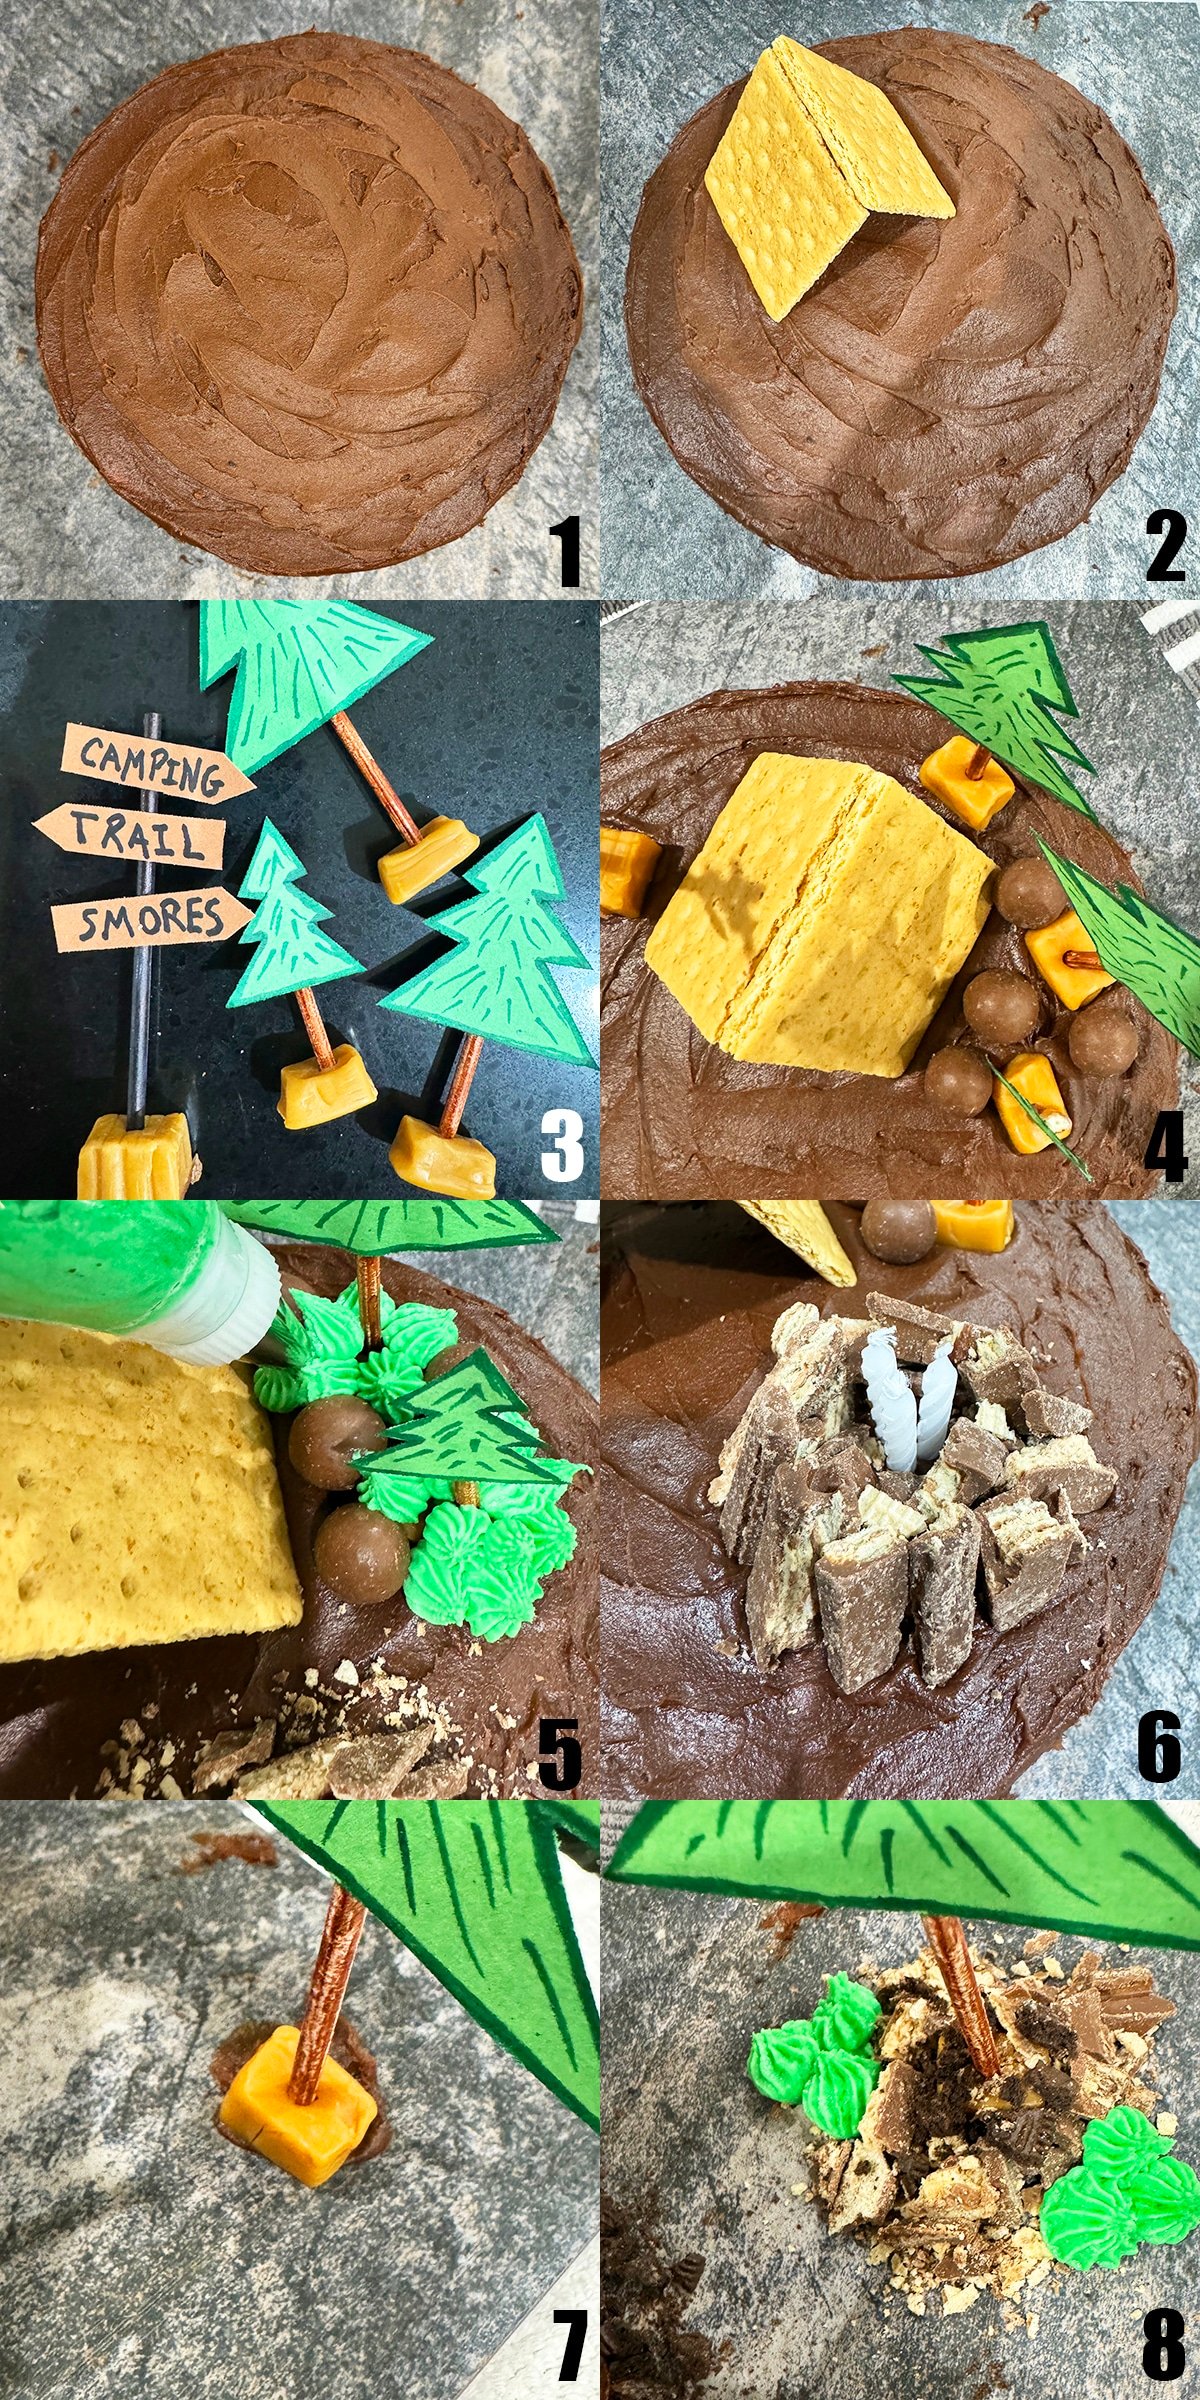
How to make easy camping cake recipe from scratch?
Decorating the cake
- Bake cakes and allow them to cool- While you prepare the chocolate, green, and blue frosting.
- Place one cake on cake stand- And spread icing on top.
- Place the second cake on top of the icing- Then frost the entire cake in a rustic design (Image 1).
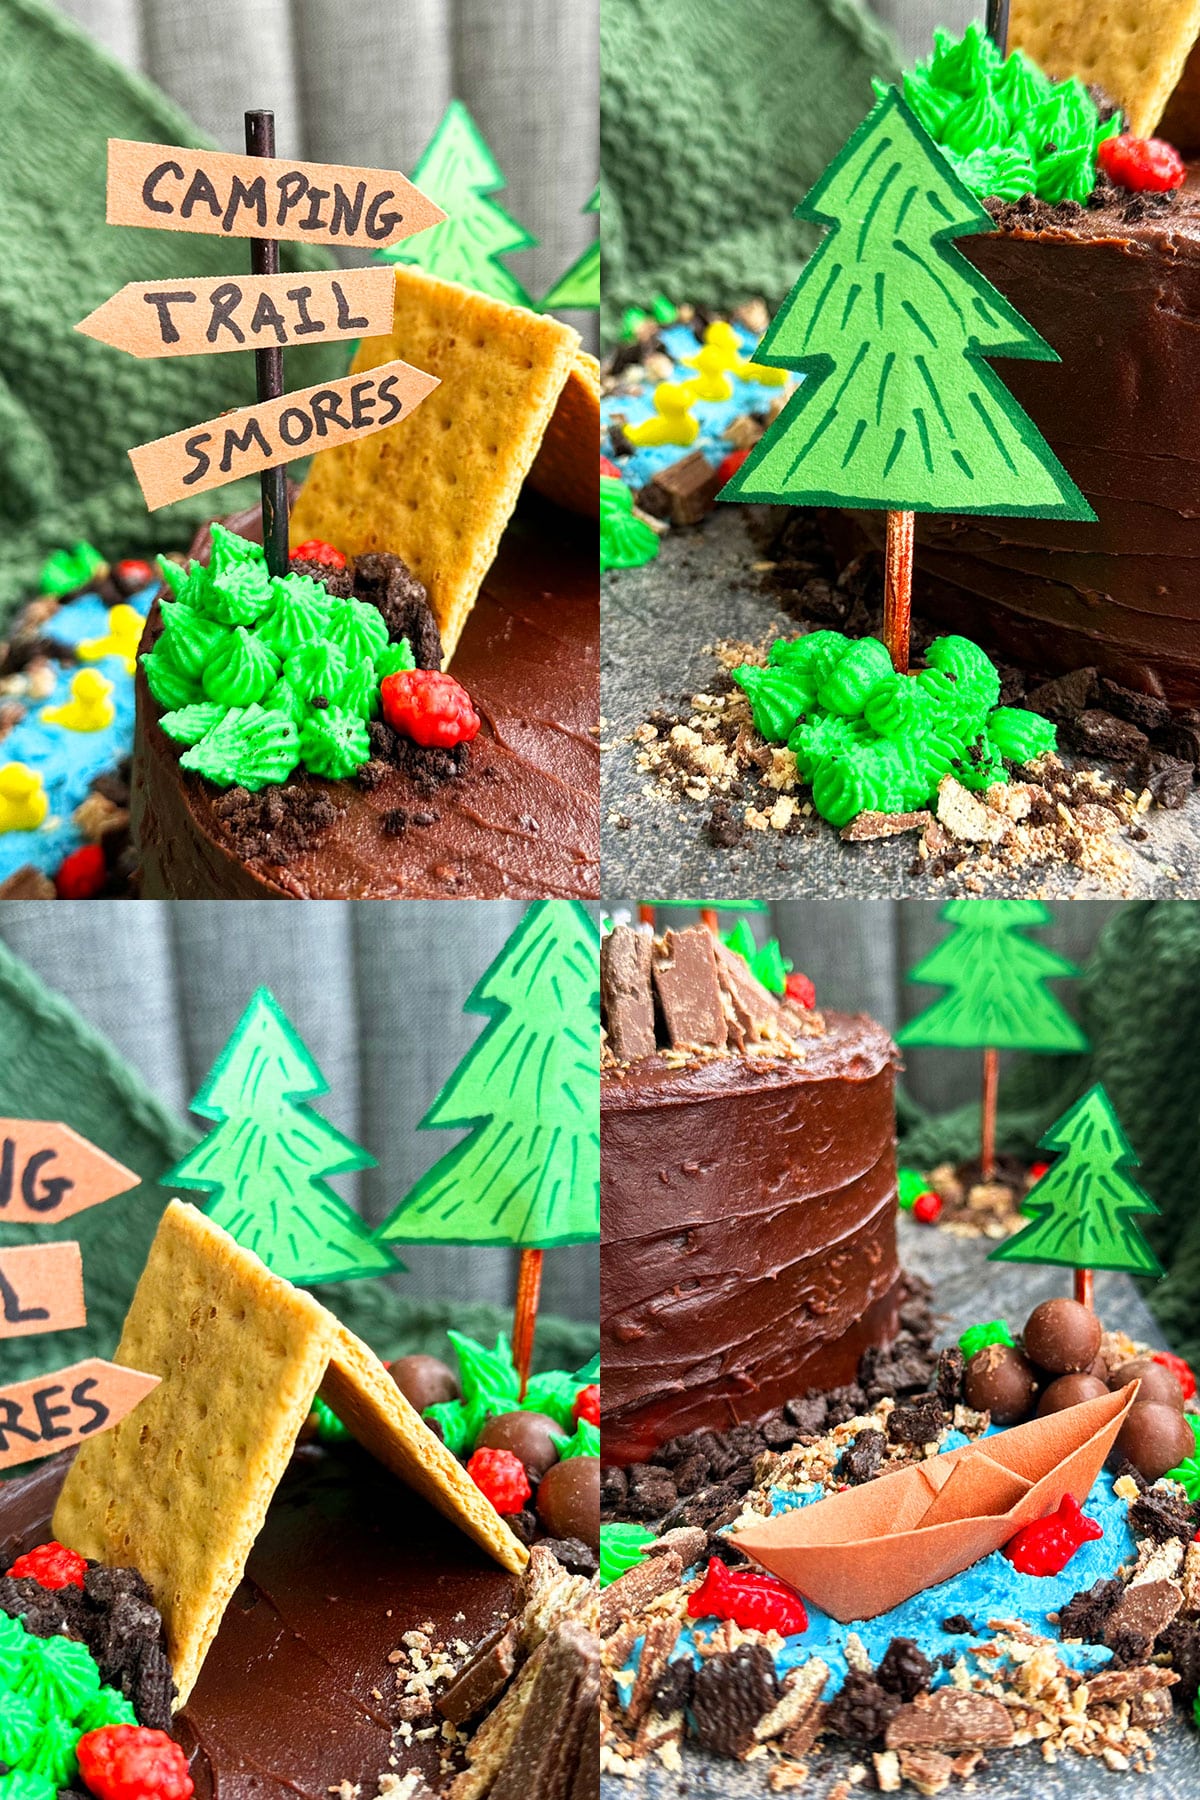
- Arrange the 2 graham crackers- To make a tent on the top of the cake (Image 2).
- Stick a lollipop stick behind trees and sign- Push the base of the stick into caramel (Image 3).
- Place trees on top- And around the cake with a dab of icing (Image 4, 7).
- Arrange Whopper candies- On top and around the cake (Image 4)
- Fill a piping bag with green icing- And pipe grass around the base of the trees (Image 5).
- Toss some crushed Oreos and Kit Kats- On top to create the illusion of dirt and stones (Image 8).
- Stick a few red candy balls- Randomly on the green buttercream.
- Make the fire pit- With Kit Kat pieces arranged in a hollow circle and candles placed in the middle (Image 6).
Adding details to the cake board
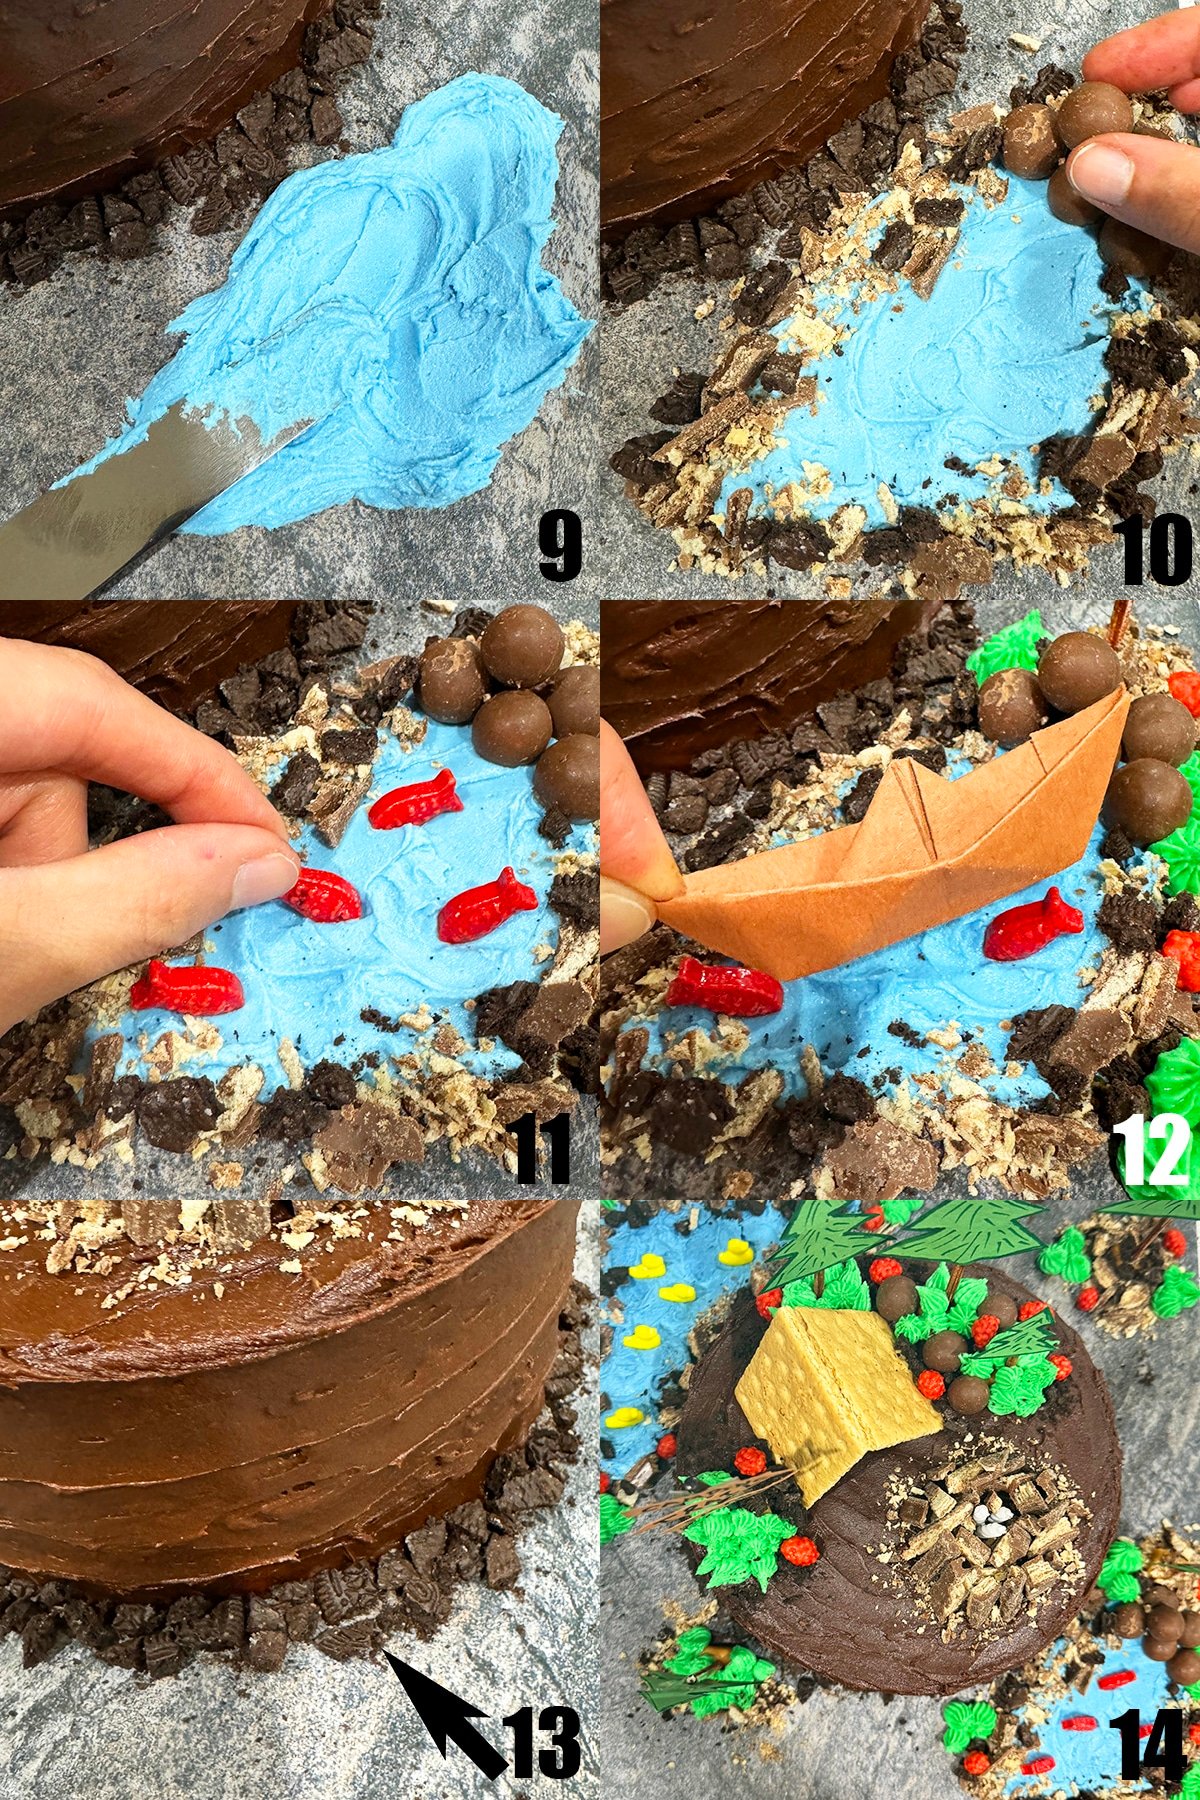
- Use blue icing- To create lakes on the cake board (Image 9).
- Place some Whopper candy- Around the lake along with some crushed Oreos and Kit Kats (Image 10).
- Push fish and duck candies- Partially into the blue icing "lake" (Image 11)
- Place a small boat- In the blue icing as well (Image 12).
- Sprinkle crushed Oreos- Around the base of the cake and enjoy (Image 13,14).
Tips and techniques
- Don't ignore the cake board- Use it to tell the whole camping story and create a scene. Add edible decorations like trees and lakes and candies there too. I suggest using a large board.
- Don't decorate a warm cake- Because the frosting will just melt off and you don't want that!
- Homemade or store bought decorations- I made the cardboard decorations like the trees and camp sign but you can also buy them online or make them with fondant.
- Use full fat ingredients- For the best flavor and results when making the cakes and buttercream.
- Use room temperature ingredients- For the cake and buttercream recipes so that they each mix well.
- Remove the cream from the Oreo- Because you don't want it to get everything gooey, plus you want a dry mixture that looks more like dirt.
- If using toys as decorations- Clean them before using so you don't get anything unwanted on the cake.
- Don't worry about smooth icing- For the this cake, because you want that rustic feel like you are out in the woods.
Recipe FAQs
Yes, you can also use fondant to decorate this cake. Be sure to check out my Marshmallow Fondant recipe linked at the top of this post and these Fondant Coloring Tips as well as my New Year's Cake for help on how to get the best results. Also, I recommend buying red and black fondant, because it is hard to make the color from scratch.
No. This is only necessary when making tall or tiered cakes, or if you are adding heavy decor items on top of the cake. Some great examples to look at include this Teddy Bear Cake and Easy Rustic Cake.
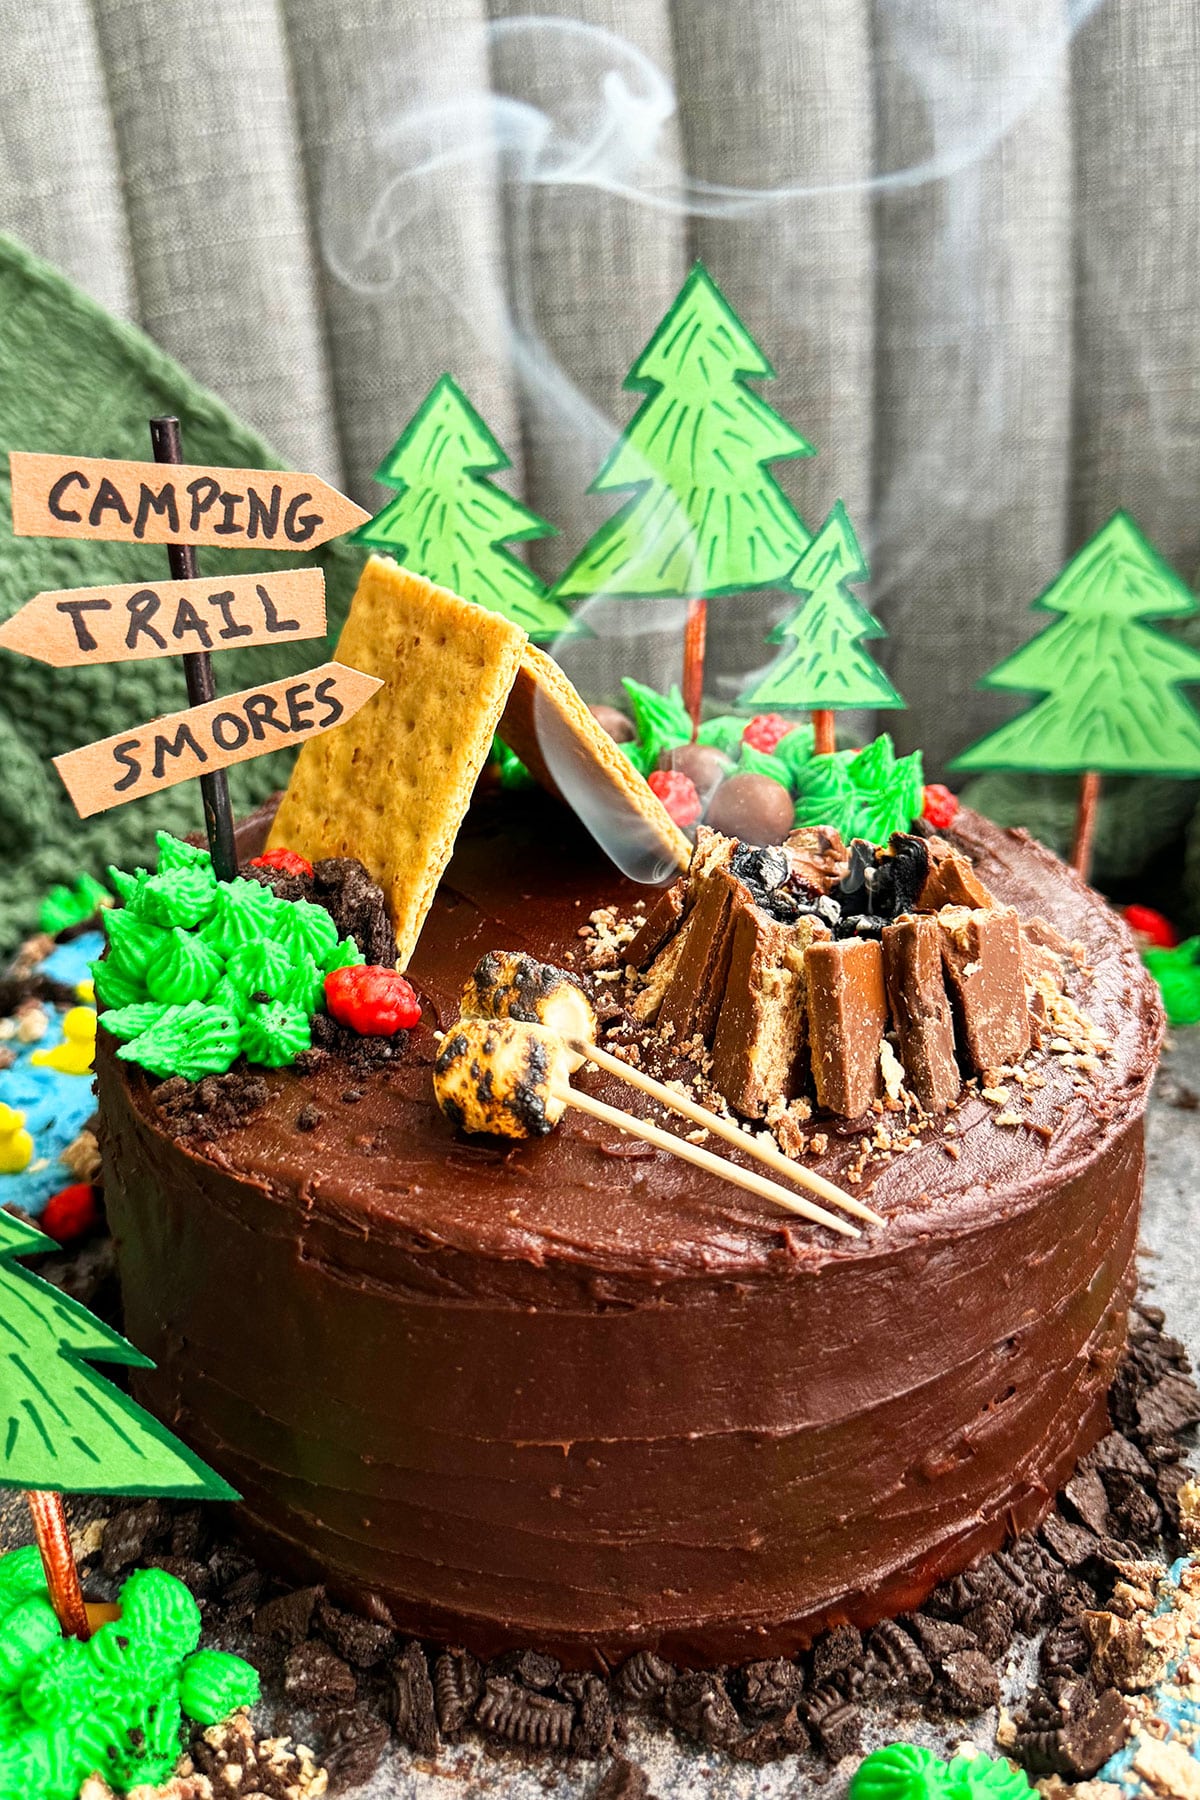
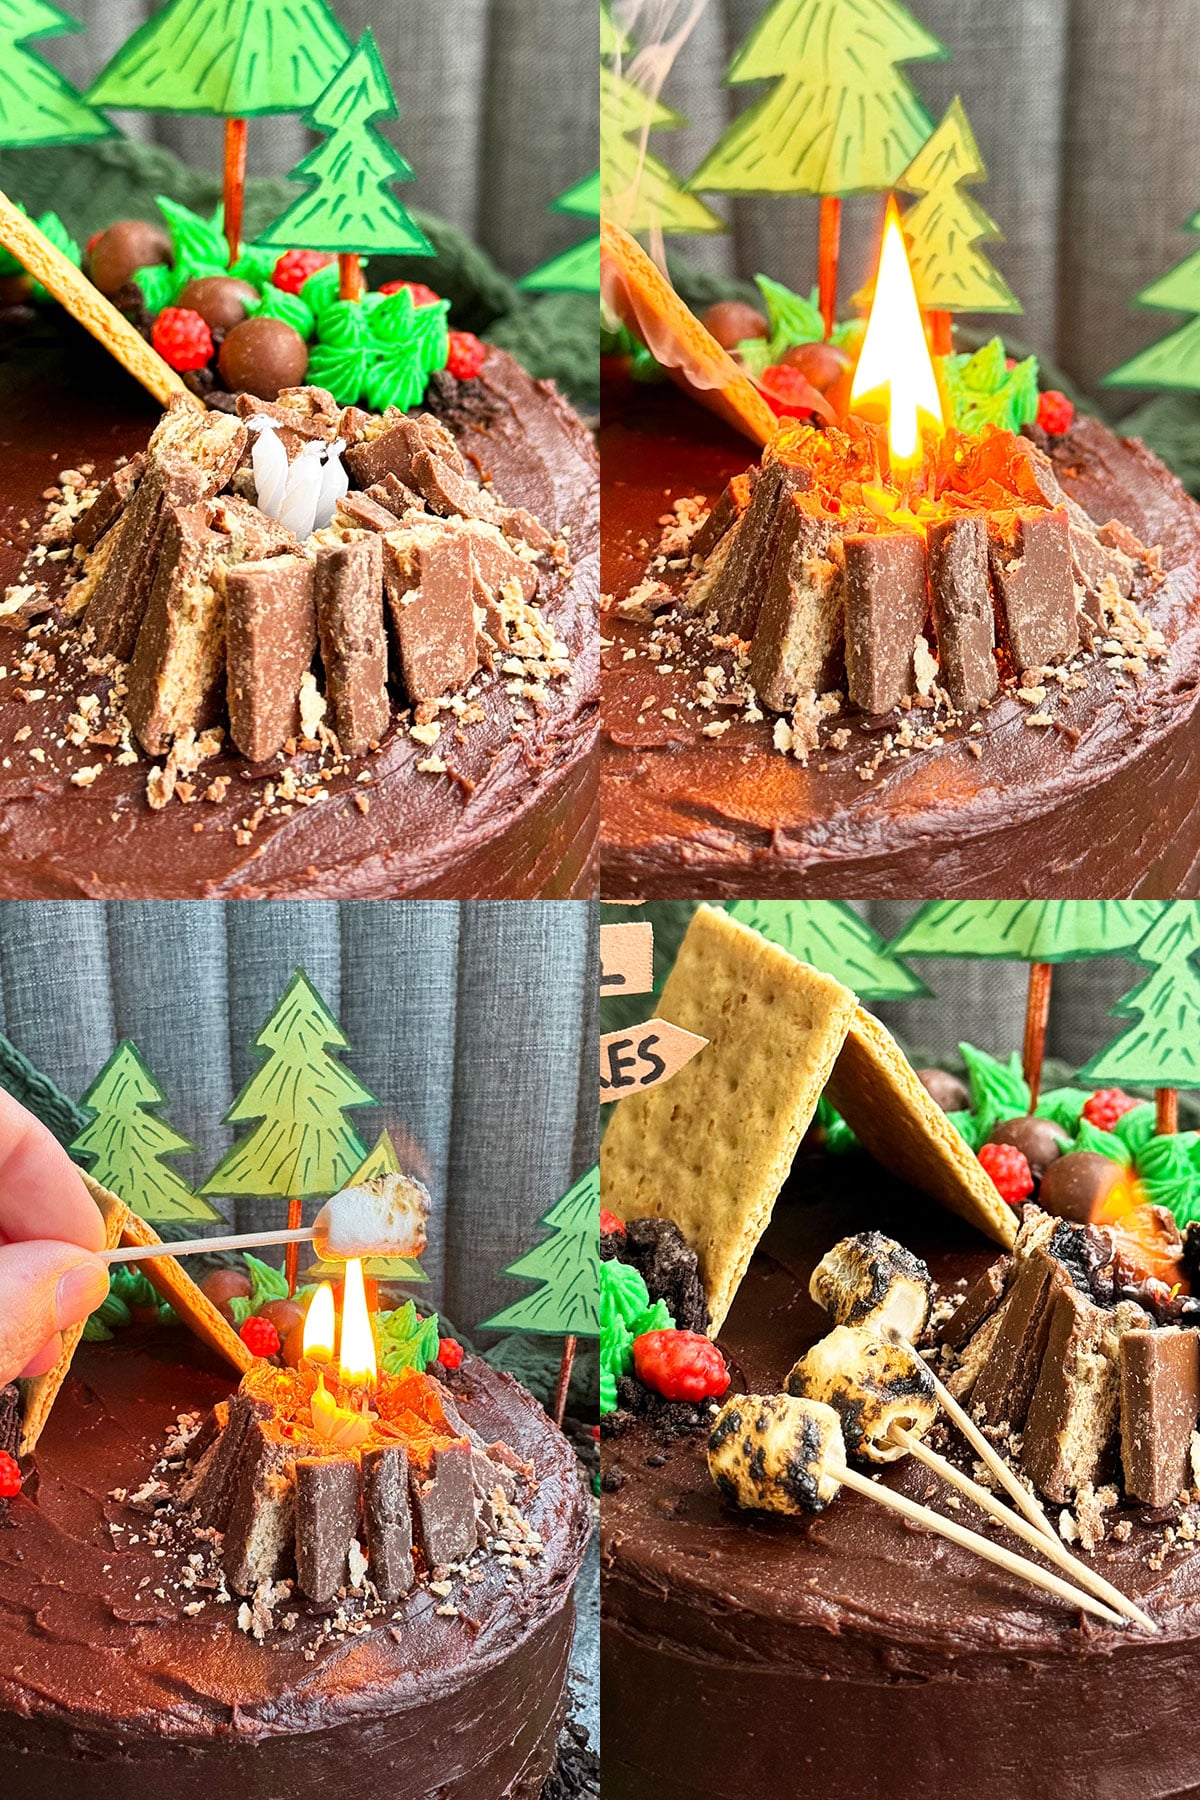
You simply use 3 regular birthday candles and stick them in the center of your Kit Kat stick teepee. Push them down in and make sure the wicks are the same height as the Kit Kats. Then light them and it looks like a real campfire, which is so fun!
Storage
- Make ahead instructions- You can make this cake up to 3 days in advance and place it in a covered box in the fridge.
- Room temperature- If there are no perishable or dairy fillings, then this cake can be left covered in a box for 3-5 hours.
- Refrigerate- Leftovers can be stored in a sealed container in the fridge for up to 3 days.
- Freeze- An unfrosted cake can be stored in a sealed container for up to 1 month. Store frostings in separate airtight container for up to 1 month as well. Thaw and decorate as per instructions below when you are ready.
More easy decorated cakes
- Easy Teddy Bear Cake (And Party)
- Pink Ombre Mother's Day Cake (And Party)
- Summer Cake (Kids Backyard Summer Party)
- Easy Baby Cake
- Homemade Wedding Cake
- Easy Caterpillar Cake (And Party)
Indoor camping party details
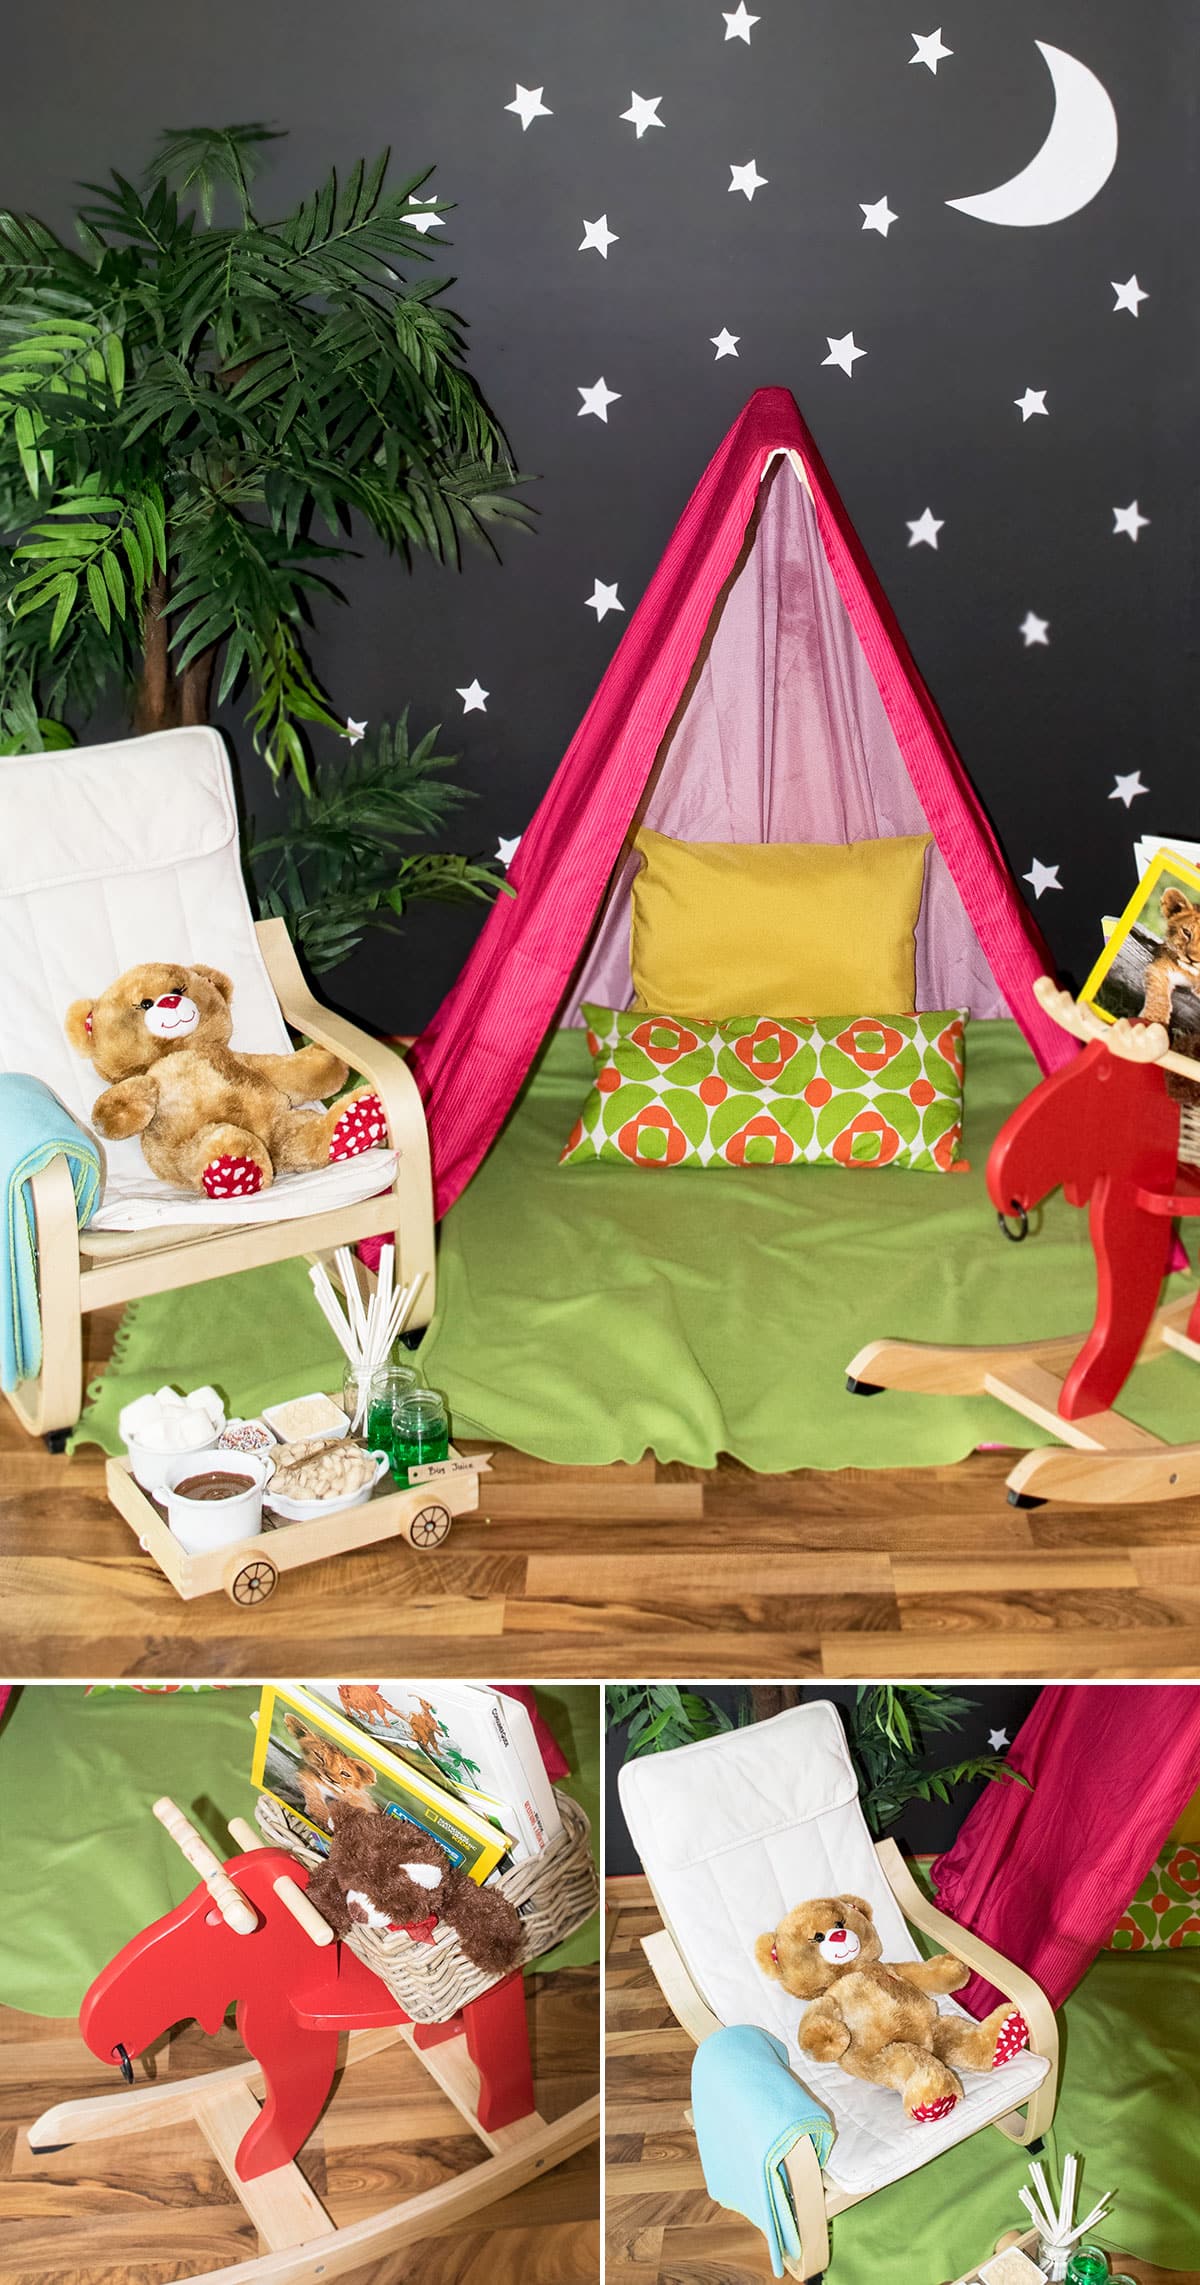
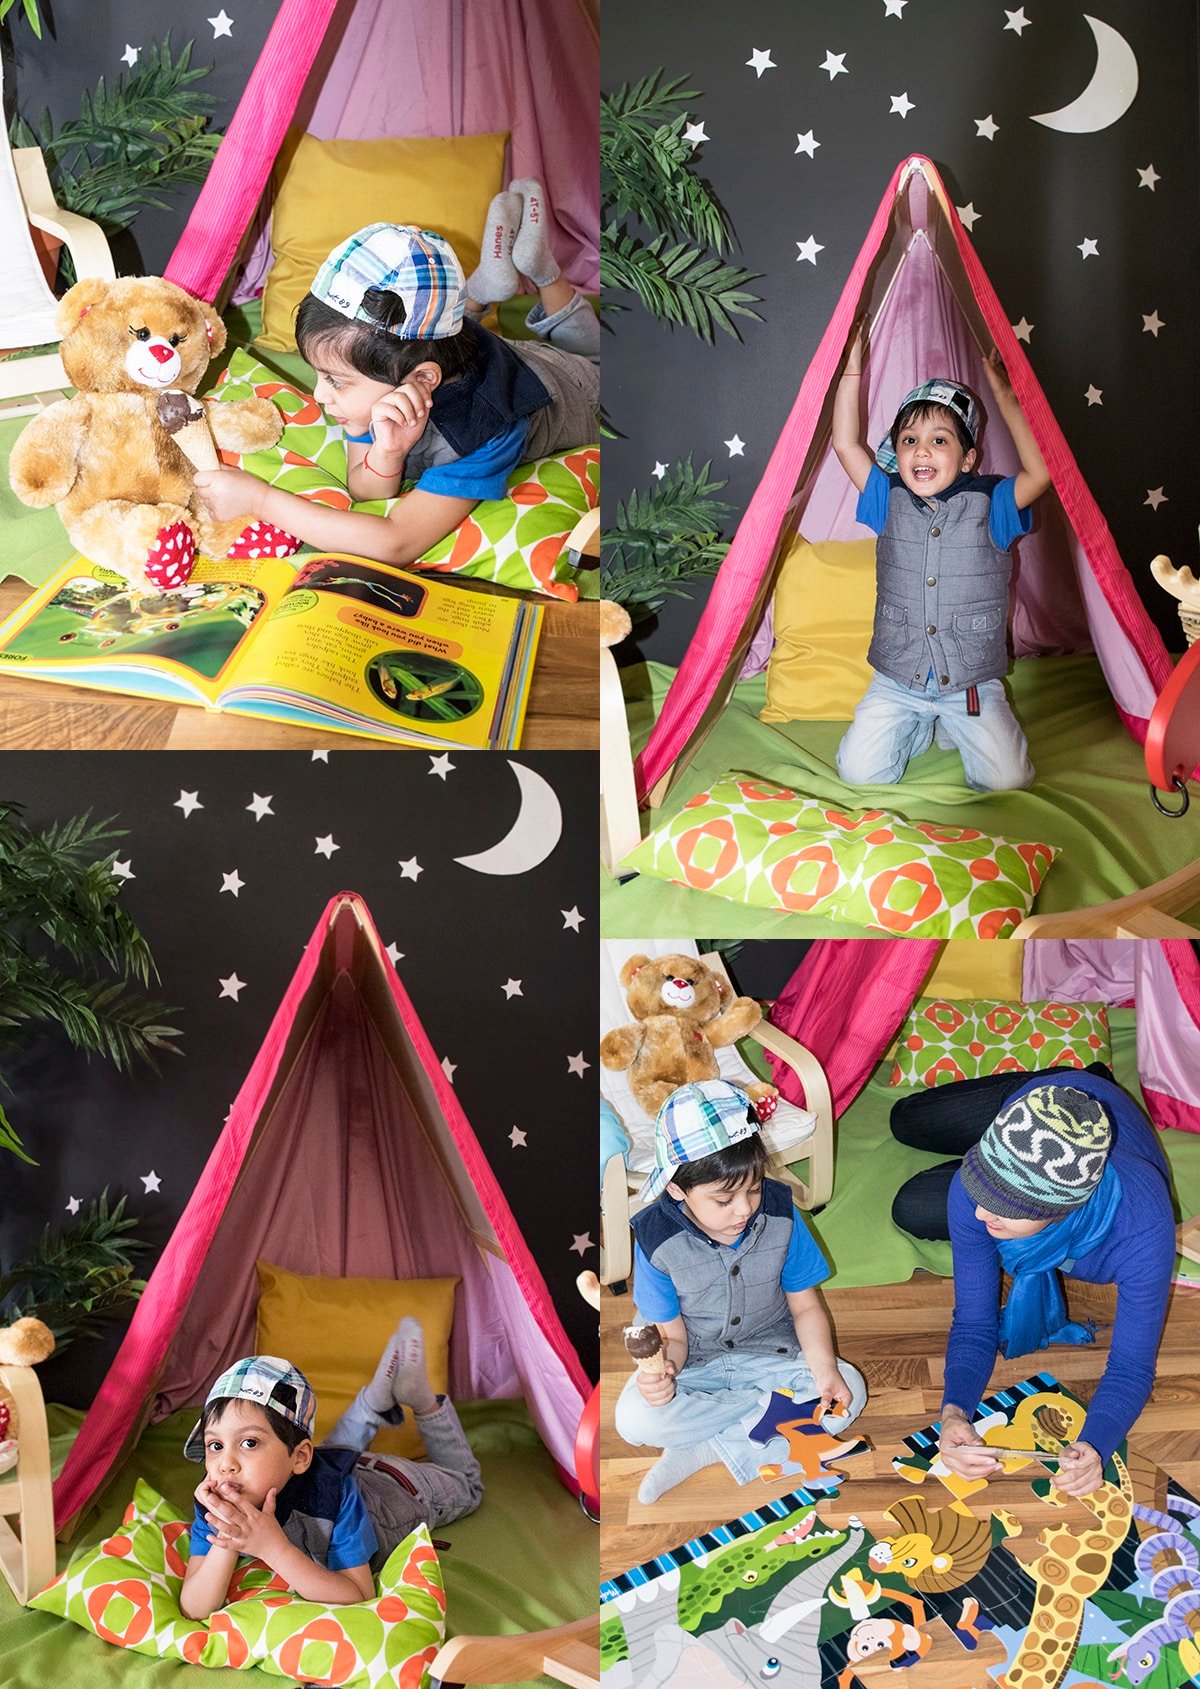
To set up this indoor camping party, I started out by spreading a small carpet in my living room and covering it in a green fleece blanket. I placed the tent in the center and tossed a few pillows inside to make it comfortable. Oh by the way, this tent is basically an Ikea chalkboard set up in a triangle shape and covered with a bed sheet. Smart! Eh? I even taped some sparkly white stars and a moon on the black wall to give everything the feel of night time. Near that tent, I set up some artificial plants, his comfy chair and a basket with books. Next time, I might add some LED light strings too coz they would look like shining stars...hehe.
Party activities
In terms of activities, obviously we did a lot of eating but we also made large animal themed puzzles, did some crafts, read National Geographic books and made loud animal noises. My little one pointed out all the animals that can be found in the woods. I told him funny camping stories from my childhood. We made up funny ghost stories. It was such a hit!
Camping food
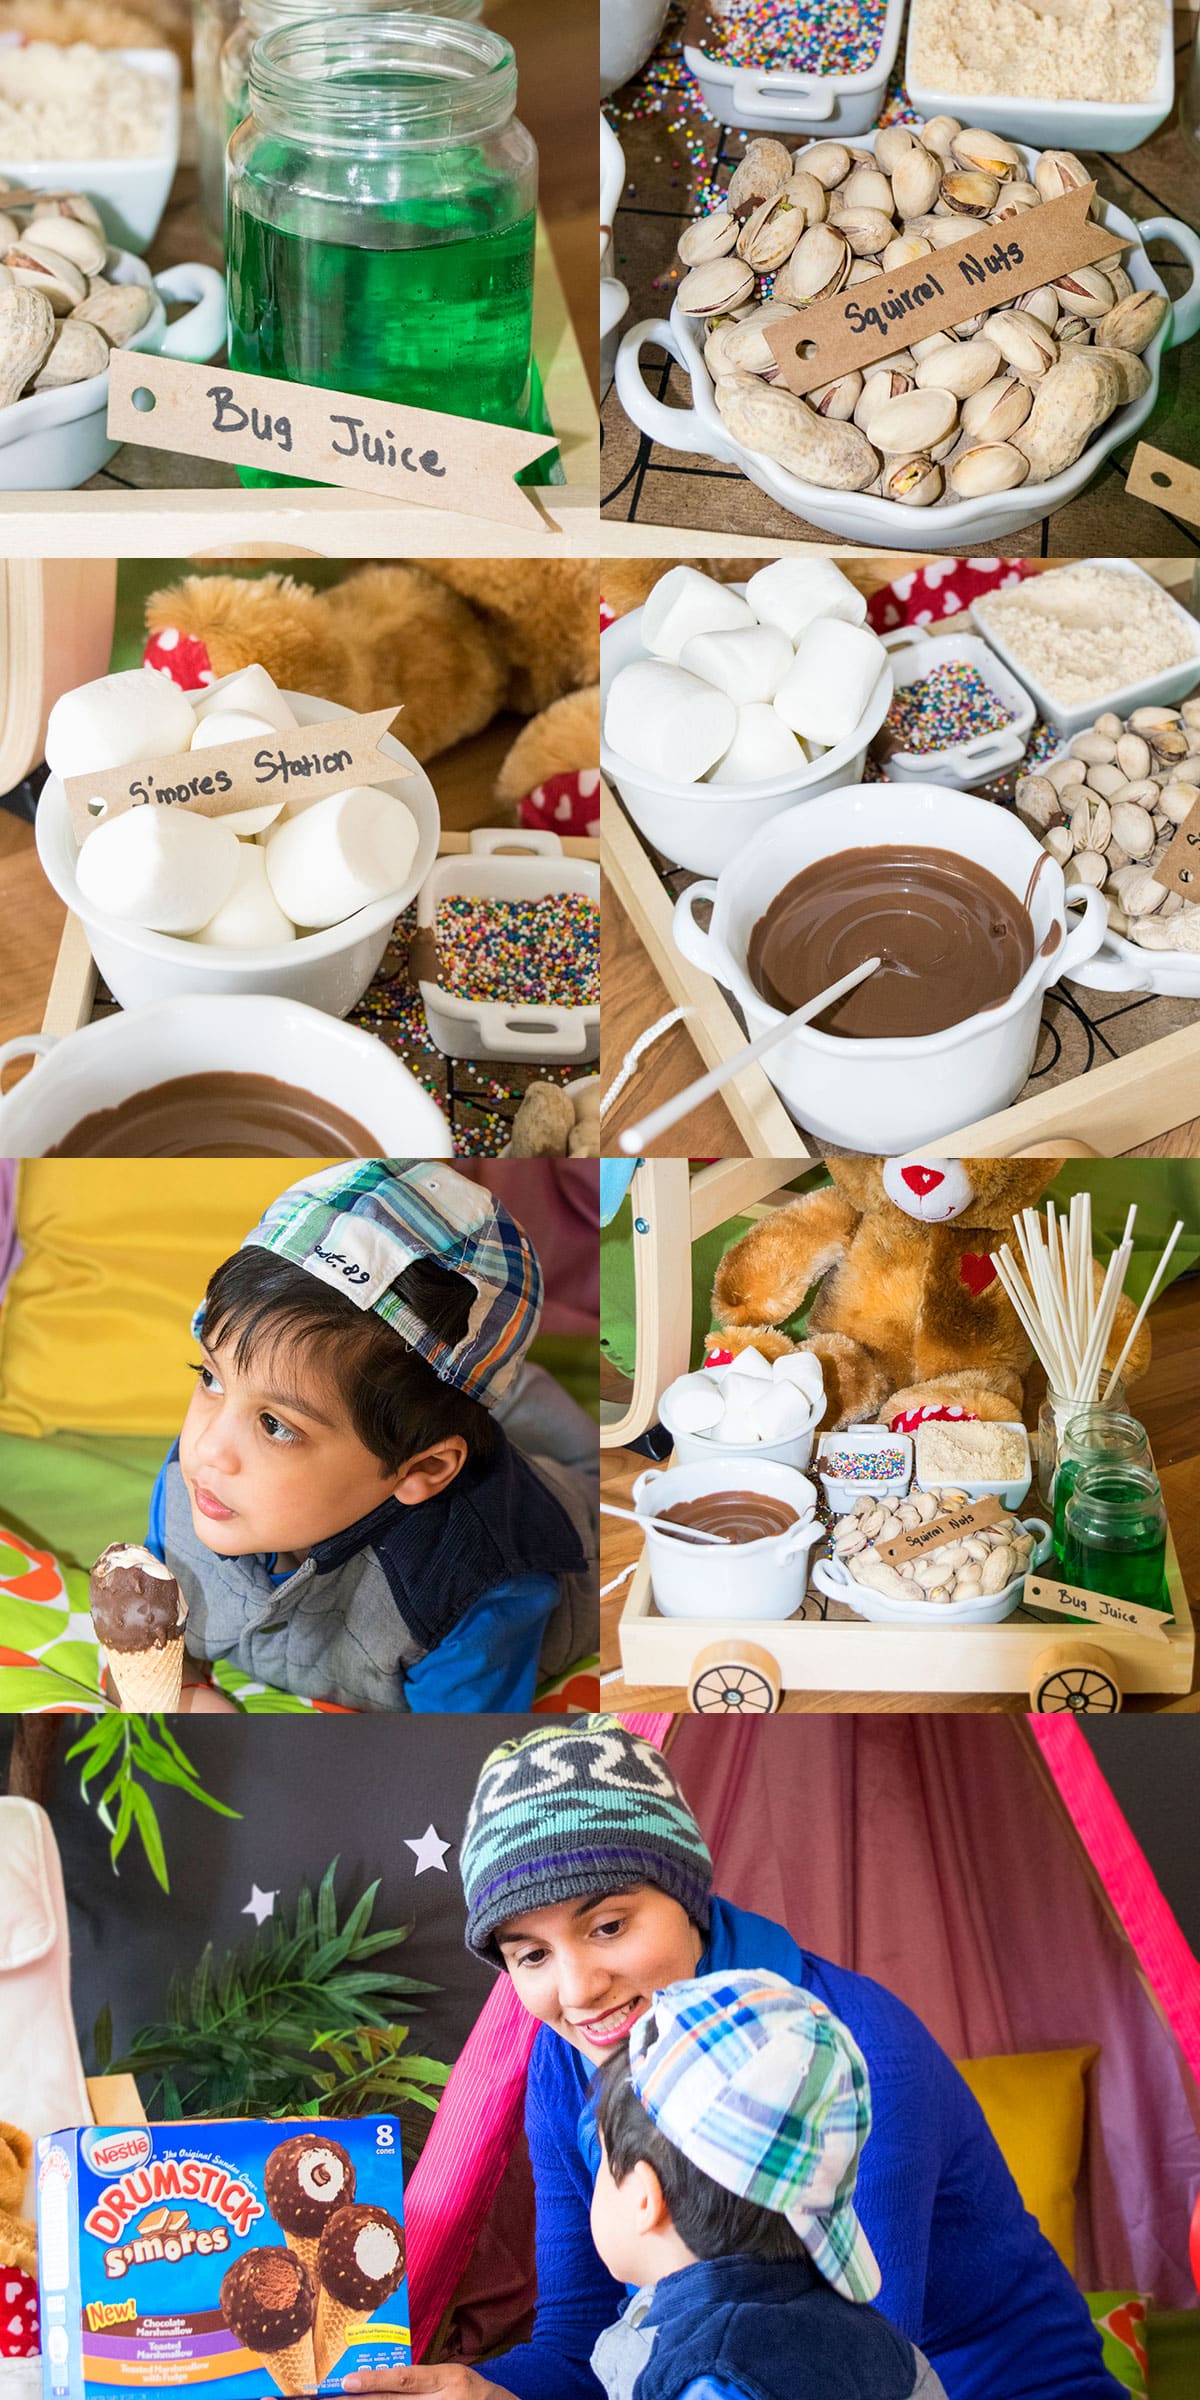
Now, let's get into all the yummy food details. Of course, we had cake that you just saw above. A camping trip just isn't complete without s'mores but I wasn't comfortable setting up a real fire. I didn't want any accidents. Instead, we made easy s'mores by dipping marshmallows in melted chocolate and covering them in graham crackers/ sprinkles. The little one had a blast! Every camping party obviously needs ice cream. So, we picked up a box of Nestlé® Drumstick® S’mores. There are three flavors in the box: Toasted marshmallow with fudge, Toasted marshmallow and Chocolate marshmallow. Our favorite was the one with Fudge. Mmmmmmm. My little munchkin even shared his ice cream with teddy and his dear Mama. So darn cute! As for drinks, we sipped on "green bug juice" in little jars. You can add green fruit powders in water or just add green food coloring in water or you can make my delicious kid-friendly green punch. Campsites always have squirrels and thus, we gathered some "squirrel nuts" to eat and also share with the wild animals.
Recipe
Easy Camping Cake (With Real Campfire)
Want to Save This Recipe?
Enter your email & I'll send it to your inbox. Plus, get great new recipes from me every week!
By submitting this form, you consent to receive emails from CakeWhiz
Ingredients
- 2 Coca cola cake Round, 8x2 each
- 4 cups Chocolate buttercream icing
- ½ cups Green buttercream icing
- ½ cup Blue buttercream icing
- 2 Graham crackers
- 5-6 Soft caramel candies
- ¼ cup Whoppers Or your choice of round chocolate candy balls
- ¼ cup Red candy balls
- 1 cup Oreos Roughly chopped up
- 2 Kit Kats Broken up into rough shaped sticks
Instructions
- Bake cakes and allow them to cool fully.
- While cakes are baking and cooling, prepare the chocolate icing plus green and blue frosting.
- Place one cake on cake stand.
- Use a spatula to spread icing on top.
- Place the second cake on top of the icing.
- Use a spatula to frost the entire cake in a rustic design. You don't have to ice smoothly at all.
- Arrange the 2 graham crackers to make a tent.
- Buy or make trees and camping sign out of cardstock paper. Stick a lollipop stick behind them. Push the base of the lollipop stick into a chewy caramel candy and place them on top of the cake and around the cake board, using a dab of icing.
- Arrange some Whopper candy balls around the trees and sign.
- Fill a piping bag with green icing and attach Wilton star tip # 21 and pipe grass around the base of the trees. This will also hide the caramel candy. Also toss some crushed Oreos and crushed Kit Kats to create the illusion of dirt and stones.
- Stick a few red candy balls randomly on the green buttercream for a pop of color.
- To make the fire pit, arrange the broken Kit Kat pieces in a small circle. Leave it hollow inside. Push 3 small stick candles in the middle. I had to trim the candles with scissors to make them the same height as the fire pit.
- Use a spatula and blue icing to create lakes on the cake board.
- Arrange some Whopper candy balls around the lake and sprinkle some crushed Oreos and crushed Kit Kats.
- If you have fish and duck candies/ sprinkles, push those partially into the blue icing.
- Buy or make a small boat out of thick brown paper and place that on the blue frosting.
- Sprinkle crushed Oreos around the base of the cake and enjoy.
Notes
- Don't decorate a warm cake.
- Make sure to extend the decoration to the cake board to complete the overall scene.
- I didn't add a cake filling but you can add ganache or jam if you like.
- I made the cardboard decorations like the trees and camp sign but you can also buy them online or make them with fondant.
- Read additional tips and variations above.
- Leftovers can be stored in a sealed container in the fridge for up to 3 days.
Nutrition
An automated tool is used to calculate the nutritional information. As such, I cannot guarantee the accuracy of the nutritional information provided for any recipe on this site.

Leave a Reply