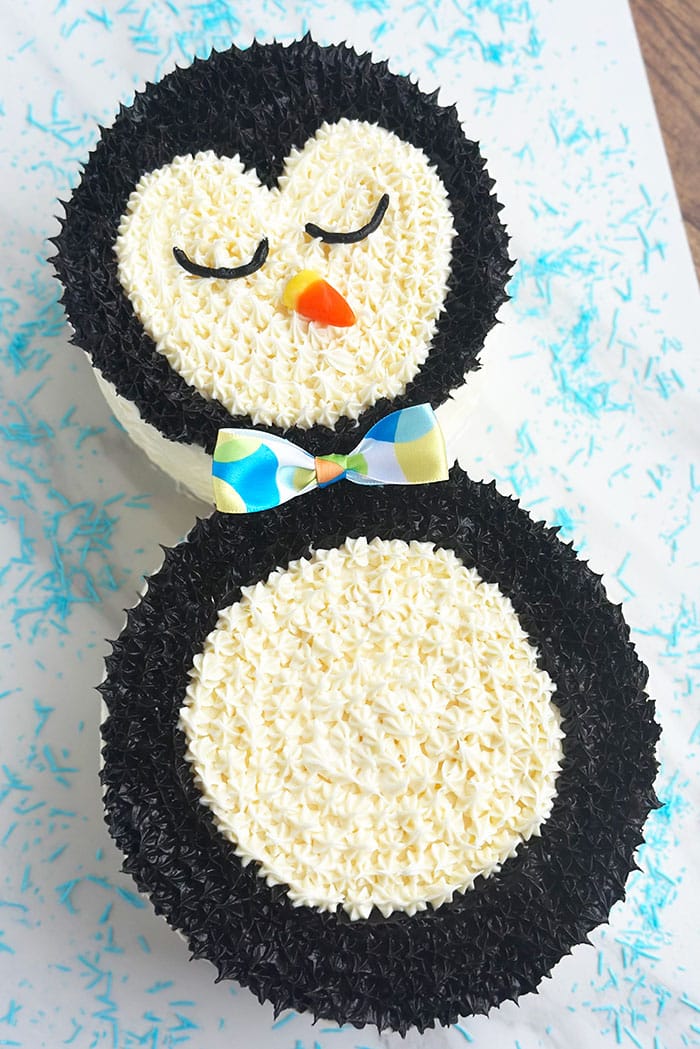
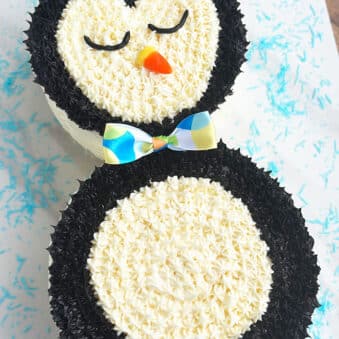
Use this cake decorating tutorial to learn how to make an easy penguin cake with buttercream icing. Perfect for Winter/ Christmas parties and birthday parties.
As if penguins weren't cute enough in real life, this cake takes it to the next level. For 100 bonus points, It is also super easy to make. All you need are regular round cakes, 2 Wilton piping tips, and a couple decor pieces. If you are new to cake decorating this is a fantastic place to start. To take the penguin theme even further, add these Nutter Butter Penguin Cookies to your dessert table for birthday or Winter themed parties.
Want to Save This Recipe?
Enter your email & I'll send it to your inbox. Plus, get great new recipes from me every week!
By submitting this form, you consent to receive emails from CakeWhiz
Table of contents
How to Make Easy Penguin Cake With Buttercream Icing?
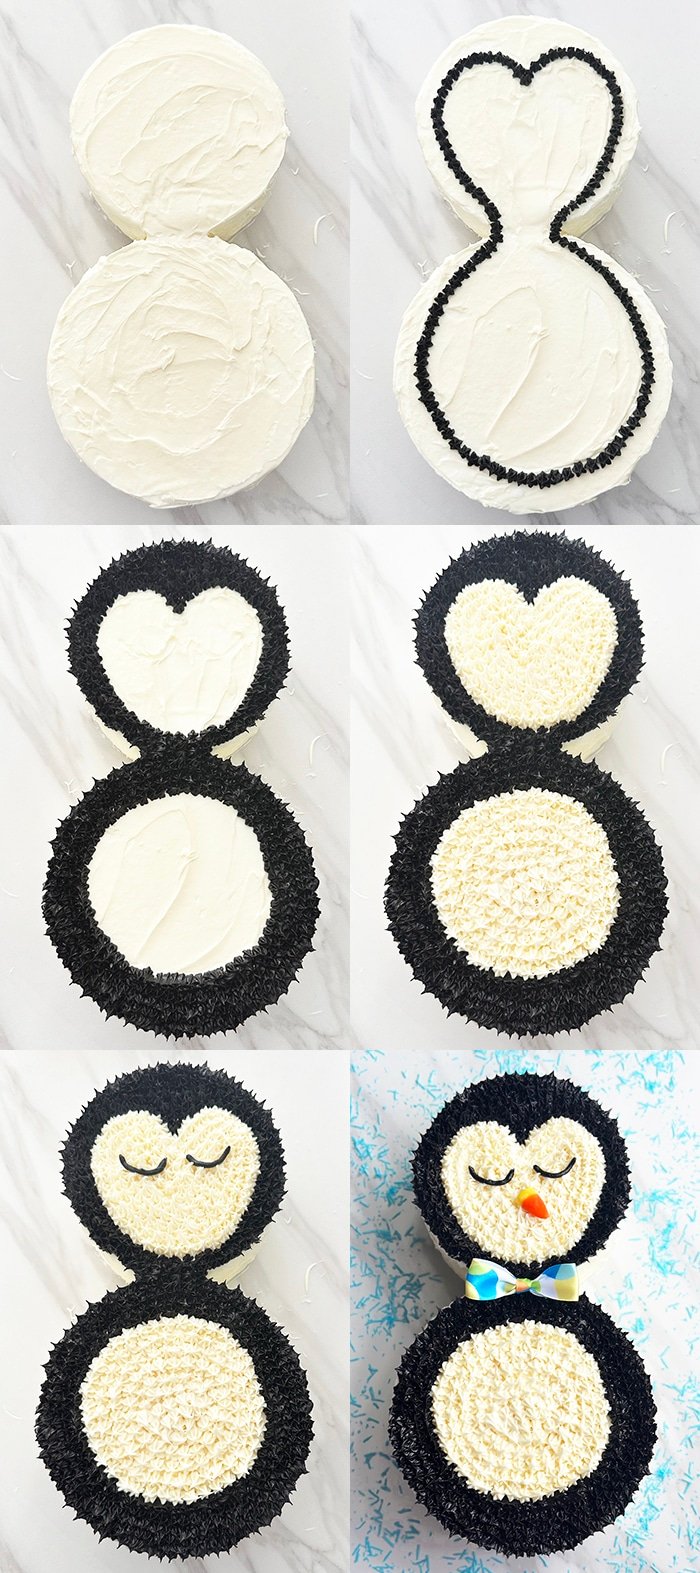
- Bake and cool cakes- Prepare frosting during this time.
- Cut, frost, and stack cakes- Ice each cake smoothly with icing.
- Secure on a large cakeboard- In a penguin shape, with tape.
- Map out face and body shape- Using a toothpick.
- Pipe outer portion- Using Wilton Tip #18 and black buttercream.
- Add white stars- Inside the outline.
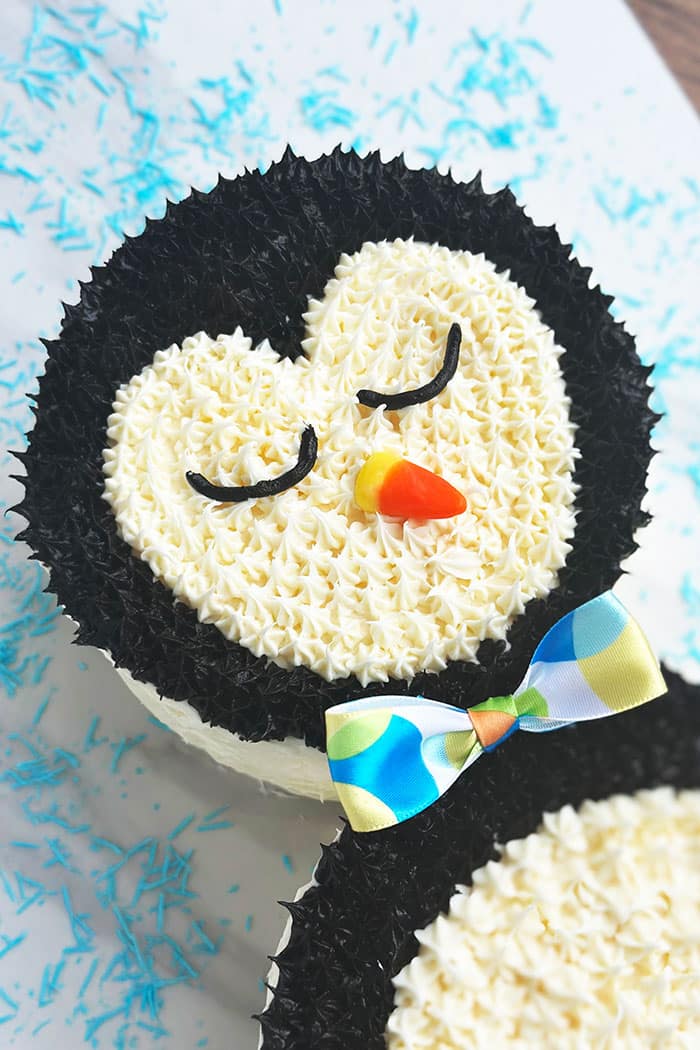
- Pipe eyes- With black icing and Wilton's Tip # 3.
- Add a beak/mouth- Using an orange candy corn. Enjoy.
Variations For Penguin Birthday Cake
Use candy eyeballs- Instead of piping them onto the cake.
Add a bow- For a girl birthday cake add a bow on the penguin's head. Use this How To Make Easy Fondant Bows to guide you, or add a ribbon head bow instead of using it as a bow tie.
Try another cake flavor- Such as Moist Triple Chocolate Cake {From Scratch}, Best Vanilla Cake Recipe {From Scratch}, or Funfetti Cake / Confetti Cake {From Scratch}.
Try another frosting- Such as White Chocolate Buttercream Frosting, Best Cream Cheese Frosting, or How to Make Homemade Stabilized Whipped Cream.
Add a filling- Such as How to Make Strawberry Pie Filling, Chocolate Ganache Frosting {2 Ingredients}, or Homemade Vanilla Custard {Easy}.
Use fondant for the beak/mouth- Instead of candy corn, if you prefer.
Use another color frosting- Make a whimsical penguin using icy blue frosting, or even pink frosting instead of black for the penguin. This would be cute for a winter baby shower, or boy or girl birthday cake.
Tips and Techniques For Winter Cake
How many does this cake feed? It feeds about 20 people.
Cool cakes completely before slicing and icing- Because otherwise the cake will crumble and the frosting will slide right off the cake.
Secure cakes onto the cakeboard- Use tape to do this so all your hard work doesn't accidentally slide off the boards.
What piping tips will I need for this cake? I used the small star Wilton Tip #18 for the black and white penguin "feathers" and the round Wilton Tip #3 for the eyes.
Use a toothpick to map out the penguin face and body- Because this makes it so much easier to pipe the shape symmetrically. You can always redo a toothpick line easily, but a frosting line is much harder to fix.
What size cake pans to use? I used a 6×3 pan for the head and an 8×3 pan for the body of penguin.
What size cakeboards to use? You will need 1 that matches the size of the smaller cake (6x3), one that matches the larger cake (8x3), and then a much larger board to be the base for both cakes.

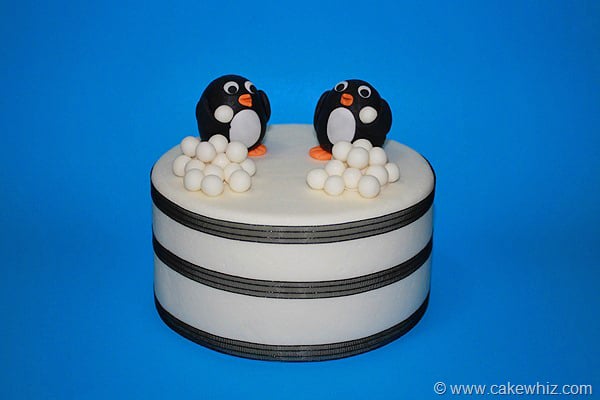
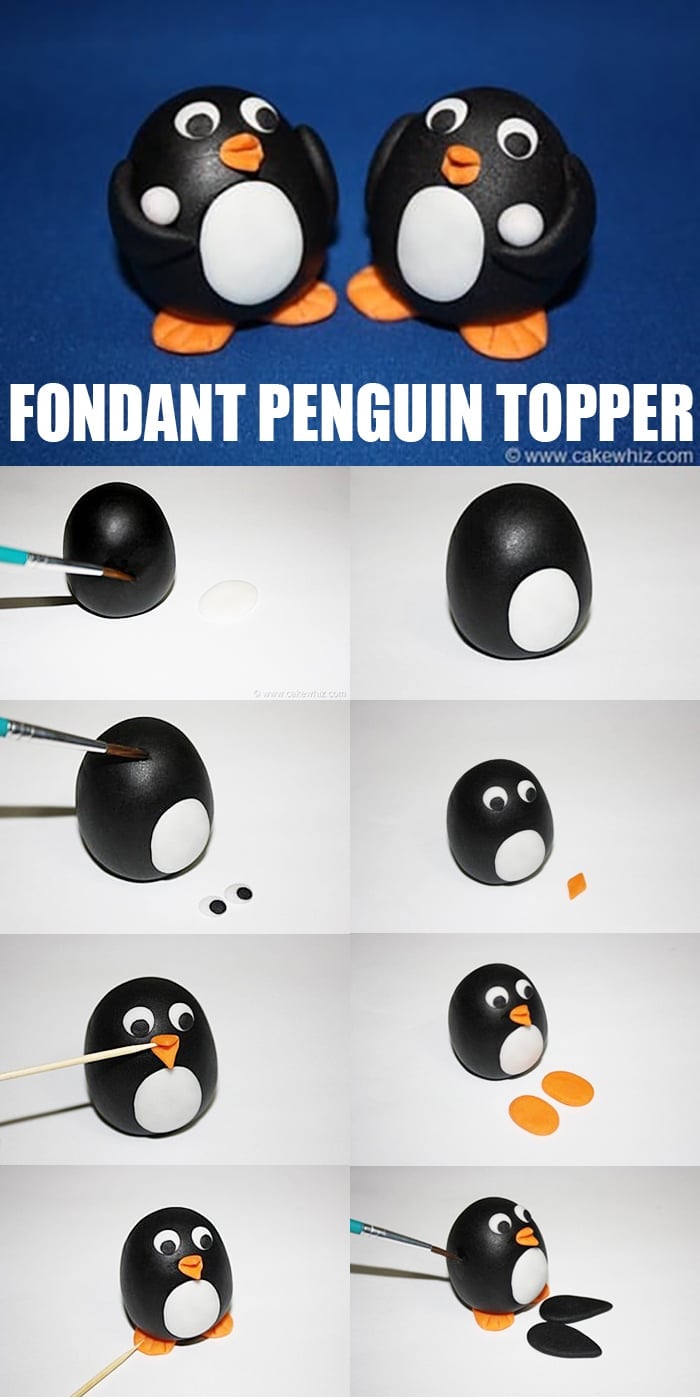
Another idea- Fondant Penguin Topper
You can make a simple round cake, ice it smoothly and then add this topper to finish it off. Make a few figures and create the illusion of them having a snowball fight. These figures can be made weeks in advance. Once they dry and become hard, you can store them safely away from direct heat and moisture in a cardboard box. Instead of fondant, you can also use gum paste or modeling chocolate. It's entirely up to you and what medium you are comfortable with.
Step 1:
Roll out black fondant into an egg shape.
This will be your penguin’s body and head.
Roll out a small ball of white fondant and flatten it into an oval shape.
Brush some water on the center of the penguin’s body.
Step 2:
Position the white oval shaped fondant on this water mark and press gently to secure into place.
Step 3:
For the eyes, roll out two small balls of white fondant and flatten them into circles.
To complete the eyes, roll out two very small balls of black fondant . Place them on top of the white circles and press gently until they stick to each other.
Brush some water on top of the penguin’s black body.
Position both the eyes on this water mark and press gently to secure them into place.
Step 4:
For the beak, roll out a small ball of orange fondant and press into a circle.
Using your fingers, shape your circle into a diamond shape.
Step 5:
Press the center of this orange diamond with a toothpick until it sticks to it.
Brush some water where you want the penguin’s beak to be positioned.
Gently press the toothpick holding the beak onto the water mark and secure into place.
Step 6:
For the feet, roll out two balls of orange fondant and flatten them into an oval shape.
Step 7:
Brush the bottom of the penguin’s black body with water and stick the feet into place.
To create toes, press a toothpick thrice on each foot.
Step 8:
For the wings, roll out two balls of black fondant and flatten them into circles.
Using your fingers, mould them into petal shapes. I did not have a petal cutter but you can use that to make wings too.
Brush the sides of the penguin’s body with some water and stick the pieces here.
Give your penguins white fondant snowballs and you are done.
Storage of Homemade Decorated Cake
Refrigerate- In a sealed container for up to 3 days.
Freeze- In a freezer safe container for up to 1 month. Thaw in the fridge or at room temperature when you are ready to enjoy it again.
More Winter Desserts
- Snowman Cupcakes {With Donut Toppers}
- Easy Snowman Cake {Frosting & Fondant}
- Snowman Cookies {Snowman Oreos}
- White Snowflake Cake {Winter Cake}
- Snowflake Cookies {Snowflake Oreos}
- Snowflake Cupcakes {Winter Cupcakes}
- Snow Ice Cream Recipe
Recipe
Easy Penguin Cake
Want to Save This Recipe?
Enter your email & I'll send it to your inbox. Plus, get great new recipes from me every week!
By submitting this form, you consent to receive emails from CakeWhiz
Ingredients
- 2 Rainbow cake Round, Dimensions: 6×3 and 8×3
- 6 cups Buttercream icing Black and white
- 1 Large candy corn Or any large orange triangle candy
Instructions
- Bake the cakes and allow them to coom completely.
- While the cakes are baking and cooling, make the frosting.
- Cut each cake in half lengthwise and spread a thin layer of icing with a spatula.
- Place the other halves of the cakes on top and press gently to secure into place.
- Place these cakes on round cake boards (same size as the cakes).
- Ice each cake smoothly with icing.
- Place these two iced cakes on a large cake board. The smaller cake should be on top and the bigger one should be positioned below it. Stick them into place with tape.
- Use a toothpick to map out a rough shape for the face and body.
- Fill a piping bag with black icing and attach a small star tip (Wilton's Tip # 18).
- Pipe little black stars on your rough outline.
- Then, fill outside the outline with little black buttercream stars.
- Fill another piping bag with white icing and attach a small star tip (Wilton's Tip # 18).
- Fill inside the outline with little white buttercream stars.
- Fill another piping bag with black icing and attach a small round tip (Wilton's Tip # 3).
- Pipe eyes with a very steady hand.
- Stick a large orange candy corn for the beak/mouth below the eyes. Another option is to cut out an orange fondant triangle piece and stick that here. Enjoy.
Notes
- Read all my tips above.
- Leftovers can be stored in a sealed container in the fridge for up to 3 days.
Nutrition
An automated tool is used to calculate the nutritional information. As such, I cannot guarantee the accuracy of the nutritional information provided for any recipe on this site.

Leave a Reply