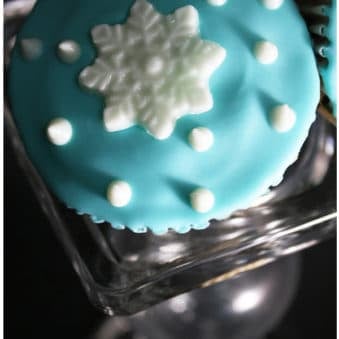
Easy snowflake cupcakes recipe, homemade with simple ingredients. All you need is white chocolate and a candy mold. Perfect Winter cupcakes for parties!
Since this chilly winter refuses to go away, you might as well make some Winter desserts like this Snowflake Cake and these Snowflake Cookies.
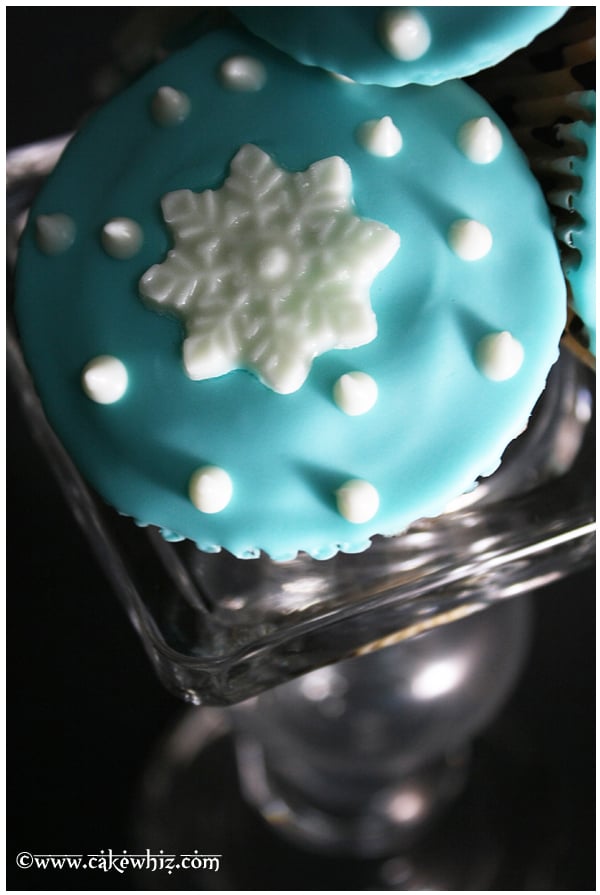
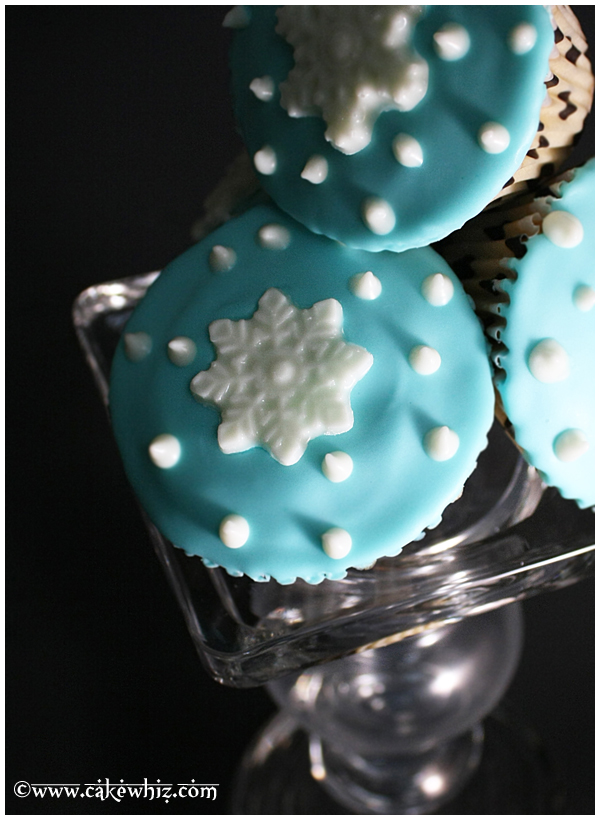
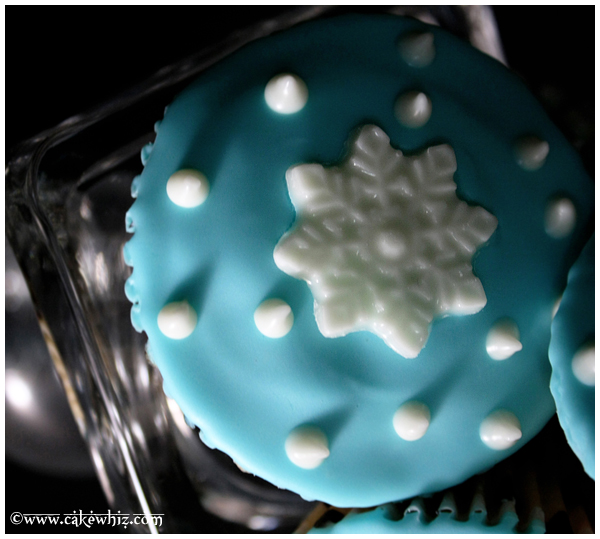
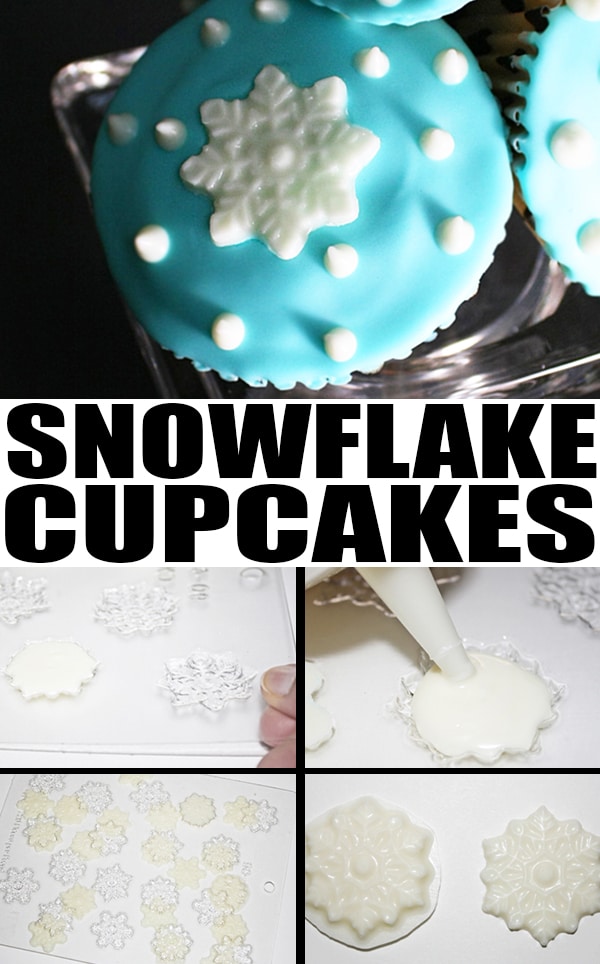
I used a candy mold to make chocolate snowflakes. They can be used immediately on desserts or you can save them for later to decorate cakes and cupcakes.
Want to Save This Recipe?
Enter your email & I'll send it to your inbox. Plus, get great new recipes from me every week!
By submitting this form, you consent to receive emails from CakeWhiz
How to make snowflake cupcakes (Winter cupcakes)?
- Bake cupcakes- And cool completely.
- Spread frosting- On top of cupcakes.
- Make chocolate snowflakes- Using melted white chocolate and a candy mold.
- Freeze mold- And then remove each piece carefully.
- Decorate cupcakes- With a single snowflake and sprinkles.
Variations for Winter Wonderland Cupcakes
Try different colors- I used a classic blue and white Winter color scheme but you can use whatever colors you like. Try to match the colors to the event of party theme.
Try different cupcake flavors- Such as Best Red Velvet Cupcakes or Brownie Cupcakes.
Try different frostings- For a chocolate kick, use Chocolate Ganache Frosting or Chocolate Cream Cheese Frosting. For white icing that can be colored, use American Buttercream Frosting or Marshmallow Frosting or Cooked Flour Buttercream (Ermine Frosting) or Seven Minute Frosting.
Fill cupcakes- With jam, caramel, dulce de leche, peanut butter, frosting or Nutella.
Decorate cake- Use those snowflakes to decorate a cake. It can be a a large cake, tiered cake or individual-sized mini cakes.
Make different sizes and designs- Candy molds come with various designs and sizes of snowflakes, allowing you to make a variety. This will allow all your cupcakes to look slightly different but still, maintain a unified theme.
Tips and Techniques
Avoid over-filling the cavities- I over-filled one and it looks like an ugly blob. See the picture in the collage below.
Candy melts vs. Chocolate chips- Either can be used. If you are planning on coloring white chocolate chips, be sure to use oil-based colors. Candy melts, on the other hand, already come in a range of colors.
Don't decorate warm cupcakes- They must cool completely before they are decorated or else the icing will slide and decorations will melt.
Don't remove chocolate snowflakes until they harden- That's because they will break when you try to remove them from the mold.
Don't overheat chocolate- Because it can burn easily and you will end up with burnt bits. There is no way to fix it.
Homemade icing vs. Store-bought icing- Either can be used. However, homemade frosting cannot be heated and poured as a glaze on top of cupcakes. You will have to pipe it.
Storage
Refrigerate- Leftovers can be stored in a sealed container in the fridge for up to 3 days.
Freeze- Unfrosted and undecorated cupcakes can be frozen in a sealed container for up to 1 month and thawed overnight in the fridge. Once thawed, they can be decorated, as per instructions below.
Make ahead instructions- These cupcakes can be made 1 day in advance.
How to store chocolate snowflake candies? Keep them in a sealed container at room temperature away from sunlight, heat and moisture.
More Winter Desserts
- Snow Ice Cream Recipe
- Snowball Cake (Cheesecake Stuffed Chocolate Cake)
- Snowman Donuts
- Snowman Cupcakes
- Snowman Cake
- Snowman Ice Cream Cones
- Nutter Butter Penguin Cookies
Recipe
Snowflake Cupcakes (Winter Cupcakes)
Want to Save This Recipe?
Enter your email & I'll send it to your inbox. Plus, get great new recipes from me every week!
By submitting this form, you consent to receive emails from CakeWhiz
Ingredients
- 24 Yellow cupcakes
- 1 container Vanilla icing Pillsbury or Betty Crocker, Colored blue with liquid food coloring
- 2 cups White chocolate chips Or white candy melts
Instructions
- Bake cupcakes and let them cool completely.
- Heat frosting in the microwave until it's a pourable consistency.
- Pour it in a bowl (This makes dipping easier in the next step).
- Either dip the cupcake (top down only) into the frosting or spread a spoonful of frosting on top.
- Let the icing set.
- While it's setting, make chocolate snowflakes. Place white chocolate chips in a squeeze bottle or piping bag and heat in the microwave until candies are fully melted.Don’t overheat! Heat and mix at every 30 seconds.
- Now, start squeezing melted chocolate in the snowflake candy mold.
- Start tapping the side of the tray gently until melted chocolate spreads into the corners of the cavity.
- Place your tray in the freezer for 15-20 minutes until the chocolate hardens.
- Then, turn over your mold onto a smooth surface, lined with wax paper or parchment paper.
- Tap the top of your mold and the snowflake candies will just fall out.
- Decorate each cupcake with a snowflake candy and white sprinkles. Enjoy!
Notes
- Read all my tips above.
- Leftovers can be stored in a sealed container in the fridge for up to 3 days.
Nutrition
An automated tool is used to calculate the nutritional information. As such, I cannot guarantee the accuracy of the nutritional information provided for any recipe on this site.
Yaneri
these sure are very pretty!! Love how you covered the cupcake with the turqoise! I a newbie in baking and I'm learning. Is that fondant? Got a recipe and tutorial for that?
Olga
these look really pretty!
Food Frenzy
Great job! Just impressed by your attention to detail.
Lisa Fine
Those are absolutely adorable. I love this idea, and they're perfect for winter. Thanks for stopping by my blog yesterday.
Ricardo
great detail super delicious and fun. well done
melissa
These are so adorable -- they must be amazing in person!