Use this quick and easy cake decorating tutorial to learn how to make buttercream ruffle cake with just Tip 104. Perfect for Valentine's day parties!
I first saw this cake design by Martha Stewart and I was absolutely smitten with it. Considering the fact that it only uses one decorating tip, I was amazed by how elegant it looked. If you are fond of pretty cakes, be sure to check out these Easy Cake Decorating Ideas and these Bundt Cake Decorating Ideas as well as these Birthday Cake Ideas. You can make today's cake using buttercream frosting or fondant but I prefer the frosting technique because it's quick, easy and simple. Even beginners and others who have never decorated a cake in their life can make this cake. By the way, I started icing this cake when our air conditioning wasn't working, making my kitchen unbearably hot. That was a big mistake! My buttercream icing became very soft and as you know, it's very difficult to pipe with soft frosting. It’s a good lesson for next time.
Want to Save This Recipe?
Enter your email & I'll send it to your inbox. Plus, get great new recipes from me every week!
By submitting this form, you consent to receive emails from CakeWhiz
Table of contents
This easy ruffle cake design would be perfect for:
- Valentine's Day- Also check out these Pink Desserts (Valentine's Day Desserts).
- Mother's Day
- Anniversary parties
- Birthday parties for girls
- Weddings
- Gender reveal parties
- Baby showers
Key ingredients
- Cake- It can be any flavor you like but must be at room temperature.
- Frosting- It can be colored with food coloring and have a firm consistency.
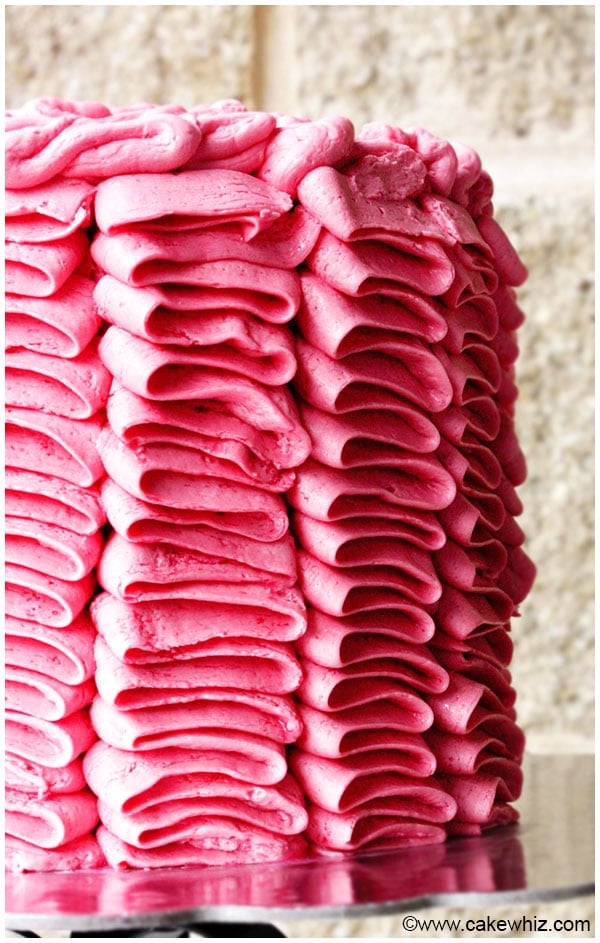
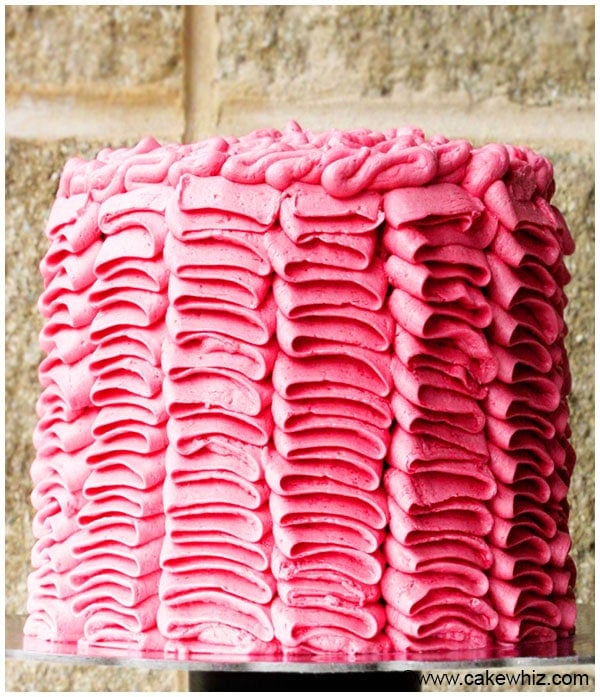
How to make buttercream ruffle cake?
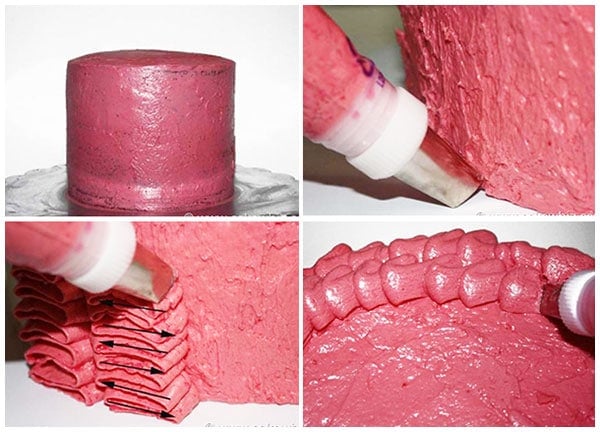
- Fill a piping bag with frosting and attach Tip 104.
- Place the tip along the bottom edge of the cake and start piping in a right left motion until you have a column of frosting.
- Continue piping columns all around the cake until it's fully covered.
What tip to use for piping ruffles?
You need to use Wilton's Tip 104, also known as the "leaf tip."
How to make a fondant ruffle cake?
That is made by cutting thin strips of fondant and ruffling the edges. Then, it's pasted onto the cake with icing. It's a very time-consuming process.
Tips and Techniques
Don't work in a hot kitchen- Like I mentioned earlier, never ice a cake in a hot kitchen. That's because your icing will become very soft and difficult to handle.
Chill roughly iced cake (crumb coat)- Be sure to frost the entire cake in icing roughly and chill it in the fridge, which makes it easier for the buttercream stacks to stick along the sides of the cake.
Time convenience tip- To save some time, you can use a cake mix and store-bought frosting. If you are using store-bought frosting, be sure to chill it in the fridge for 30 minutes so that it firms up a bit.
Keep cake refrigerated- Keep the decorated cake refrigerated until you are ready to serve. This is important because it prevents the stacked ruffles from becoming too soft and losing its shape or sliding down and making a mess.
Make even sizes of ruffles- To do this, mark the roughly frosted cake with a butter knife and use that as a guide so that it each stack is about the same width.
DON'T rush- Go slow and steady so that each column is neat and aligned properly.
Frosting consistency- It should not be so firm that you have to squeeze the piping bag really hard to make the design but it should also not be so soft that it's oozing out of the piping bag. It should be a medium consistency.
Variations
Rainbow pattern- Use all your leftover colored frostings from previous cakes to make a rainbow themed cake.
Do an ombre design- Use varying shades of the same colored frosting to make an ombre cake (e.g. dark pink, medium pink, light pink). This Blue Ombre Cake is also very popular.
Make a tiered wedding cake- Crumb coat a tiered cake and then, apply this same decorating technique to a larger cake.
Try other frostings- Such as this Easy Mint Frosting or this Blackberry Buttercream Frosting.
Decorate the top- I iced the top with more icing but you can decorate the top with fresh edible flowers or even fresh fruits, especially berries.
Storage
Refrigerate- In a sealed container for up to 3 days.
Freeze- Undecorated cakes and frostings can be stored in a sealed container for up to 1 month and thawed in the fridge overnight and then, assembled. Frosted cakes cannot be frozen because they don't thaw well.
Room temperature- This is not recommended since the frosting is made with milk and that can go bad after a few hours at room temperature.
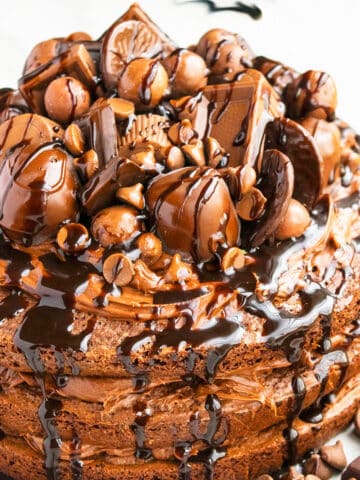
More Valentine's Day Desserts
Recipe
Buttercream Ruffle Cake
Want to Save This Recipe?
Enter your email & I'll send it to your inbox. Plus, get great new recipes from me every week!
By submitting this form, you consent to receive emails from CakeWhiz
Ingredients
- 2 Pink velvet cake Both cakes should be round and 8 inches
- 6-8 cups American buttercream frosting Colored pink
Instructions
- Bake two 8 inch cakes and let them cool completely.
- Place one cake on a serving dish.
- Use a spatula to spread icing on top of the cake.
- Place the other cake on top of the icing and press gently to secure it in place.
- Then, use a spatula to spread icing on top of the cake and all over and around the cake.You don’t have to be neat. The ruffles will hide all imperfections which is why I LOVE this cake!
- Chill the cake for about 30-45 minutes in the fridge so that the icing hardens a bit.
- Place your chilled cake on a turntable.
- Fill a piping bag with pink frosting and attach Wilton tip 104. The tip has a broad end and a narrow end. The broad end should face the cake and narrow end should be facing you. Hold the bag at a 45 degree angle.Now, start squeezing and moving your bag right and left quickly while gently moving upwards on the cake and you will end up with columns of ruffles.
- TIP: Before you start to pipe each column of ruffles, use a Kleenex to wipe off the tip so that each column looks neat.
- For the top of the cake, do the same thing. Start piping around the outer edge of the cake and continue to work your way inwards until the top is fully covered in ruffles too. Enjoy!
Notes
- Read all my tips above.
- Leftovers can be stored in a sealed container in the fridge for up to 3 days.
Nutrition
An automated tool is used to calculate the nutritional information. As such, I cannot guarantee the accuracy of the nutritional information provided for any recipe on this site.
marla
lovely pink ruffle cake
Juliana
Absolutely gorgeous! You are sure very skillful.
Margargaret
If you used regular buttercream, instead of the meringue frosting in the recipe, that could be another reason that your ruffles melted a bit.
Saw this on Serious Eats, and it was definitely eye catching
Abeer
Thanks for that tip Margaret! I will use meringue frosting next time
Tori
Wowsa! That is one impressive, beautiful cake! I might have to make this for my stepdaughter's birthday, it's fit for a princess!
Carina
WOW! I love it! I am learning that I LOVE to make cakes - I'm a complete amatuer, but I'm having so much fun trying so many different techniques - this looks fantastic!
Stephanie
Beautifully done! My arm is sore just looking at all the piping!
Katie
This cake is *gorgeous*. I think 'cake whiz' might be a bit of an understatement.
Angie
that cake is might Ruffley and beautiful!
Beth Michelle
Beautiful! WHat a wonderful job you did! Looks like Martha did it herself!
Asmita
I really want to make this some day. I just need more patience and a lot of talent. This is superb!!!
Hannah
This cake is absolutely stunning! It's shameful, really- I don't think I've used my ribbon tip twice, if at all, since adding it to my piping set. I just lack to confidence to pull of anything nearly as grand as this... I'm inspired by the tutorial, but I wish you could give me a hands-on lesson!
Karen
Looks great. Makes me want to get off my blog and make one!
Norma Chang
Gorgeous!!!!! You make it seems so easy. I could not decorate a cake even if my life depended on it, hopeless.
Winnie
What a beautiful cake! It would be so perfect for a ladies tea, or a baby shower too . Thanks for sharing the "how to". I took 4 Wilton Cake decorating courses years ago with my sister, and had a blast, but nothing like this! Thank you for visiting and commenting on my blog yesterday. It made my day.
Asmita
BEAUTIFUL!!!