Use this cake decorating tutorial to learn how to make peacock cake and cupcakes with fondant feathers. Perfect for weddings, anniversaries and birthday parties.
Want to Save This Recipe?
Enter your email & I'll send it to your inbox. Plus, get great new recipes from me every week!
By submitting this form, you consent to receive emails from CakeWhiz
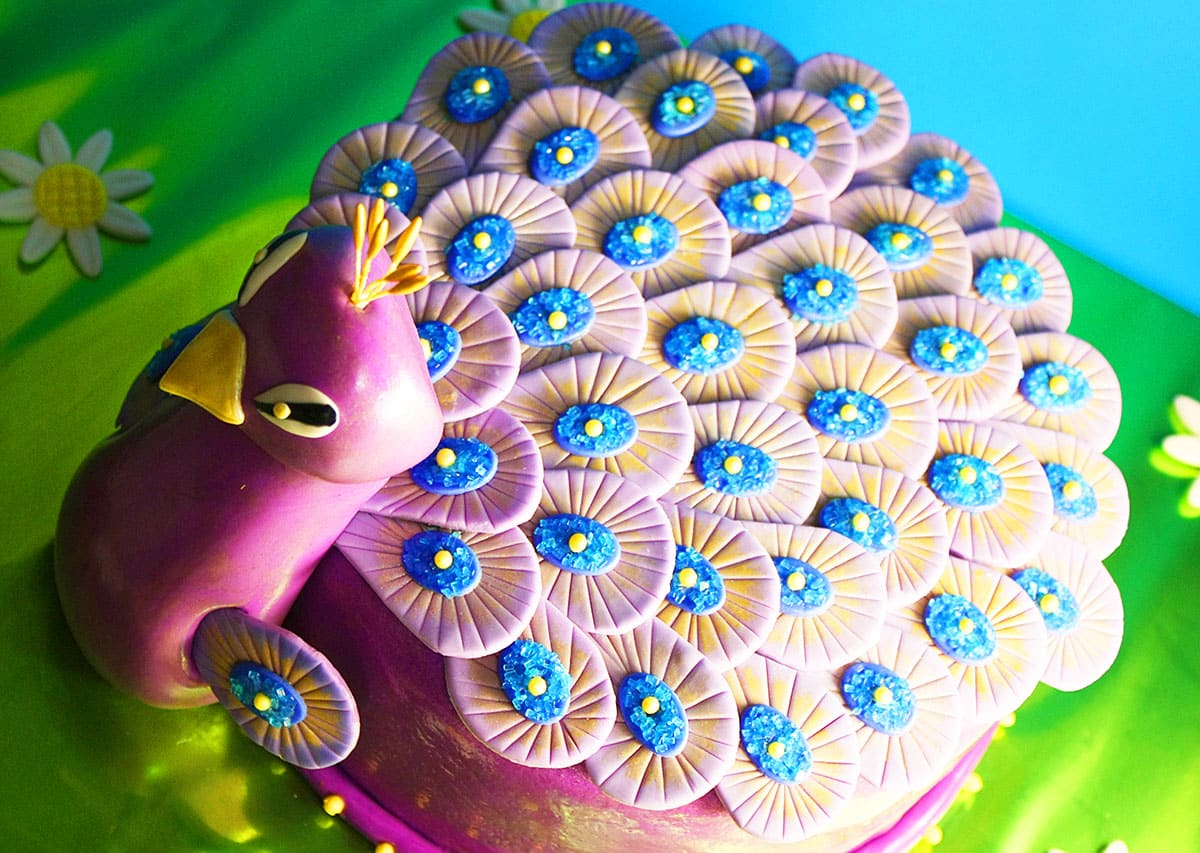
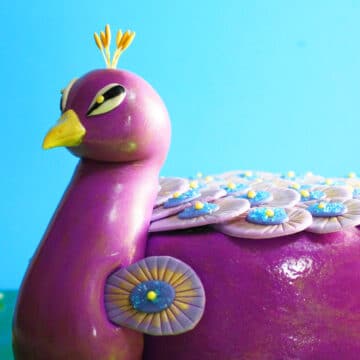
This dessert is much more fun and dramatic than a basic peacock topper. It totally makes the list of my favorite Birthday Cake Ideas. Although it takes some time and effort to put together, the end result is absolutely worth it.
Want to know my favorite feature of this cake? All the gorgeous feathers! They were truly the highlight of this cake and made it so special. Since this was a birthday cake for my cousin, I had to write “Happy Birthday.” However, I can’t pipe letters to save myself. After many failed attempts, I decided to use letter shaped candy molds. Problem solved!
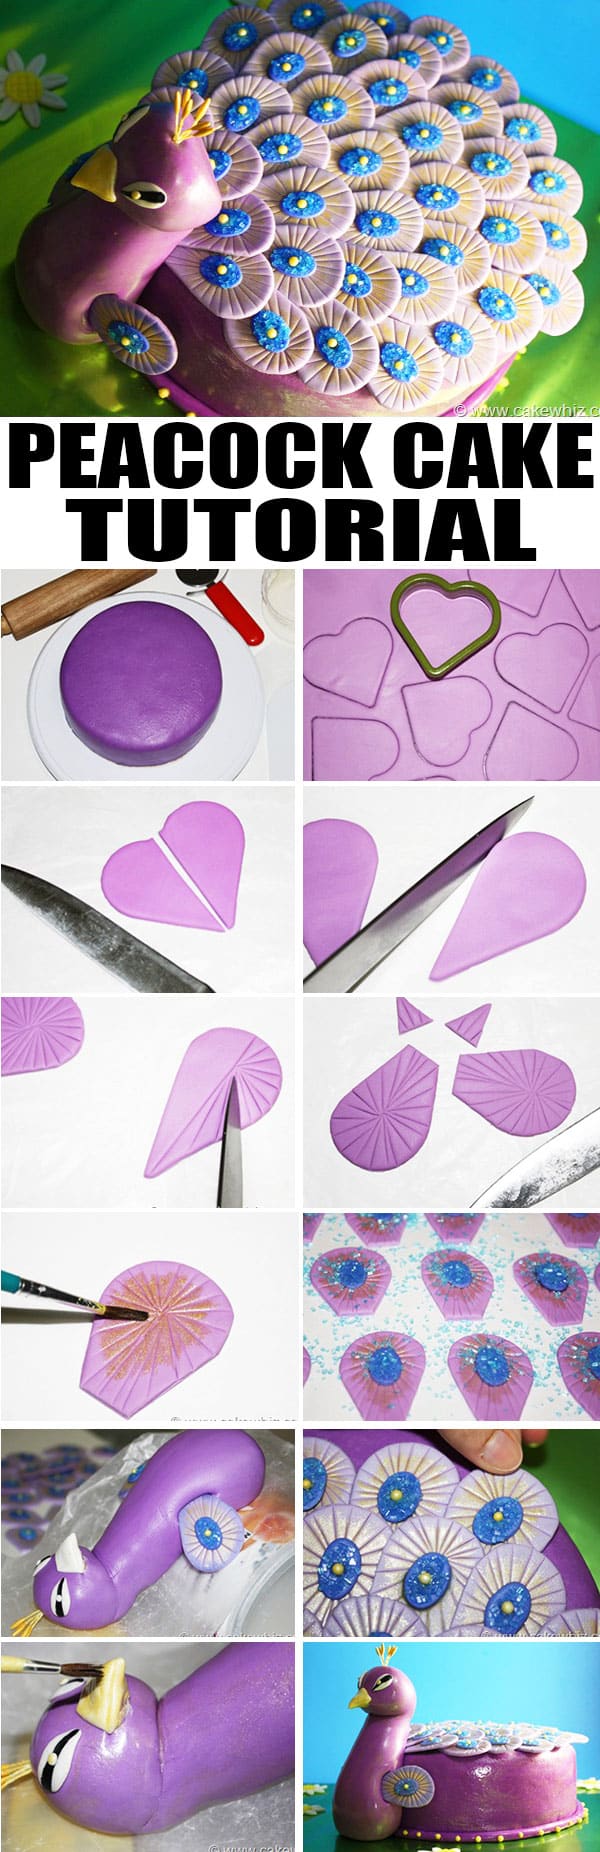
How to make easy peacock cake for birthdays and weddings?
- Bake cakes- And let them cool completely.
- Make icing- And color it purple, if you like.
- Assemble– Place one cake on cake stand, ice the top, then, place the other cake on top and then, ice the whole cake.
- Spread purple fondant- And cut off excess around the base of the cake.
- Make fondant feathers- And let them dry.
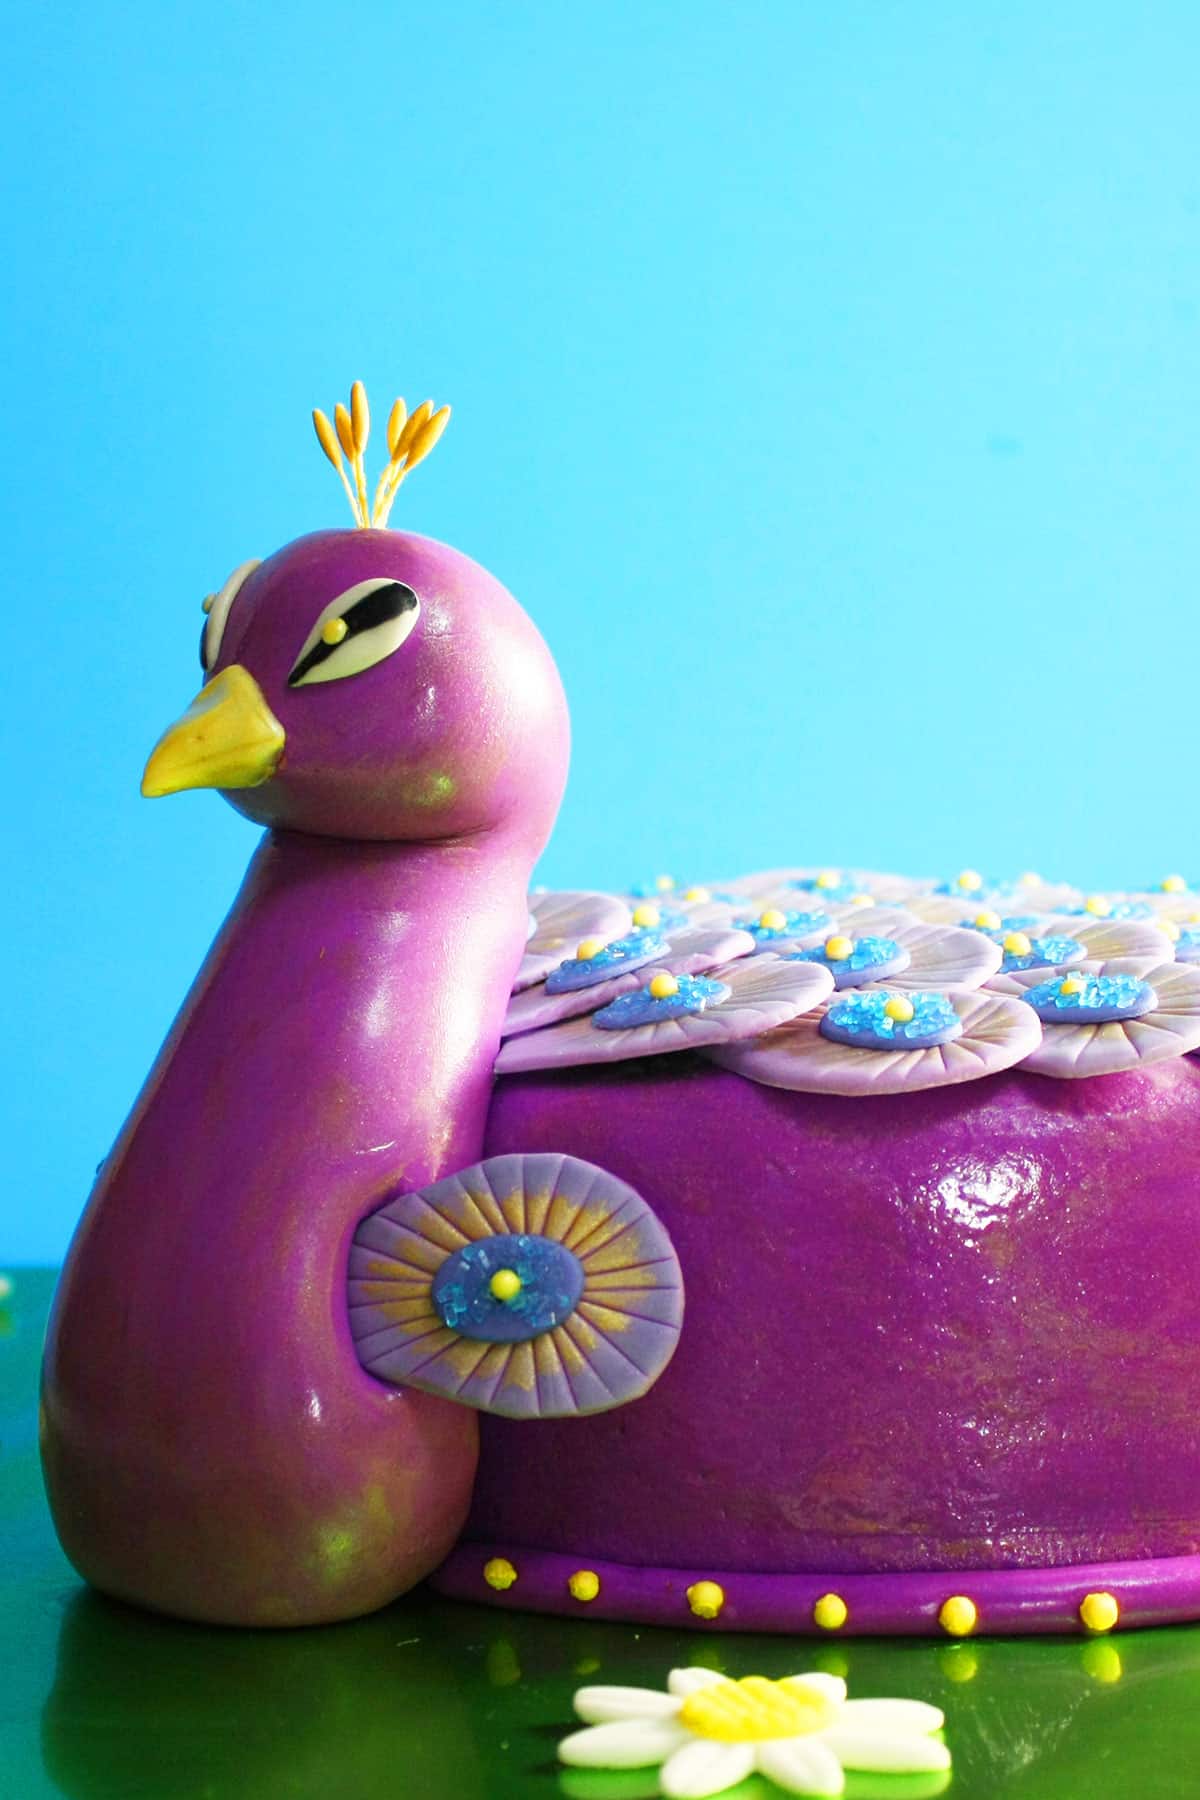
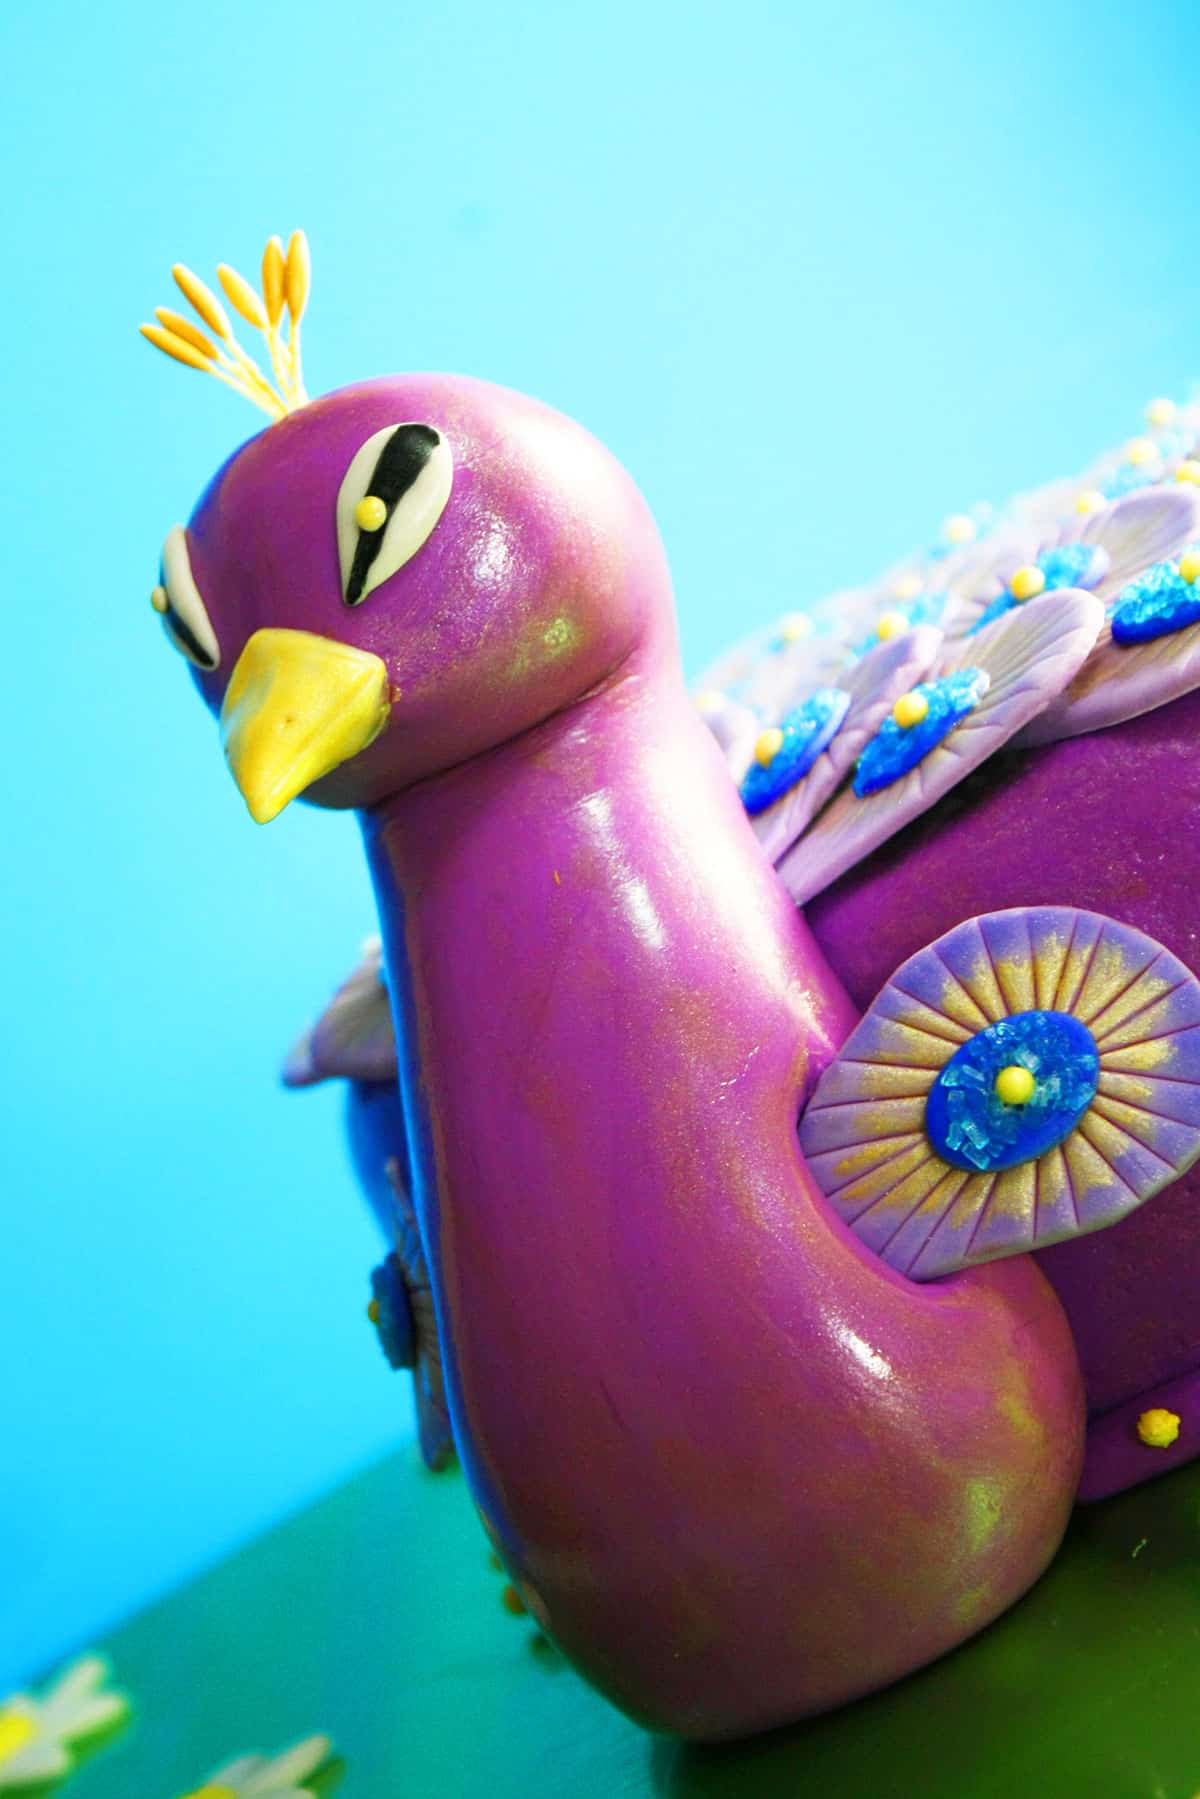
- Make peacock face and body- And let it dry.
- Decorate– Stick the feathers on top of the cake and stick the body on the side and you are done.
Variations and tips
- Don’t frost or decorate warm cakes- Because the warmth will cause the icing and fondant to melt and make a sticky mess.
- Homemade fondant vs. Marshmallow fondant- Either can be used. They both have their pros and cons. I prefer homemade fondant because it tastes delicious and smells amazing. However, you can buy pre-colored fondant, which means less work for you and is simply more convenient.
- Use other fondant flowers- Homemade fondant flowers vs. Store-bought flowers– Either can be used. Wilton has some beautiful ones that will save you time. I decorated the board with fondant daisies but you can also check out my tutorial for super easy red flowers in this 4th of July Cake post. You can also make Easy Wafer Paper Flowers or Royal Icing Flowers (Sugar Flowers) or these Easy Fondant Roses (Ribbon Roses).
- Make a larger tiered cake- And have the fondant feathers cascade down the cake.
- Small cake- Instead of a large cake, follow the same tutorial to make individual sized mini cakes.
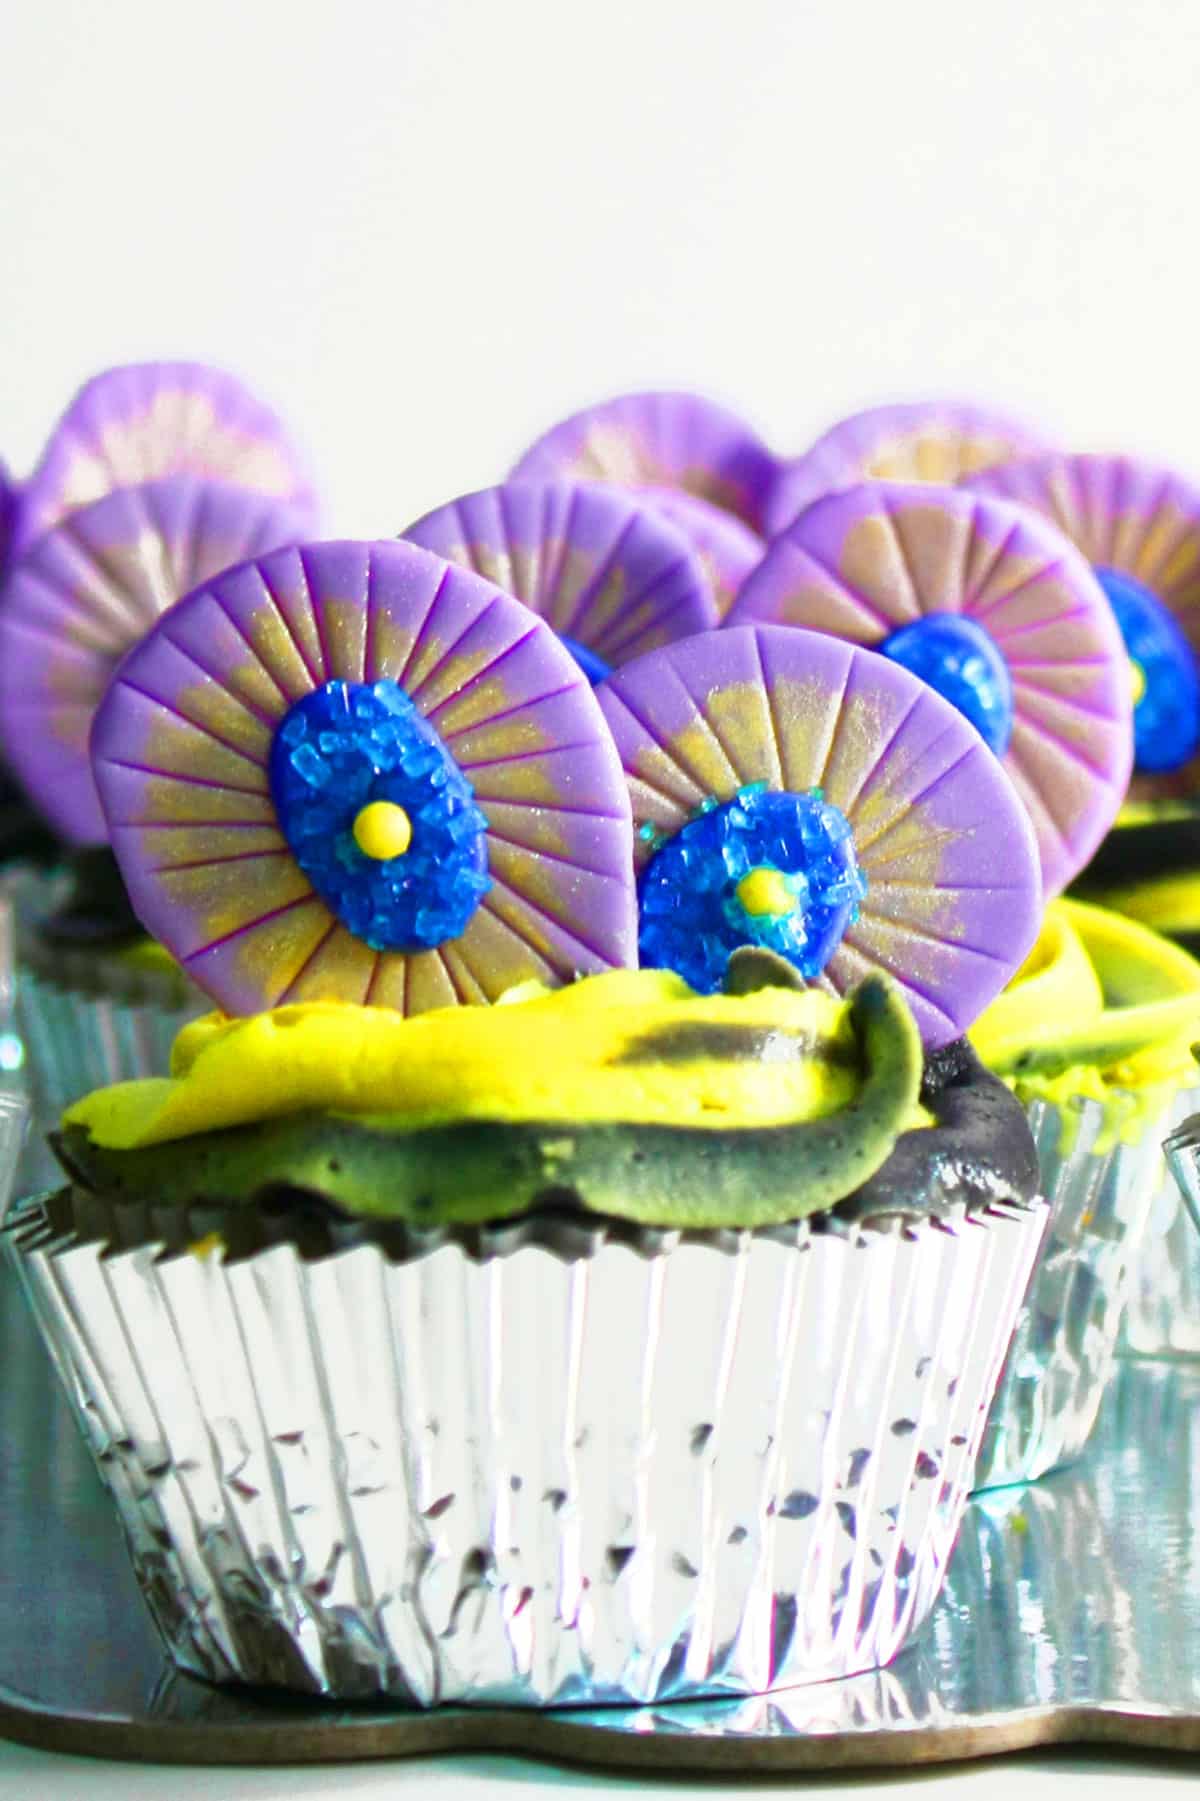
- Peacock cupcakes- Follow the same tutorial on a smaller scale and decorate iced cupcakes.
- Use rice krispie treats to make the body- I made it entirely of 50/50 (combination of fondant and gum paste) but that made it very heavy. Rice krispie treats are easy to mold and lighter.
- Cupcake cake- Arrange cupcakes in the correct formation and decorate it with icing and fondant to look like the purple majestic bird.
Storage
- Room temperature- Decorated cake can be left at room temperature as long as there is no fruit filling that requires refrigeration.
- Refrigerate- Leftovers can be stored in a sealed container in the fridge for up to 3 days. However the fondant decorations will become slightly sticky and tacky from the moisture in the fridge.
- Freeze- Unfrosted cakes can be stored in a sealed container for up to 1 month. When you are ready to enjoy it, let it thaw in the fridge overnight and then, decorate as per instructions below.
- Make ahead instructions- This cake can be baked and decorated 1 day in advance and stored at room temperature until you are ready to serve.
Use leftover fondant feathers to decorate cupcakes. These are Chocolate Cherry Cupcakes, topped off with a swirl of buttercream and feather toppers. You can even use them to decorate Cake Pops.
More decorated cakes
- Butterfly Cake
- Tie Dye Cake
- Fondant Flower Cake
- Crying Baby Cake
- Mini Sushi Cake
- Modern Abstract Cake
- Bumblebee Cake (Spring Cake)
Recipe
Easy Peacock Cake
Want to Save This Recipe?
Enter your email & I'll send it to your inbox. Plus, get great new recipes from me every week!
By submitting this form, you consent to receive emails from CakeWhiz
Ingredients
- 2 Rainbow cakes Round, Dimensions: 8x2 each
- 2 cups American buttercream frosting
- 4 cups Marshmallow fondant Purple
- ¼ cup Sanding sugar Blue
- 8-10 Fondant daisies
Instructions
- Bake cakes and allow them to cool to room temperature completely.
- While the cakes are cooling, prepare icing.
- Trim the domes (if any) so that tops are flat.
- Then, place one cake on a serving dish and spread icing on top.
- Then, place the other cake on top.
- Ice the entire cake until smooth.
- Roll out purple fondant and spread it over the iced cake. Smooth it out and cut off excess around the base with a pizza cutter. Keep aside.
- Roll out purple fondant and cut out hearts using a heart shaped cookie cutter.
- Use a knife to cut this heart in half.
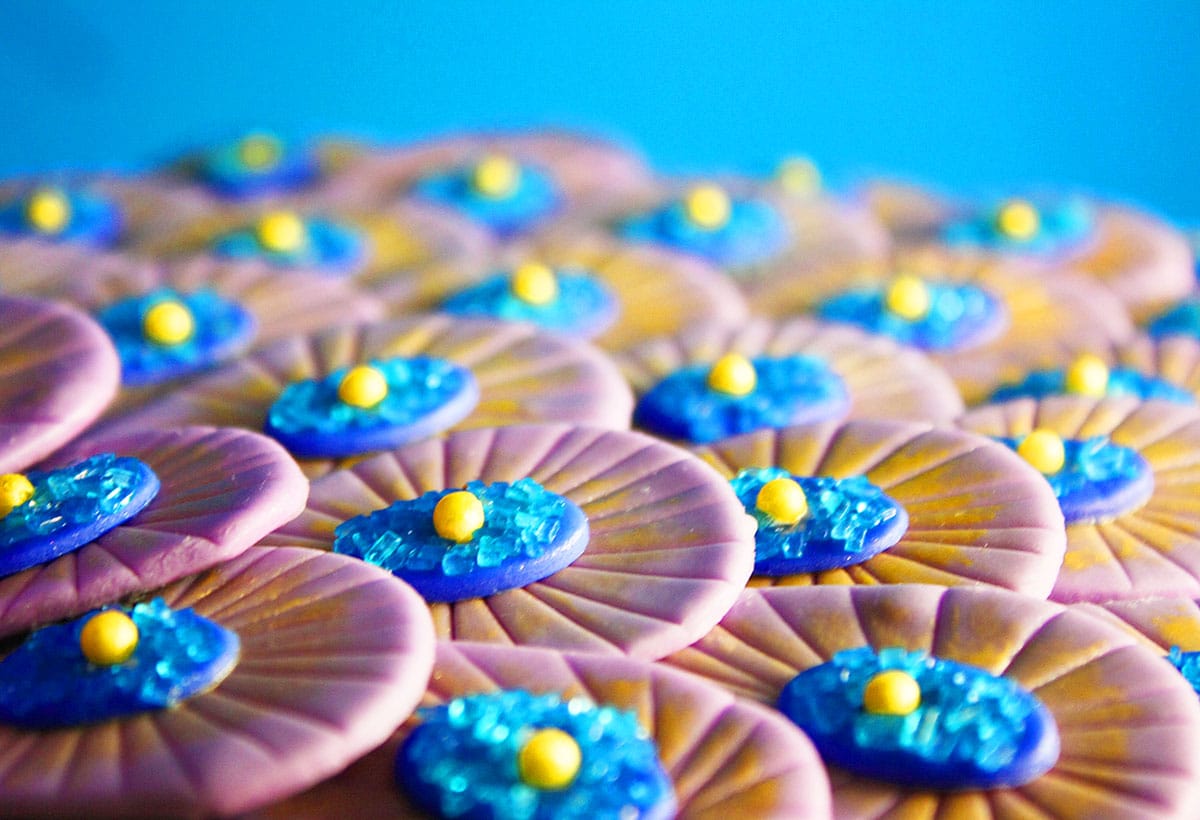
- Cut out the jagged ends with a knife and use the sides of the knife to smooth out the ends. These will be the feathers of your peacock.
- Press the knife gently onto these feathers to create a pattern.
- Use a knife to cut off the pointy ends of these feathers.
- Now, mix some golden lustre dust with a few drops of vodka or clear vanilla extract.
- Use a paintbrush to paint only the centers of these feathers.
- Start painting in the center and then paint outwards.
- Let these feathers dry.
- Use a small oval cutter to cut out blue fondant ovals and stick them in the center of the feathers with a little water. You can use corn syrup or royal icing to stick them too.
- Brush some water on top of the blue ovals and sprinkle some blue sanding sugar.
- Once the sanding sugar sticks to the blue ovals, brush away all the excess sugar.
- Use 50/50 (half gum paste- half fondant combination) to make the face and body of the peacock. There is no easy way to do this. You would have to mold it with your hands as if you are playing with play-doh. Next time, I am going to make the shape out of rice krispie treats and then cover it in fondant, which will be easier.
- Stick two feathers on either sides to create wings.
- Stick a cluster of golden stamens on top of the head.
- Mold some white fondant into a beak and stick it in position.
- Paint the beak golden.
- Allow this body to dry completely. It took 2-3 days for me.
- Now, stick the feathers on top of the fondant-covered cake with buttercream icing.
- Place the cake on a large cake board.
- Stick the body on the side of the cake with royal icing or melted chocolate.
- Roll out a long purple “snake” and wrap it around the base of the cake to give it a nice, refined look.
- Stick some golden edible pearls on the feathers and around the base of the cake.
- Prepare some more golden paint and paint lightly along the sides of the cake as well as the body. This gives the entire cake a nice shine.
Notes
- Read all my tips above.
- Leftovers can be stored in a sealed container in the fridge for up to 3 days.
Nutrition
An automated tool is used to calculate the nutritional information. As such, I cannot guarantee the accuracy of the nutritional information provided for any recipe on this site.
Leave a Reply