Learn how to pipe cake borders with easy buttercream frosting. Use various nozzles to make simple designs to cover edges (shells, ruffles, dots or pearls, ribbons, stars and more).
Want to Save This Recipe?
Enter your email & I'll send it to your inbox. Plus, get great new recipes from me every week!
By submitting this form, you consent to receive emails from CakeWhiz
Sharing my baking tips and cake decorating tricks with all of you you is something that brings me a lot of joy. When I first started cake decorating, I practiced by piping on a sheet of wax paper and then wiping it off and starting over and over again. This allowed me to learn how to use different piping tips (nozzles) and how much pressure I need to apply, how to keep my hand steady and how different wrist movements can yield different designs.
Jump to:
Supplies and key ingredients
- Frosting- Buttercream is always a favorite, but you can use any of your favorite recipes as long as it is stable.
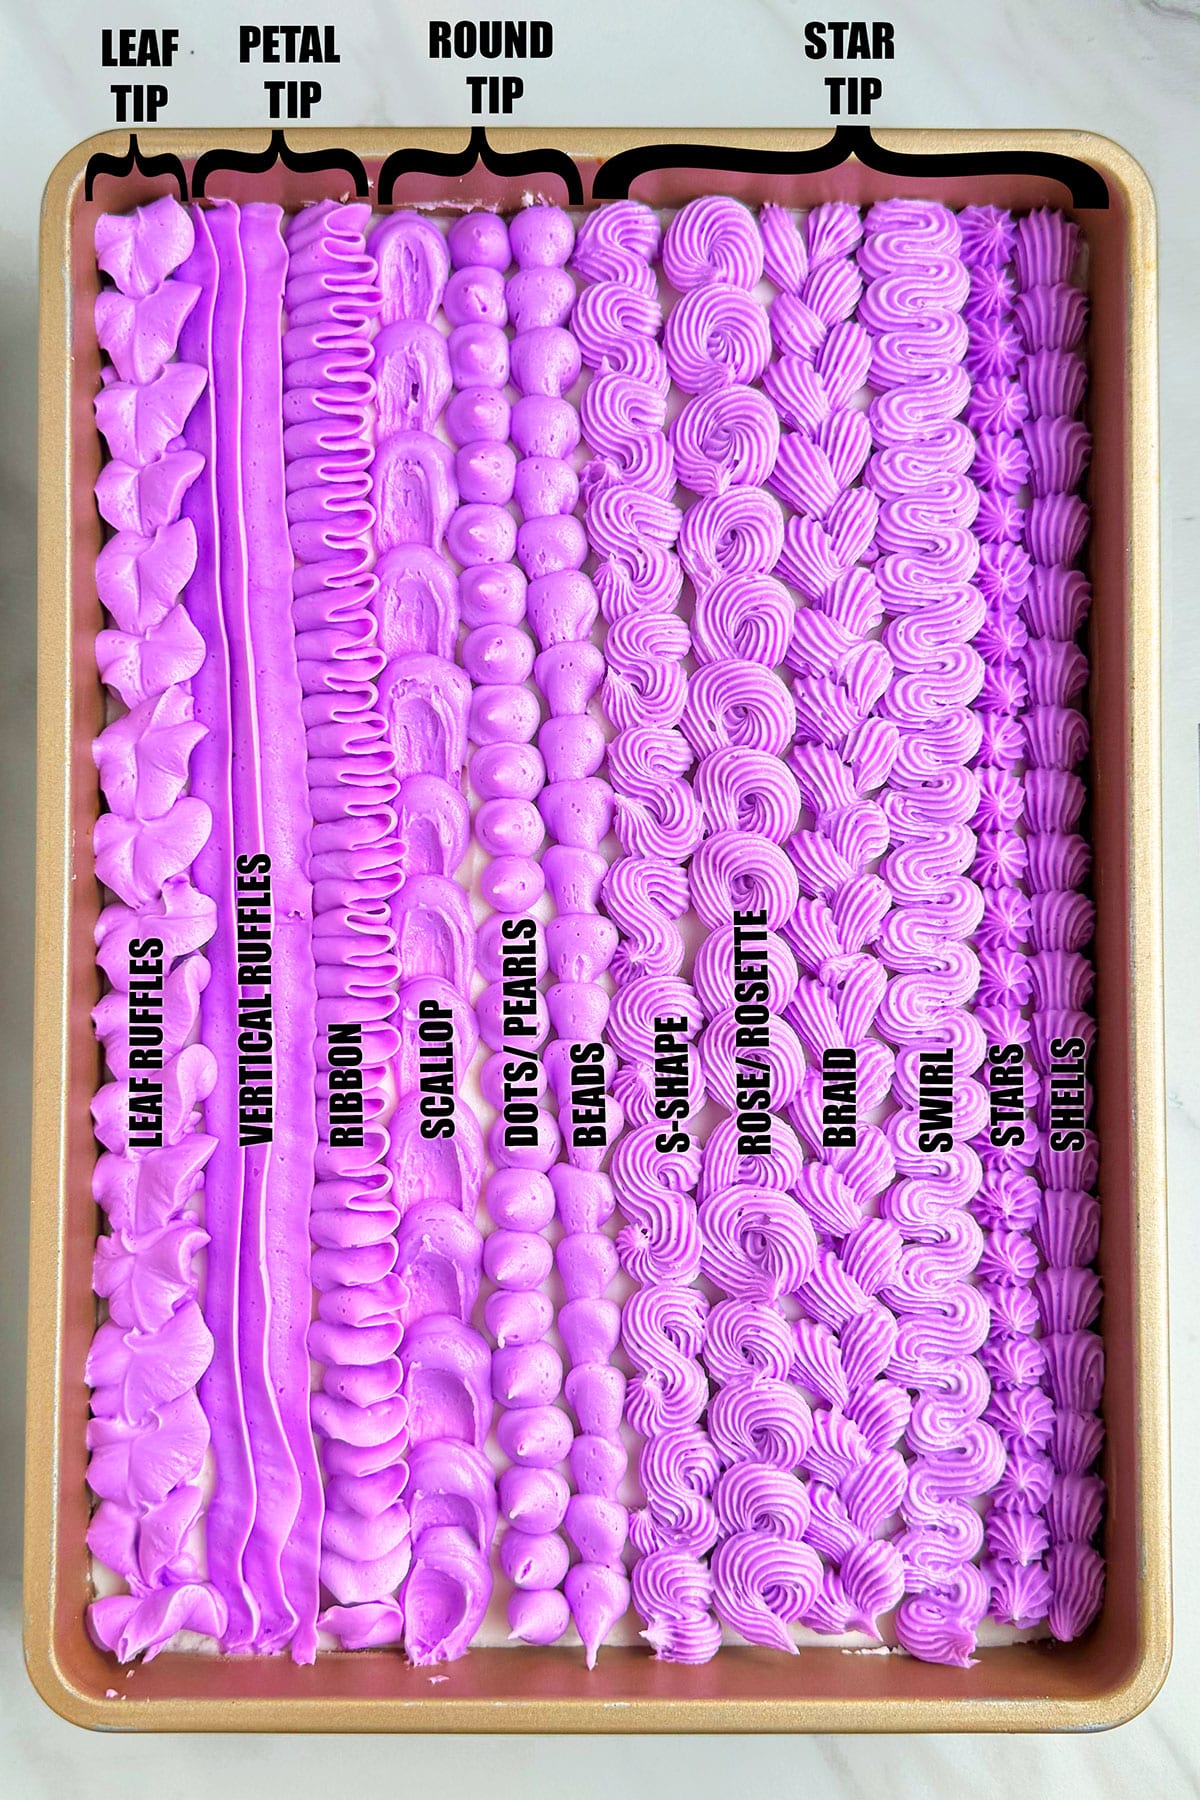
- Piping tips or nozzles- Use Wilton tip 21, 32, 1M, 4B, 2D (star tips). Use 12, 1A (round tips). Use 352, 366 (leaf tips). Use 103, 104 (petal tips).
- Couplers- This is used to secure the piping tip to the piping bag.
- Piping bags- There are various options available from disposable to reusable.
- Spatula or spoon- To scoop icing from bowl into piping bags.
- Gel food coloring- This is best compared to liquid, because it won't make your frosting runny.
- Rubber bands- Use this to secure the end of the piping bags and keep the the icing from oozing out as you are piping and squeezing the bag.
How to pipe cake borders with buttercream frosting (icing)?
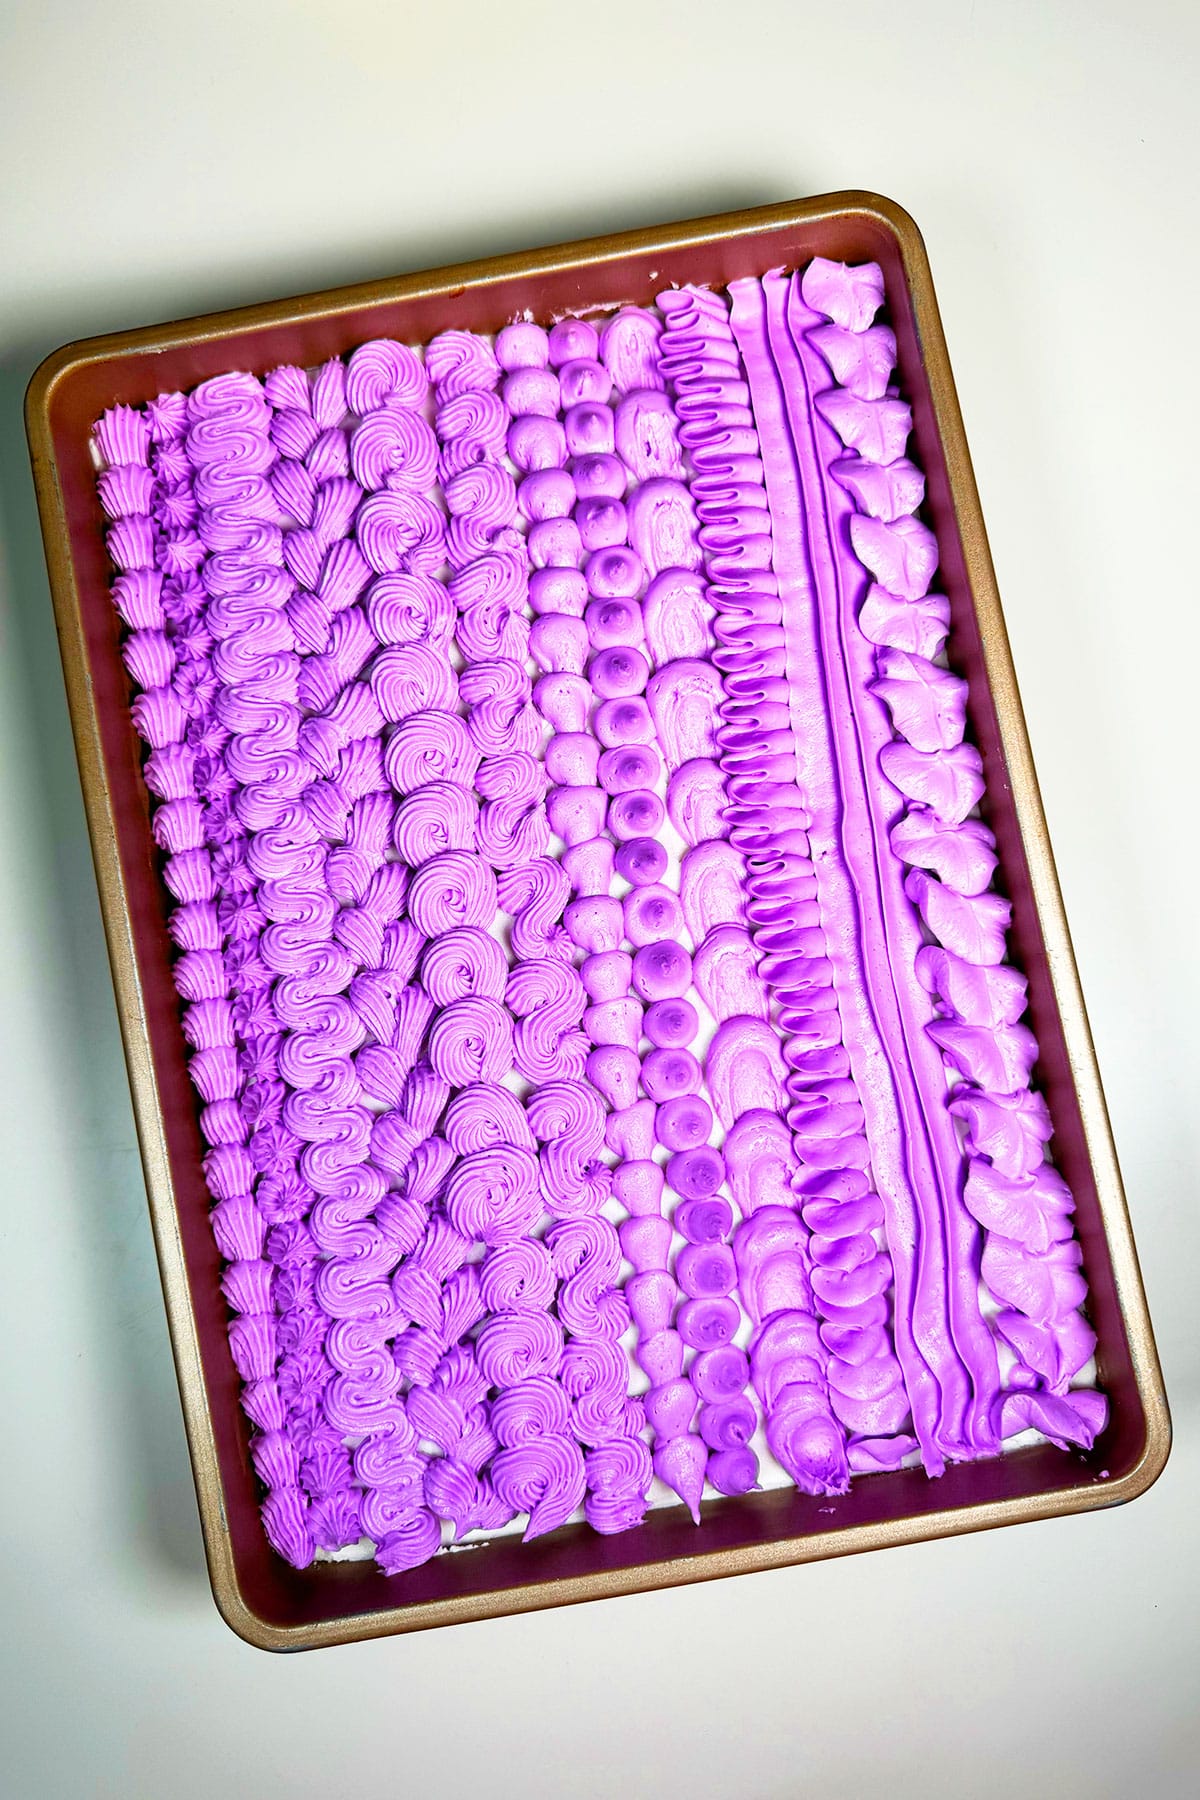
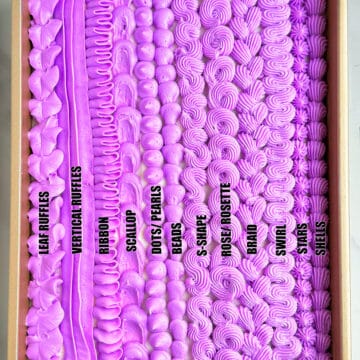
Ruffles
For leaf ruffles, use leaf tip (Tip 352 or 366). Hold the bag at a 45 degree angle. Squeeze bag and allow the icing to heap up a bit and then and then gently pull away to the right, leaving behind a single leaf. Pipe another leaf starting from the end of this leaf you just made. Continue doing this until you have a complete piped border.
For vertical ruffles, use petal tip (Tip 103 or 104). Hold the bag at a 45 degree angle. Squeeze bag and allow the icing to release and then glide your hand to the right while continuing to squeeze until you have a complete piped border. You can leave this single ruffle as is or pipe a few additional rows of ruffles on top of this one you just made to make a bigger impact.
Ribbon
Use petal tip (Tip 103 or 104). Hold the piping bag at a 45 degree angle. Squeeze bag and allow the icing to release and then do an "up and down" motion with your hands, while continuing to keep the same pressure on the icing bag. Continue doing this until you have a complete border.
Scallop
This specific design is made with a combination of the round tip (Tip 12, 1A) plus the back of a spoon. Hold the piping bag at a 90 degree angle. Squeeze bag and allow the icing to heap up a bit and then and then gently pull away upwards. Use the back of a small spoon to press this dot and gently glide your hand to the right, leaving behind a single scallop design. Continue doing this until you have a complete border.
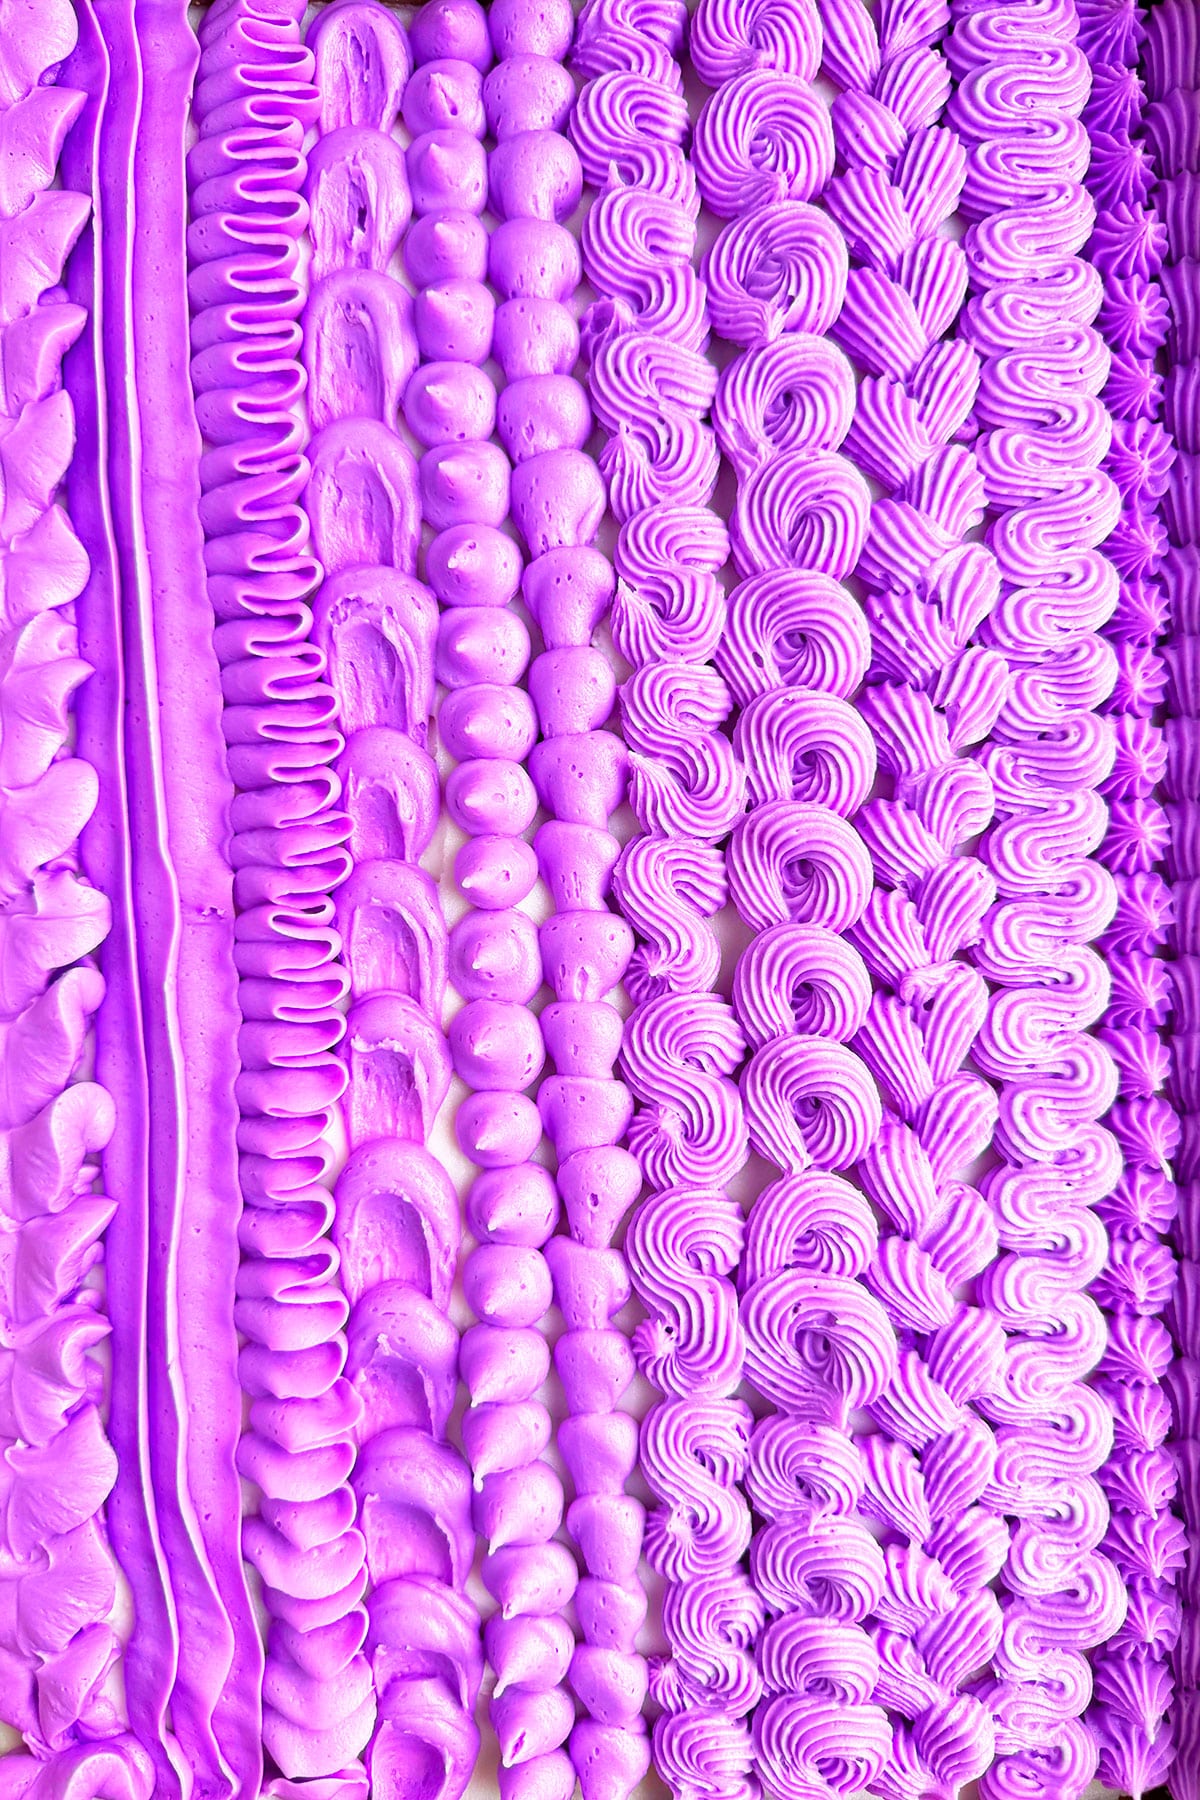
Dots or Pearls
Use round tip (Tip 12 or 1A). Hold the piping bag at a 90 degree angle. Squeeze bag and allow the icing to heap up a bit and then and then gently pull away upwards. This will leave behind a sharp point. Moisten your index finger with water and gently tap down that point. Continue doing this until you have a complete border.
Beads
Use round tip (Tip 12 or 1A). Hold the piping bag at a 45 degree angle. Squeeze bag and allow the icing to heap up a bit and then and then gently pull away to the right, leaving behind a single bead. Pipe another bead starting from the end of this bead you just made. Continue doing this until you have a complete border.
S-Shape
Use star tips (Tip 21, 32, 1M, 4B or 2D). Hold the piping bag at a 90 degree angle and pipe an "S" shape. Continue piping these "S" shapes until you have a complete border.
Rosette or Rose
Use star tips (Tip 21, 32, 1M, 4B or 2D). For smaller rosettes, use the smaller star tips and for the larger roses, use the bigger star tips. Hold the piping bag at a 90 degree angle. Squeeze bag and allow the icing to release and then move your hand clockwise in a full continuous circle until you have a singe rose. Continue doing this until you have a complete border.
Braid
Use star tips (Tip 21, 32, 1M, 4B or 2D). Hold piping bag at a 90 degree angle. Squeeze bag and allow the icing to heap up a bit and then and then gently pull up. Squeeze bag again above this shell you made and do the same this but this time, gently pull down. Continue doing this until you have a complete border.
Swirl
Use star tips (Tip 21, 32, 1M, 4B or 2D). Hold piping bag at a 45 degree angle. Squeeze bag and allow the icing to release and then do an "up and down" motion with your hands, while continuing to keep the same pressure on the icing bag. Continue doing this until you have a complete border.
Stars
Use star tips (Tip 21, 32, 1M, 4B or 2D). Hold the piping bag at a 90 degree angle. Squeeze bag and allow the icing to heap up a bit and then and then gently pull away upwards. Continue doing this until you have a complete border.
Shells
Use star tips (Tip 21, 32, 1M, 4B or 2D). Hold the piping bag at a 45 degree angle. Squeeze bag and allow the icing to heap up a bit and then and then gently pull away to the right, leaving behind a single shell. Pipe another shell starting from the end of this one you just made. Continue doing this until you have a complete border.
Tips and techniques
- Use medium consistency icing- Because if your icing is too runny or soft, the design won't be proper and it will look messy at the end. Thicken your icing by mixing in more powdered sugar.
- Do more than just borders- Use on the top outer edges of the cake as well. Take it a step further and you can decorate a full cake with the same technique as well. Check out this post on How to Make Rosette Cake (Buttercream). It's decorated entirely with piped rosettes and this Pink Ombre Mother's Day Cake is piped fully with large roses.
- Avoid using icings with chunks- Such as chopped nuts, shredded coconut, or mini chocolate chips. This clogs the nozzles and make it difficult to pipe properly.
- Use a nozzle proportionate to the size of your cake- For example, a smaller round tip will yield a smaller pearl border for a mini cake, but a bigger round tip will yield a bigger pearl border if your cake is large.
Variations
- Add color- Buttercream icing starts off white or off-white, but you can use gel food coloring to tint frosting and create any shade you like.
- Get creative- Try other piping tips (nozzles) and other wrist movements to create even more beautiful designs.
- Do more than cakes- Apply these piping techniques to decorate cookies such as these Easy Monster Cookies (Candy Corn Cookies) where I piped shells. You can even pipe ruffles on brownies and bars. I think that would look lovely on these Carrot Brownies.
- Try other frostings instead of buttercream icing- Such as this Best Cream Cheese Frosting (Stable) that goes great with this Moist Carrot Cake or Chocolate Sour Cream Frosting (Cocoa Powder) that tastes amazing with this Yellow Sheet Cake.
Recipe FAQs
It's probably pulling away from the cake when you try piping and that happens when your icing is too thick. Thin it out a bit by mixing in milk or water. That will give it enough moisture to adhere to the cake.
This depends on the design you would like for your cake. Use Wilton tip 21, 32, 1M, 4B, 2D (star tips). This is great for piping roses, rosettes, stars, shells, swirls). Use 12, 1A (round tips) for dots/ pearls, beads. Use 352, 366 (leaf tips) for ruffles. Use 103, 104 (petal tips) for ruffles too as well as ribbons.
Storage of piped cake
- Refrigerate- Store in a sealed container for up to 1 week.
- Room temperature- This should be kept in the fridge since it has dairy ingredients, but it can sit out 2-3 hours.
- Freeze- Store in a sealed container for up to 1 month. Thaw in the refrigerator and whip to fluff up again.
More cake decorating tips
- How to Color Fondant
- How to Make Modeling Chocolate (Candy Clay)
- How to Make Naked Cake
- How to Male Gold Cake (With Edible Spray)
Recipe
How to Pipe Cake Borders (Buttercream)
Video
Want to Save This Recipe?
Enter your email & I'll send it to your inbox. Plus, get great new recipes from me every week!
By submitting this form, you consent to receive emails from CakeWhiz
Ingredients
- 1 Yellow sheet cake
- 2 cups American buttercream frosting Colored purple with gel food coloring
Instructions
- Bake cake and allow it to cool completely.
- While the cake is baking and cooling, prepare the icing.
- Use a spatula to spread a thin coat of icing on top of the cake.
- Fill a piping bag with icing and attach the coupler and relevant nozzle to pipe the design of your choice.
- For leaf ruffles, use leaf tip (Tip 352 or 366). Hold the bag at a 45 degree angle. Squeeze bag and allow the icing to heap up a bit and then and then gently pull away to the right, leaving behind a single leaf. Pipe another leaf starting from the end of this leaf you just made. Continue doing this until you have a complete piped border. For vertical ruffles, use petal tip (Tip 103 or 104). Hold the bag at a 45 degree angle. Squeeze bag and allow the icing to release and then glide your hand to the right while continuing to squeeze until you have a complete piped border. You can leave this single ruffle as is or pipe a few additional rows of ruffles on top of this one you just made to make a bigger impact.
- Ribbon- Use petal tip (Tip 103 or 104). Hold the piping bag at a 45 degree angle. Squeeze bag and allow the icing to release and then do an "up and down" motion with your hands, while continuing to keep the same pressure on the icing bag. Continue doing this until you have a complete border.
- Scallop- This specific design is made with a combination of the round tip (Tip 12, 1A) plus the back of a spoon. Hold the piping bag at a 90 degree angle. Squeeze bag and allow the icing to heap up a bit and then and then gently pull away upwards. Use the back of a small spoon to press this dot and gently glide your hand to the right, leaving behind a single scallop design. Continue doing this until you have a complete border.
- Dots or pearls- Use round tip (Tip 12 or 1A). Hold the piping bag at a 90 degree angle. Squeeze bag and allow the icing to heap up a bit and then and then gently pull away upwards. This will leave behind a sharp point. Moisten your index finger with water and gently tap down that point. Continue doing this until you have a complete border.
- Beads- Use round tip (Tip 12 or 1A). Hold the piping bag at a 45 degree angle. Squeeze bag and allow the icing to heap up a bit and then and then gently pull away to the right, leaving behind a single bead. Pipe another bead starting from the end of this bead you just made. Continue doing this until you have a complete border.
- S-Shape- Use star tips (Tip 21, 32, 1M, 4B or 2D). Hold the piping bag at a 90 degree angle and pipe an "S" shape. Continue piping these "S" shapes until you have a complete border.
- Rosette or Rose- Use star tips (Tip 21, 32, 1M, 4B or 2D). For smaller rosettes, use the smaller star tips and for the larger roses, use the bigger star tips. Hold the piping bag at a 90 degree angle. Squeeze bag and allow the icing to release and then move your hand clockwise in a full continuous circle until you have a singe rose. Continue doing this until you have a complete border.
- Braid- Use star tips (Tip 21, 32, 1M, 4B or 2D). Hold piping bag at a 90 degree angle. Squeeze bag and allow the icing to heap up a bit and then and then gently pull up. Squeeze bag again above this shell you made and do the same this but this time, gently pull down. Continue doing this until you have a complete border.
- Swirls- Use star tips (Tip 21, 32, 1M, 4B or 2D). Hold piping bag at a 45 degree angle. Squeeze bag and allow the icing to release and then do an "up and down" motion with your hands, while continuing to keep the same pressure on the icing bag. Continue doing this until you have a complete border.
- Stars- Use star tips (Tip 21, 32, 1M, 4B or 2D). Hold the piping bag at a 90 degree angle. Squeeze bag and allow the icing to heap up a bit and then and then gently pull away upwards. Continue doing this until you have a complete border.
- Shells- Use star tips (Tip 21, 32, 1M, 4B or 2D). Hold the piping bag at a 45 degree angle. Squeeze bag and allow the icing to heap up a bit and then and then gently pull away to the right, leaving behind a single shell. Pipe another shell starting from the end of this one you just made. Continue doing this until you have a complete border.
Notes
- I piped on top of a sheet cake just to make it easier for me to show you the various designs. You can easily apply these skills to a round cake.
- Make sure your icing has a medium consistency.
- Use gel food colors instead of liquid food colors to tint icing.
- Practice piping on a sheet of wax paper first before piping on the cake.
- Read additional tips and variations above.
Nutrition
An automated tool is used to calculate the nutritional information. As such, I cannot guarantee the accuracy of the nutritional information provided for any recipe on this site.

Leave a Reply