Use this step by step cake decorating tutorial to learn how to make an easy naked cake and semi naked cake with frosting, fruits and flowers. Requires simple ingredients. This design is perfect for beginners and ideal for weddings, birthday parties and other special events.

Want to Save This Recipe?
Enter your email & I'll send it to your inbox. Plus, get great new recipes from me every week!
By submitting this form, you consent to receive emails from CakeWhiz
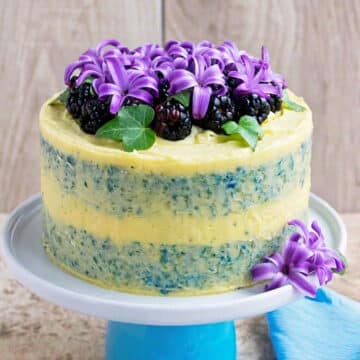
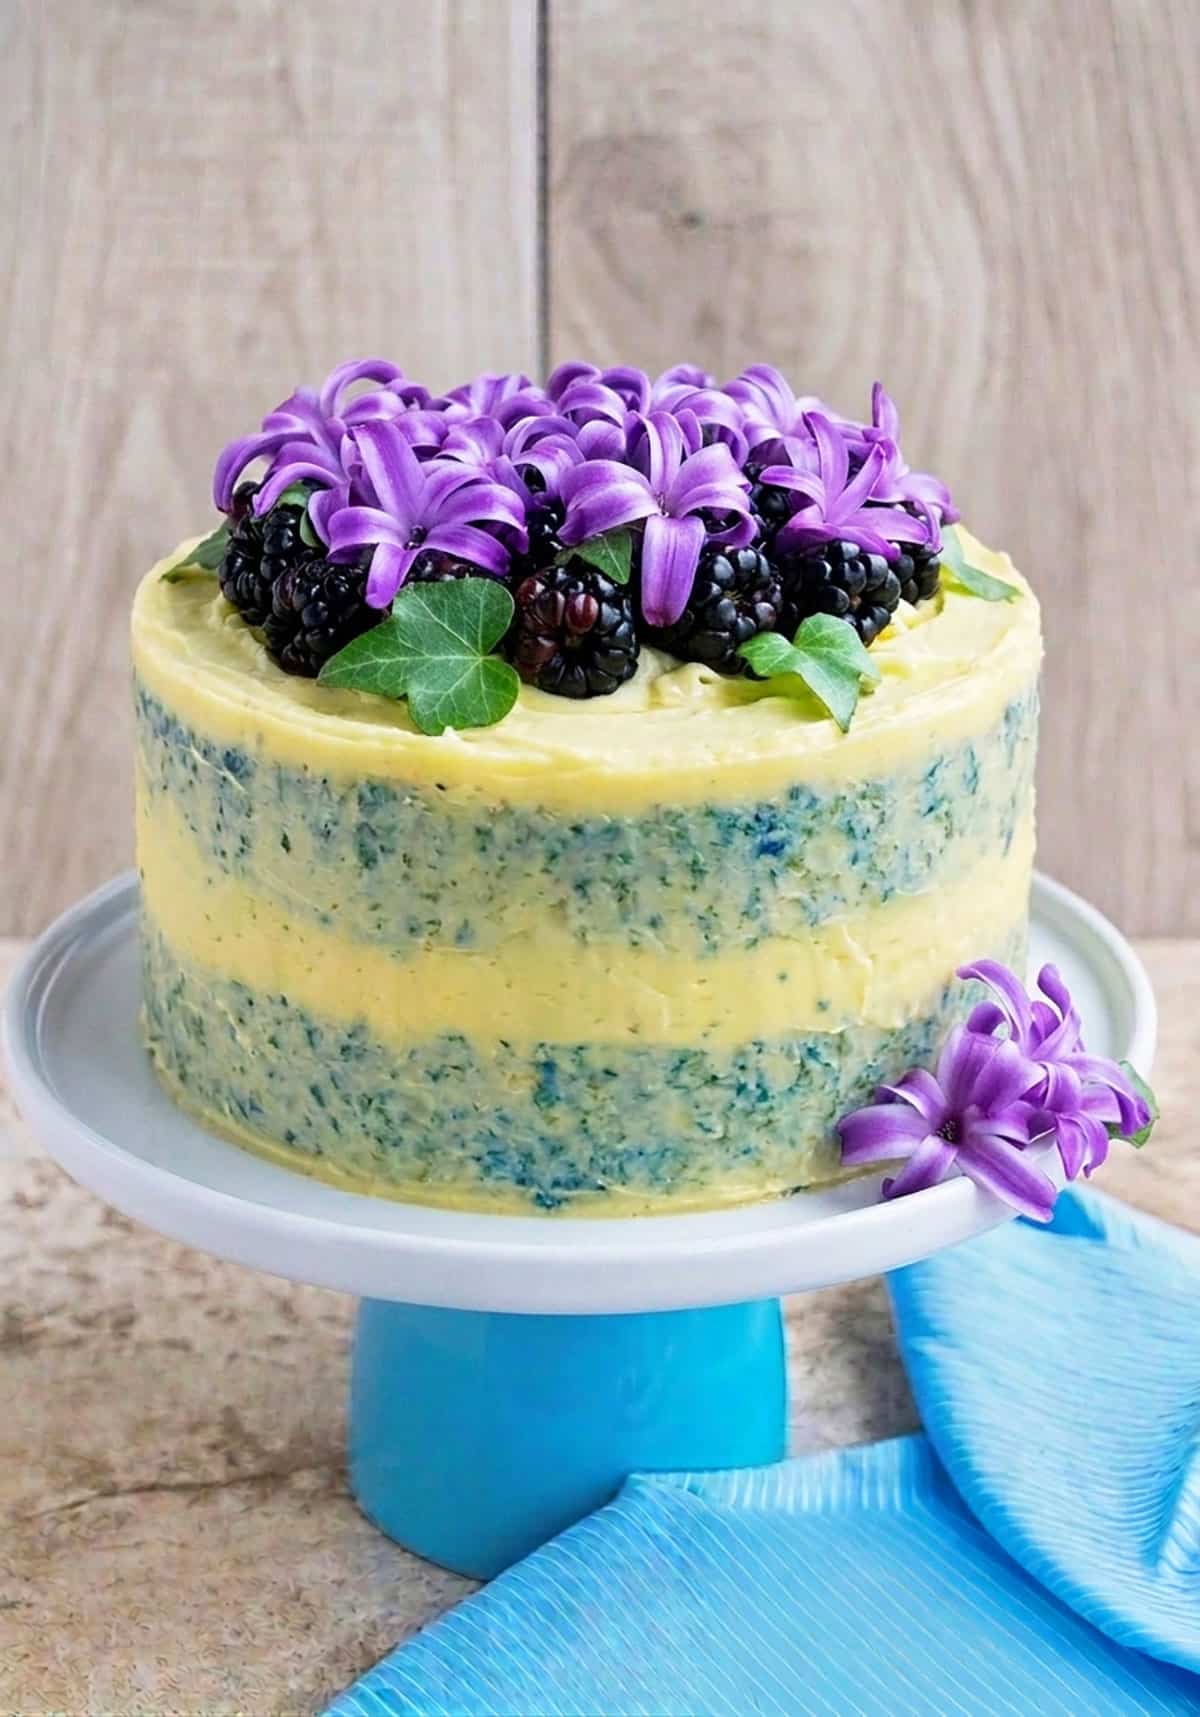
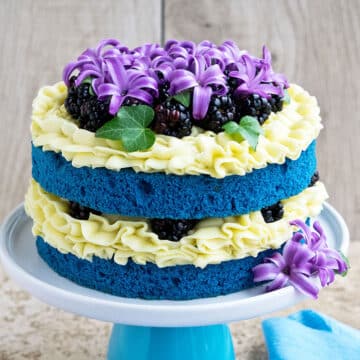
I think these types of cakes are so much easier to decorate than fondant ones and they are still stunning just like my Sunflower Cake (Peeps Marshmallows), Strawberry Shortcake Cake (Cake Mix), or this Chocolate Tree Cake. Today, I made a two layer blue velvet cake with with yellow buttercream icing and decorated with fresh blackberries and flowers. This is a very forgiving cake design, where your frosting does not need to be piped or iced smoothly and perfectly. A few flaws actually add to its rustic charm.
Jump to:
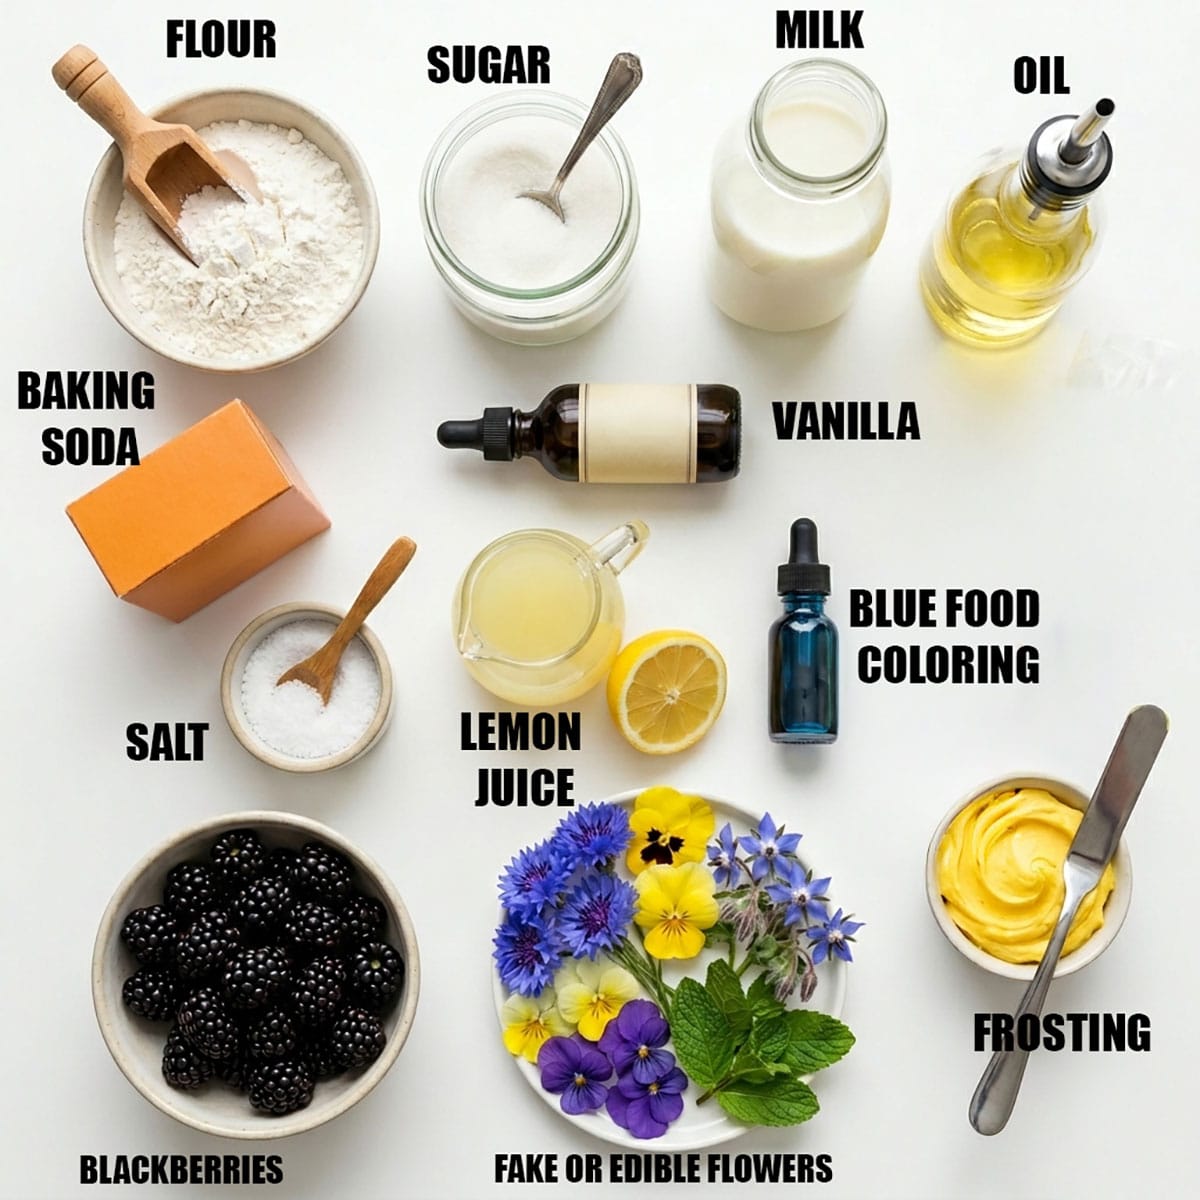
Key ingredients
- Flour- All-purpose actually works best for this particular cake.
- Sugar- You just need regular granulated for this recipe.
- Milk- The higher the fat content, the richer and creamier the dessert overall.
- Oil- Brings added moisture for a nice texture.
- Baking soda- This acts as a rising agent for a fluffier cake.
- Vanilla- Adds a complimentary aroma and flavor.
- Salt- Helps to add flavor and balance out sweetness.
- Lemon juice- Brings in a slight tanginess to the recipe.
- Blue food coloring- I always use gel food coloring for best results.
- Blackberries- Make sure they are ripe, fresh, and sweet.
- Flowers- You can either use fake or edible fresh flowers, depending on the look you desire.
- Frosting- I used my favorite buttercream, but you are welcome to choose whatever sounds best for the occasion.
Variations
- Multiple layers and tiers are possible- My cake only has one tier but you can make it as tall as you like with multiple tiers. Just use dowels or bubble tea straws for support to keep it from leaning or collapsing.
- Make a rustic "unfrosted" wedding cake for Fall and Thanksgiving season - For this, I would recommend making three tiers, gradually increasing in size from top to bottom. Use Chocolate Cake with Chocolate Sour Cream Frosting and follow this tutorial for my Rustic Cake (Tiered Cake). You don't have to ice the cakes fully which would allow the cake layers to peek through.
- Try a fun rainbow variation- For this, make my Easy Rainbow Cake (With Cake Mix) and decorate with mini Rainbow Cereal Balls and lots of sprinkles and pair with Funfetti Frosting (Sprinkle Buttercream). You can also use this Cake Batter Dip (Funfetti Dip) as a filling. This would be a great for kids birthday parties.
- Try other frosting flavors- Such as Brown Sugar Frosting (So Fluffy), Almond Buttercream Frosting (Easy), Caramel Frosting (3 Ingredients) or Blackberry Buttercream Frosting.
- Add a thick filling- Such as Dulce de Leche, Homemade Caramel Sauce, Strawberry Jam, preserves, Homemade Vanilla Custard, Vegan Chocolate Pudding, or Homemade Vanilla Pudding.
- Add a cake drip- Using Chocolate Ganache (2 Ingredients) or just melted white chocolate (dark, semisweet or white).
How to make an easy naked cake and semi naked cake recipe from scratch?
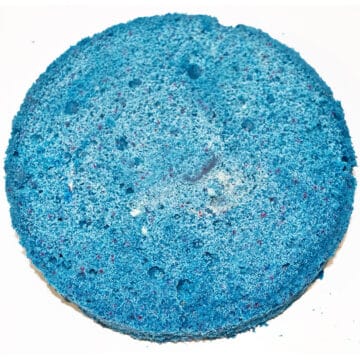
1. Bake cakes- Allow them to cool. Trim the sides and dome on top.
2. Pipe to cover- The top of the first cake.
3. Add on- Fresh blackberries.
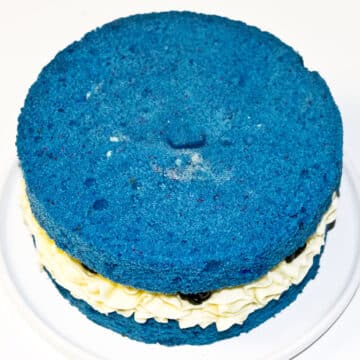
4. Top- With the second cake layer.
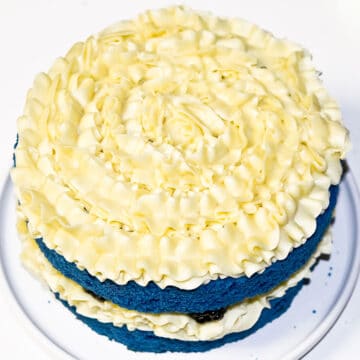
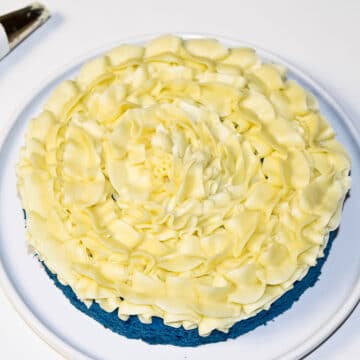
5. Frost- The top of the second cake layer.
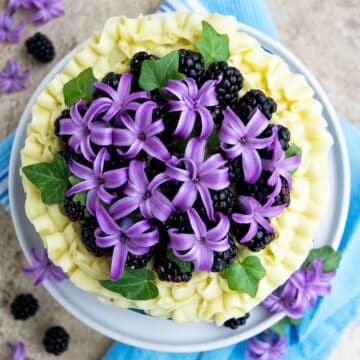
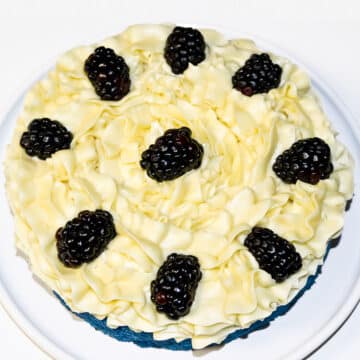
6. Decorate top- With flowers, leaves and fruits and the true naked cake design is now ready.
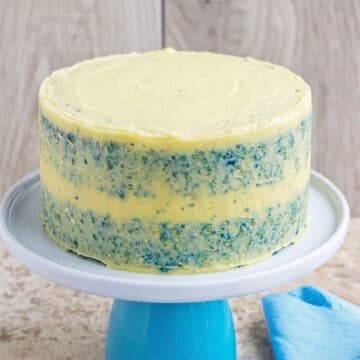
7. If you want to make a semi naked cake- Do not add the decorations yet and instead use a spatula to spread a thin layer of frosting along the sides and top of the cake.
8. Finally- Decorate the top with berries, flowers and leaves.
Decoration ideas
- Flowers- These can be fresh or fake. If using fresh, make sure they are food safe and edible. You can also make Fondant Flowers or Royal Icing Flower (Sugar Flowers) or Wafer Paper Flowers or even Buttercream Flowers (With Russian Piping Tips).
- Fruits- Such as fresh strawberries, raspberries, blueberries, blackberries, oranges, kiwis. be sure to wash and pat them dry. You can also use dried fruits or even these Candied Orange Slices and Peels or Candied Sugared Cranberries.
- Candies- There are so many flavors, colors and shapes or candies in the market these days. Ferrero Rocher balls always look beautiful. You can also decorate with homemade candies like fudge and truffles such as.....LINKS
- Sprinkles- Use seasonal ones or any color or shape of your choice. You can even use my Homemade Sprinkles.
- Cookies- Can be homemade or store bough. Chop them up...use full size or mini sized ones. Some of my favorite cookies are....LINKS
- Frosting- Different colors, different flavors such as... LINKS
- Toppers- You can make these yourselves for special occasions like birthdays, graduations, weddings, using Marshmallow Fondant (MMF) or Modeling Chocolate (Candy Clay). You can even purchase them online, which are made from thick cardstock paper or acrylic or plastic.
Tips and techniques
- Use edible flowers and leaves- Flowers must be safe and non poisonous. Ask your florist if you are unsure.
- Use greased and floured pans- This prevents cake from sticking to the pan. I also like to place a round sheet of parchment paper at the base of the pan before pouring the batter.
- Use thick and stable frosting- Make sure not to use any frostings which are very thin and runny or too light and airy such as Chocolate Whipped Cream (3 Ingredients) or Chantilly Cream (Creme Chantilly) because they can start melting or deflating and dripping all over the cake.
- Make a dam for fillings- Such as jams and preserves or caramel sauce. Just be sure to make a buttercream dam first around the outer edge of the cake first and then fill the center to keep it from leaking along the sides.
- Even cake layers are important- Because it makes for a better presentation. Use a cake leveler to help you along.
- Proper support is important- Use dowels or bubble tea straws for support if you are making a tiered cake. If you don't do this, your cake will be very unstable and start leaning and can even collapse.
- Chill cakes- Make sure to chill your cakes before slicing them because this helps them from crumbling and making a mess. Make sure to also refrigerate your final decorated and assembled cake because that allows the frosting to firm up and the cake will hold its shape until you are ready to serve.
- Trim the sides and top of the cake- Many people skip this step but I like to do it for this design. Trimming the sides removes any the darker caramelized outer crust and exposes the inner light colored soft cake. Trimming the top ensure a flat cake with the removal of the dome.
Another semi frosted cake idea
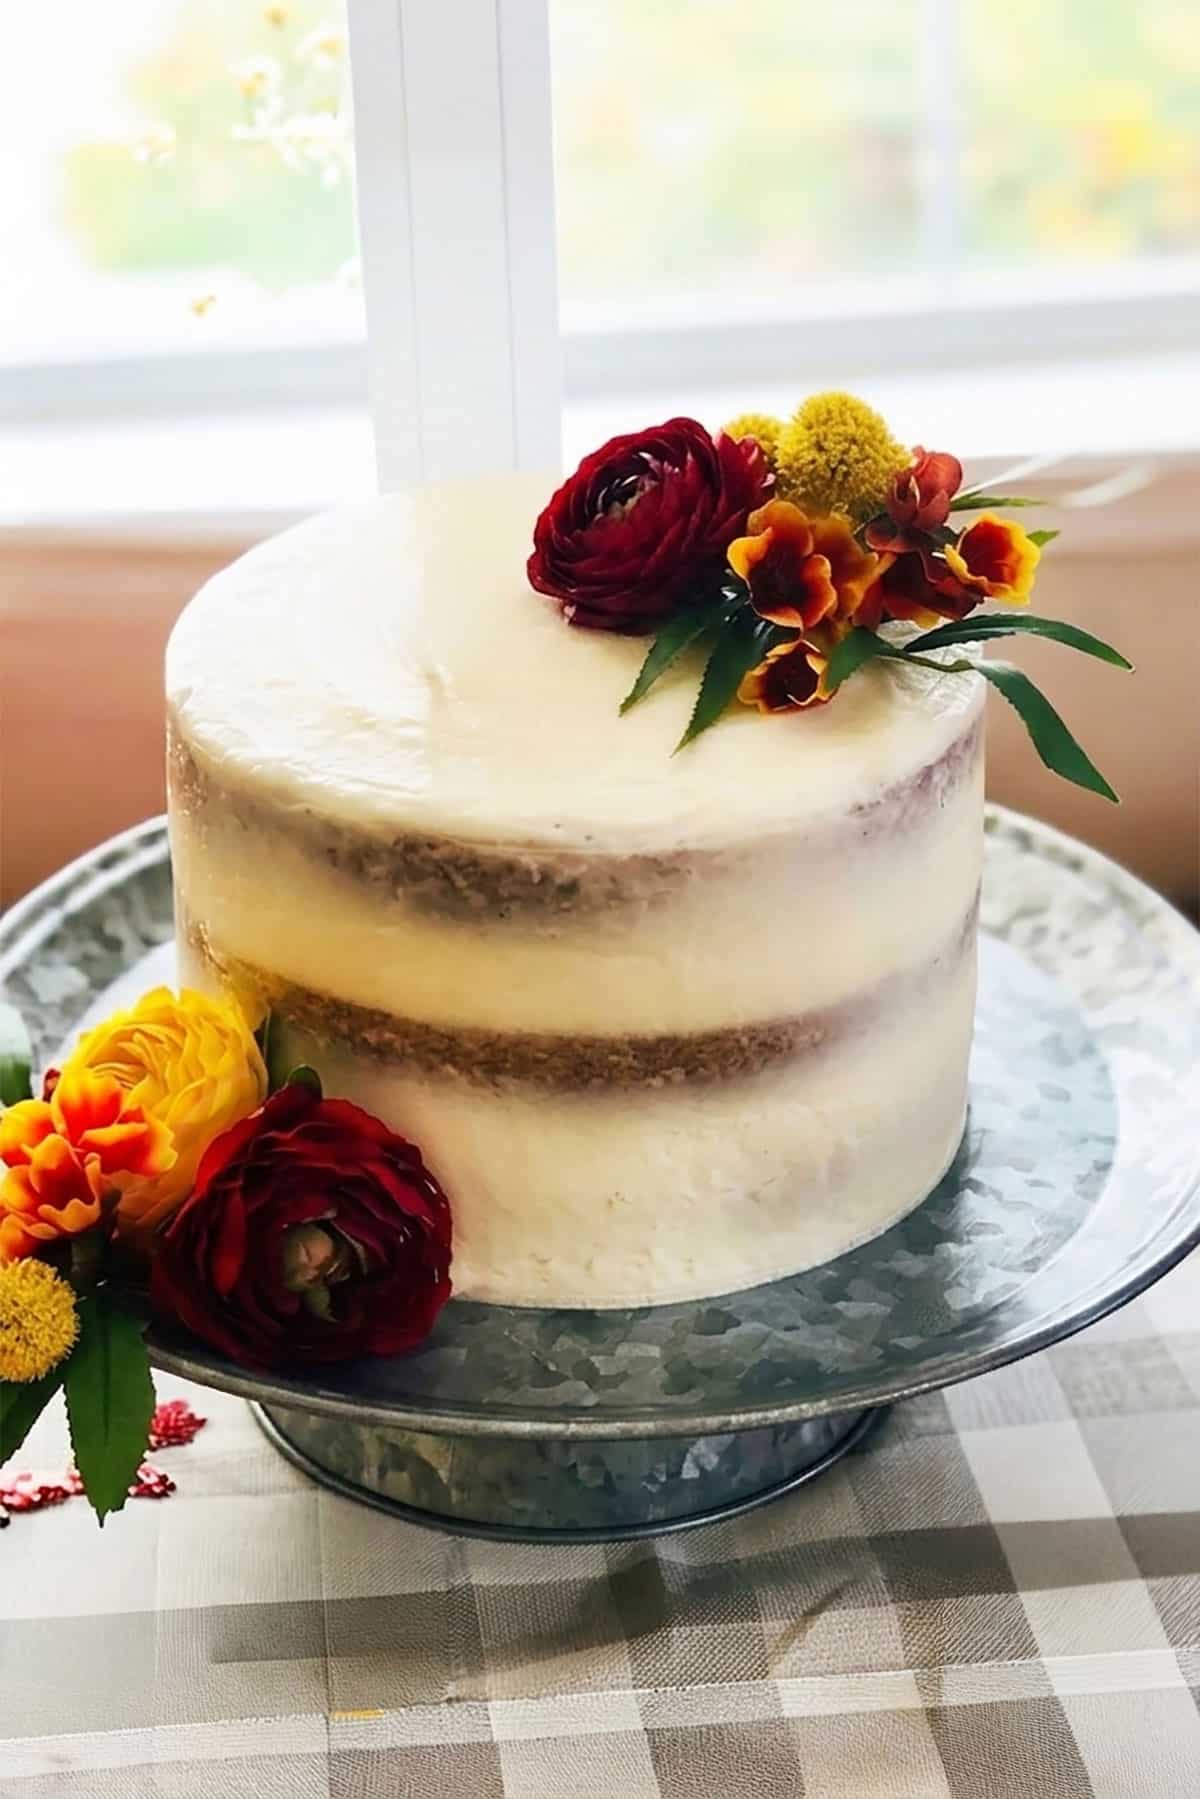
I made this one for a dear friend's rustic baby shower. It's more traditional and classic in appearance. This was a three layer Moist Lemon Cake (With Lemon Curd) and white Sour Cream Frosting. I left some space empty on the top for her to add her own topper. She loved it and that made me so happy.
Recipe FAQs
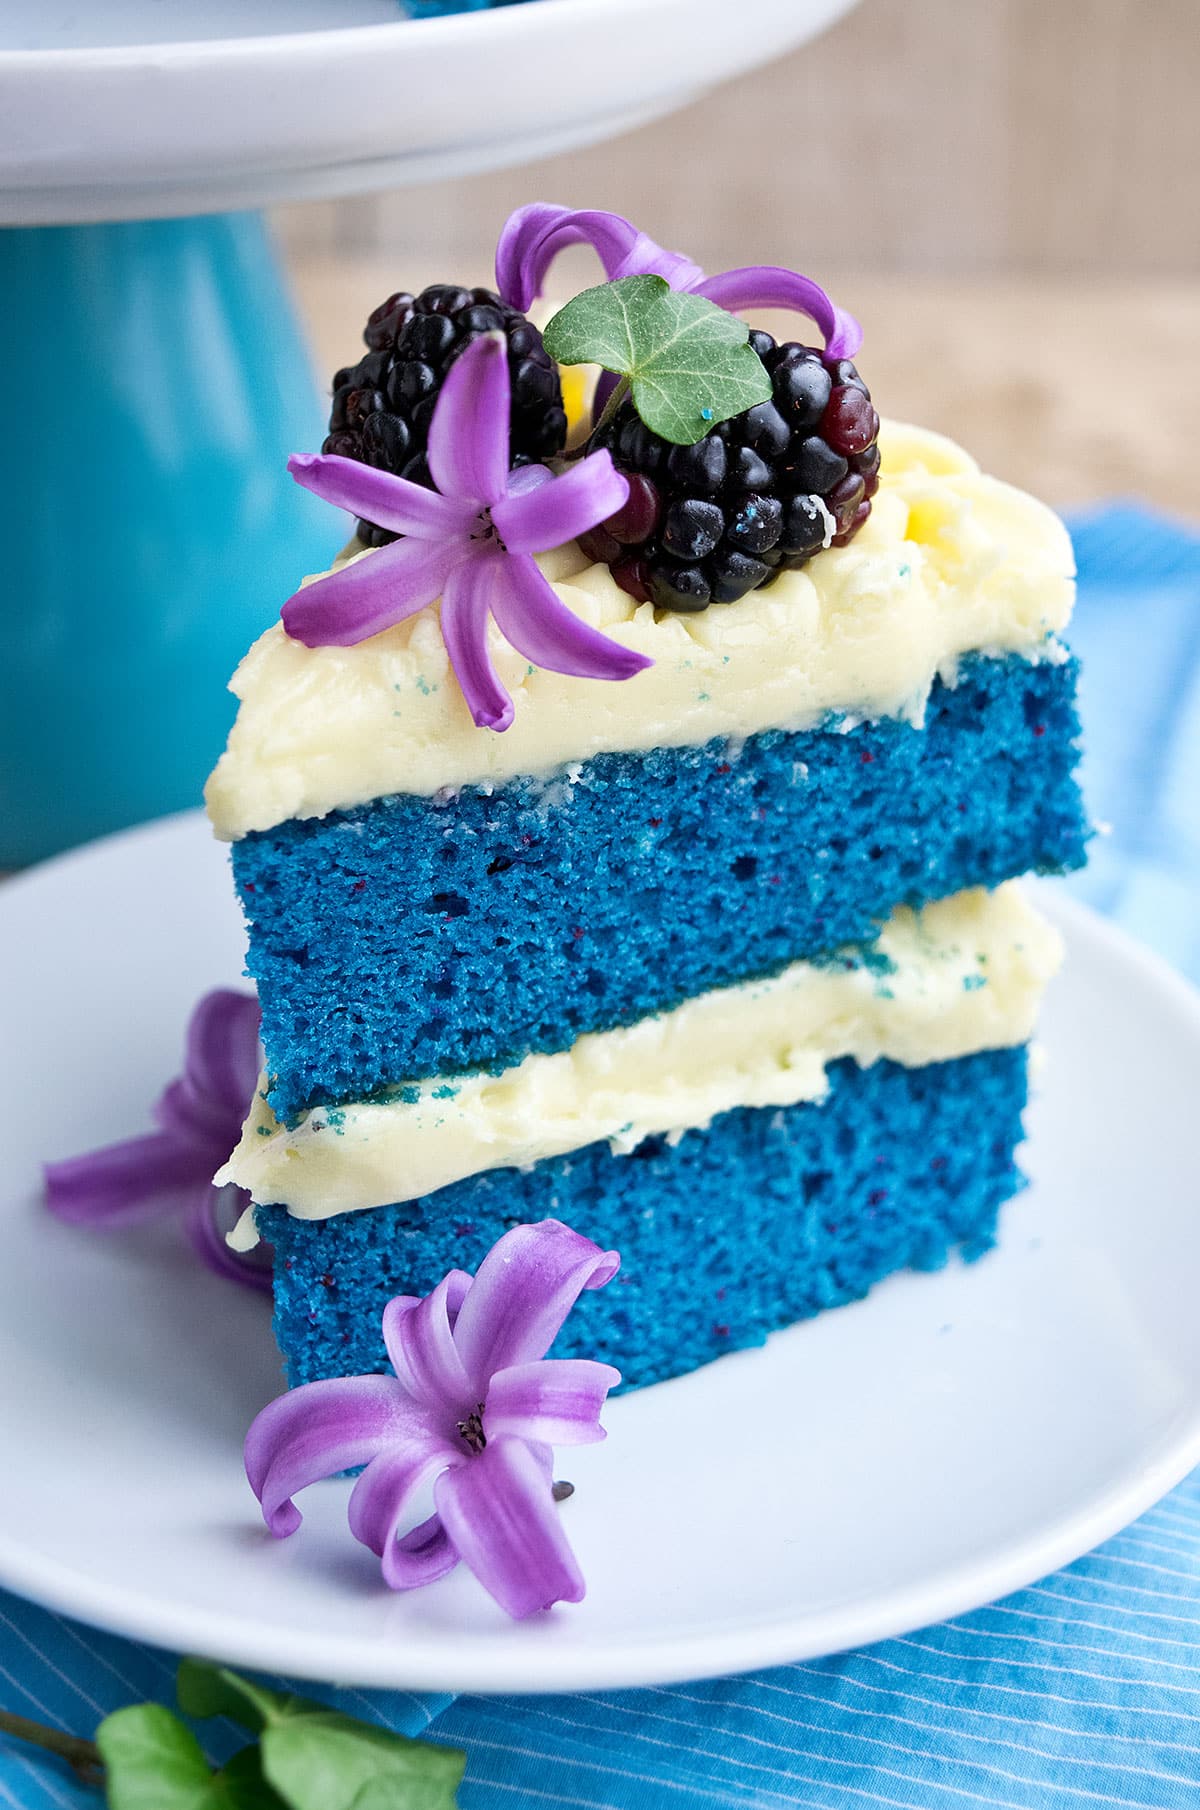
This is a layer cake in which the sides of the cake are fully exposed or partially exposed with just a thin layer of frosting. There are two types of such cakes:
1. Semi Naked or Half Dressed Cakes: These ones have very little frosting swiped all around the cake (similar to a "crumb coat").
2. True Naked Cakes: The sides of these ones have no frosting and the fillings and fully exposed.
For a semi naked design: Fill and stack your layers. Cover and chill this cake until firm. Then use a spatula to spread a thin coating of buttercream all around the sides and top of the cake until cake is peeking through.
For a true naked design: Fill a piping bag with frosting and attach a decorating tip with a wide opening such as Tip 1M, 4B, 1A. Hold the piping bag at a 90 degree angle on top of the cake and start piping from the outer edges of the cake to the inside of the cake. Place another cake on top of this frosting. Hold the piping bag at a 90 degree angle on top of the cake and start piping as before. Do not pipe the sides of the cake and leave them fully exposed.
Since the exterior of a this cake is exposed to air, it can start drying out. That's why I like to assemble these cakes only a couple of hours before serving. If you are still worried about the cake drying out, place bread slices around the cake and secure them with toothpicks. This prevents the moisture from leaving and the bread will dry out instead of the cake.
Some popular ones are pansies, roses, chamomile, marigolds, calendula, lavender. Talk to your local florist if you are unsure.
Storage
- Refrigerate- Store in a sealed container for up to 3 days.
- Freeze- This is not recommended because blackberries become watery upon thawing. However, you can freeze the cakes and frosting separately for up to 1 month. Then thaw out, frost, and decorate later.
- Make ahead- Make a day in advance and keep in an airtight container in the fridge. Or do the freezer method as outlined above.
- Room temperature- I don't recommend leaving these out more than 2-3 hours before putting in the fridge to preserve.
More homemade cakes
- Easy Chocolate Ore Cake (Layer Cake)
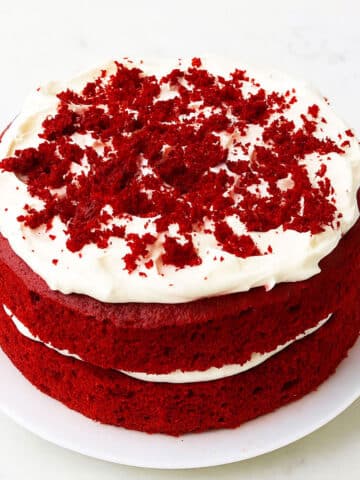
- Best Red Velvet Cake (Layer Cake)
- Apple Pie Cake (With Cake Mix)
- Easy Applesauce Cake (With Cake Mix)
- Easy Spice Cake (Chai Cake)
Recipe
Easy Naked Cake (And Semi Naked Cake)
Want to Save This Recipe?
Enter your email & I'll send it to your inbox. Plus, get great new recipes from me every week!
By submitting this form, you consent to receive emails from CakeWhiz
Ingredients
- 2¼ cups All-purpose flour
- 1¼ cups Granulated sugar
- 1½ cup Milk Preferably whole but 2% can be used. You can also use soy milk or almond milk.
- ¾ cup Oil
- 1 tablespoon Vanilla extract
- ¾ teaspoon Baking soda
- ⅛ teaspoon Salt
- 3 tablespoon Lemon juice
- Blue gel coloring
Decoration
- 4 cups American Buttercream Frosting Yellow color
- 1 cup Blackberries Fresh, Washed and patted dry
- Flowers and leaves Can be real/ edible or fake/artificial
Instructions
Bake The Cake:
- Add all milk, oil, vanilla extract and lemon juice in a mixing bowl. Mix everything until you have a pale and fluffy mixture.
- In a separate bowl, whisk together all the dry ingredients. Dump this dry mixture into the wet mixture.
- Add blue gel coloring and mix until just combined. DON’T over-mix!
- Pour the batter in two 8×2 greased and floured round cake pans.
- Bake at 350 degrees F for about 40 minutes or until an inserted toothpick in the center comes out clean.
- Allow cakes to cool to room temperature and then cover them in saran wrap and freeze them.
- When you are ready to assemble, remove cakes from the freezer and allow them to sit at room temperature for 15-20 minutes. Then, peel off the wax paper from the bottom of the cakes.
- Use a serrated knife to remove the domes and trim the sides of the cake.
- Place one cake on a cake stand or a serving dish.
- Fill a piping bag with yellow frosting and attach Tip 1M.
- Pipe a dam around the top of the cake. You can now fill the center of that dam with jam, if you like or you can just frost the inside in buttercream icing too (like I did).
- Place a few blackberries evenly around the top of all that buttercream.
- Place the second blue velvet cake on top of this layer of icing and blackberries.
- Press the top of your cake gently so that the 2 layers of cake stick together. Don't press too hard or else the icing and blackberries will shift and make a mess.
- Pipe frosting on top of your cake and you will end up will all these pretty ruffles.
- Decorate with blackberries and flowers and leaves and you are done.
- For a semi naked version, use a spatula to cover the sides and top of the cake in a thin layer of frosting. Then, decorate with blackberries and flowers and enjoy.
Notes
- If you are using real flowers, please make sure they are food safe and edible. Talk to your local florist if you are unsure. Some popular ones are pansies, roses, chamomile, marigolds, calendula, lavender.
- If you are using fake/ artificial flowers, be sure to wash them first and then pan them dry.
- Try other cake and frosting flavors.
- For best appearance, trim the dome and sides of the cake to create even layers.
- Do not over bake because it will make the cake very dry.
- Chill cakes before you trim and assemble to prevent a crumbly mess.
- Use a firm filling and frosting so that it holds its shape.
- Use other fruits like strawberries, raspberries, peaches, blueberries. Make sure to wash them and pat them dry.
- Use cake scraps and leftovers to make delicious Cake Pops and Cake Balls.
- Read additional tips and variations above.
- Leftovers can be stored in a sealed container in the fridge for up to 3 days.
Nutrition
An automated tool is used to calculate the nutritional information. As such, I cannot guarantee the accuracy of the nutritional information provided for any recipe on this site.
Edelynuy
Hello.. there is no need for eggs?
Abeer Rizvi
Nope, this cake has no eggs. The baking soda and lemon juice react with each other to help the cake rise.
Sandra
This is really pretty! Almost too pretty to eat!
Lauren
I can't believe how good this looks!
Erin
Absolutely gorgeous!
Katerina
WOW!! This cake is absolutely gorgeous!!