Use this cake decorating tutorial to learn how to make easy snowman cake with fondant. Fun to make with kids for Winter/ Christmas parties and birthday parties.
*Thank you Cakes.com for sponsoring this post and providing supplies to share this tutorial with all of you. As always, all opinions and photography are my own.*
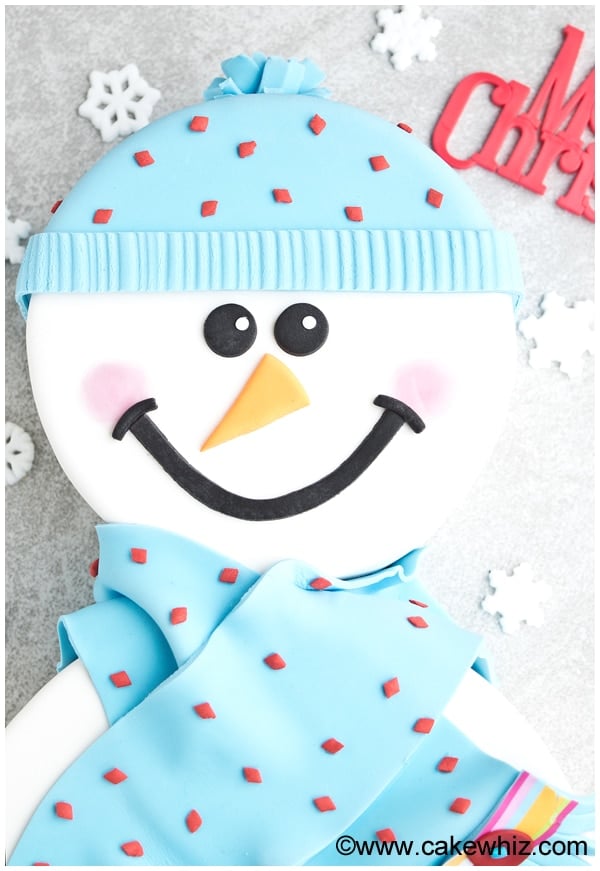
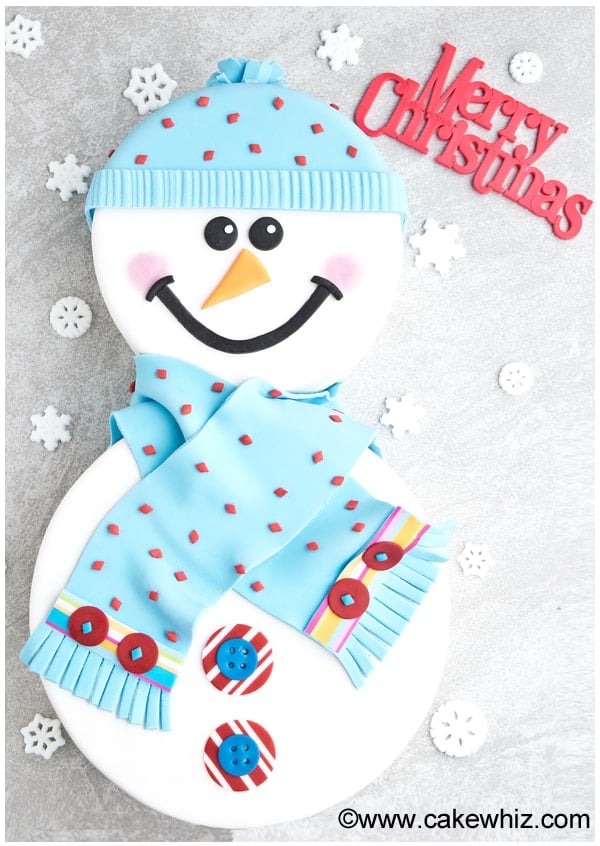
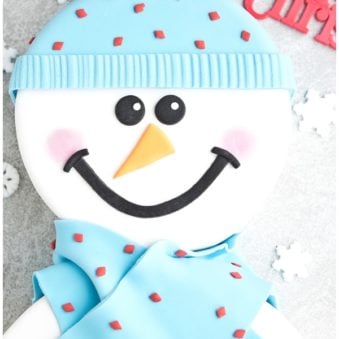
If you browse cake decorating books and even the web, you will come across many designs for today's cake. It seems to me that the snowman head or face is the most popular because it is the easiest and requires the least amount of work. Frosty is also very popular, especially during the holiday season. I decided to combine all those ideas and make this full face and body cake. Isn't he just adorable? He turned out even better than what I envisioned! These Snowman Cupcakes {With Donut Toppers}, Snowman Cookies {Snowman Oreos}, and Snowman Ice Cream Cones are all cute and creative ways to bake with this popular theme.
Want to Save This Recipe?
Enter your email & I'll send it to your inbox. Plus, get great new recipes from me every week!
By submitting this form, you consent to receive emails from CakeWhiz
Table of contents
How to make easy snowman cake from scratch?
- Bake and cool cakes- Prepare frosting during this time.
- Cut and stack cakes- Add icing between layers, and smoothly ice the tops.
- Cover in white fondant- Trim excess, and smooth surface.
- Place the 2 cakes on a large cake board- The smaller cake on top and the bigger one below.
- Make the dome, rim, and ball of the hat- Using light blue fondant and attaching with water.
- Add hat decor- Use red diamond sprinkles all over.
- Make the scarf- Using blue fondant around the neck.
- Add buttons- Use the edible dots or make some from fondant.
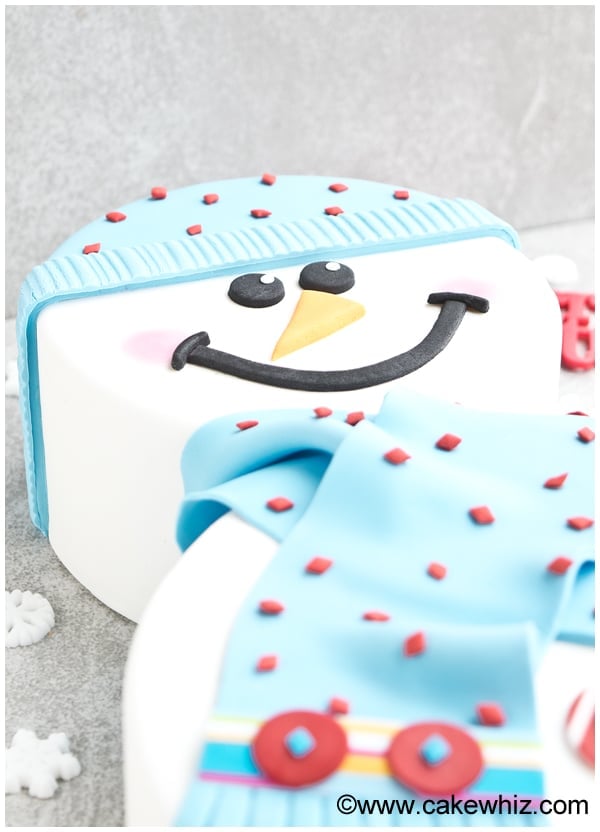
- Add facial details- Use orange triangle piece for a nose and black fondant for the eyes and a smile.
- Add cheek color- Using pink edible lustre dust powder.
- Add sugar snowflakes- On the board.
Variations for winter cake
Cover cake in desiccated coconut or white sprinkles or sparkling sugar- Instead of white fondant if that feels too intimidating.
Give the face different expressions- Such as puzzled, funny, silly, shy, extremely happy with toothed smile. Just change the black fondant mouth piece accordingly.
Change up the colors of the scarf and cap- Use whatever colors match your event or party theme.
Skip the white fondant- Instead, just ice smoothly in white icing and add only the fondant decorations as accent pieces. This is less work and great if you are intimidated by covering cakes in fondant smoothly.
Just make the snowman face- Skip the body to save time, and it's still very cute.
Make larger cakes- My dimensions were 6 inch and 8 inch but you can go with a bigger ratio like 8 inch and 10 inch or 10 inch and 12 inch. That would feed a lot of people.
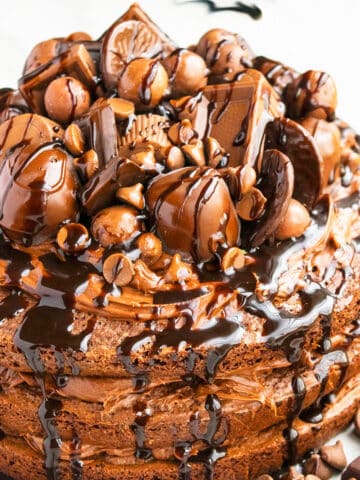
Try other cake flavors- Such as this Moist Triple Chocolate Cake {From Scratch}, Best Vanilla Cake Recipe {From Scratch}, or this Funfetti Cake / Confetti Cake {From Scratch}.
Add a cake filling- Such as Cherry Pie Filling or this Easy Chocolate Ganache {2 Ingredients}, other nut butters, fresh fruits, jams and preserves.
Pair with another frosting- Such as White Chocolate Buttercream Frosting or Strawberry Frosting (With Fresh Strawberries) or Fluffy Brown Sugar Frosting.
Use festive sprinkles for the hat decor- Instead of pre-made diamond shapes you can use any sprinkles you like to decorate the whimsical hat.
Add arms- Using brown fondant or modeling chocolate shaped like sticks. You could also use large pretzel rods for arms.
Tips and techniques for snowman Christmas cake
Use a pizza cutter to trim fondant- Because this makes cutting around the circular cake so much easier and smoother than using a knife.
What to use to attach fondant? You can very lightly brush water or corn syrup onto the cake to act as "glue." A small amount will go a long way.
Cool cakes completely prior to icing- Because this prevents the frosting from melting and sliding right off the cake also also prevents the fondant from becoming sticky.
Use store-bought fondant- Because this saves time and you can also buy it pre-colored.
Use pink fondant, or edible marker for the cheeks- If you do not have pink lustre dust.
Cakes.com supplied me with all the products for this cake tutorial and overall, I was very impressed. Everything was top-notch quality. Their delivery was fast and prompt. Everything was packaged properly and nothing broke along the way.
These are the products I got:
1. Snowflake sugar decorations: Absolutely breathtaking with intricate designs. Very sparkly!
2. Diamond sprinkles: The shape was so cute and different... haven't seen these sprinkles in my local cake supply store before. The colors were so vibrant. Huge quantity and can be used for many cake projects. Yay!
3. Edible decorating strips: These were packaged properly so that the strips don't dry out. They were also in a resealable bag. The print was clear and beautiful, just like the picture I saw online.
4. Merry Christmas cake topper: Simple topper made of plastic... Good quality, no jagged edges. Great for projects where you don't want to write a message on the cake.
5. Fondant Deco-Shapes dots: I love these circles! This was my favorite product, hands down! These are pre-cut fondant circles in different colors, different sizes and some of them even have different patterns like polka dots, stripes and chevron. No more mess with coloring fondant and cutting out lots of circle pieces, which is tiring and time-consuming. Lots of pieces and you can use them for many cake projects.
6. Satin Ice fondant (White/Vanilla): I have used this fondant before and I like it. Easy to use, soft, smells and tastes great!
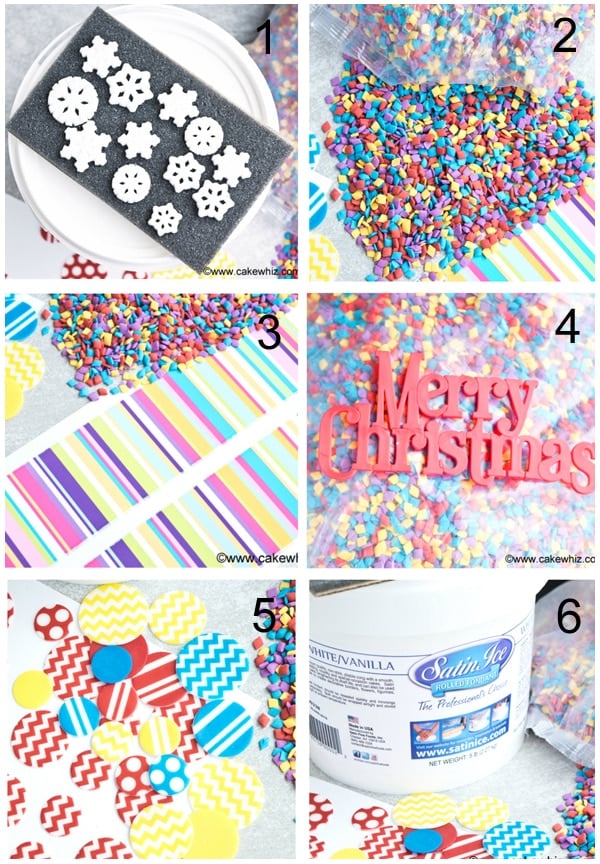
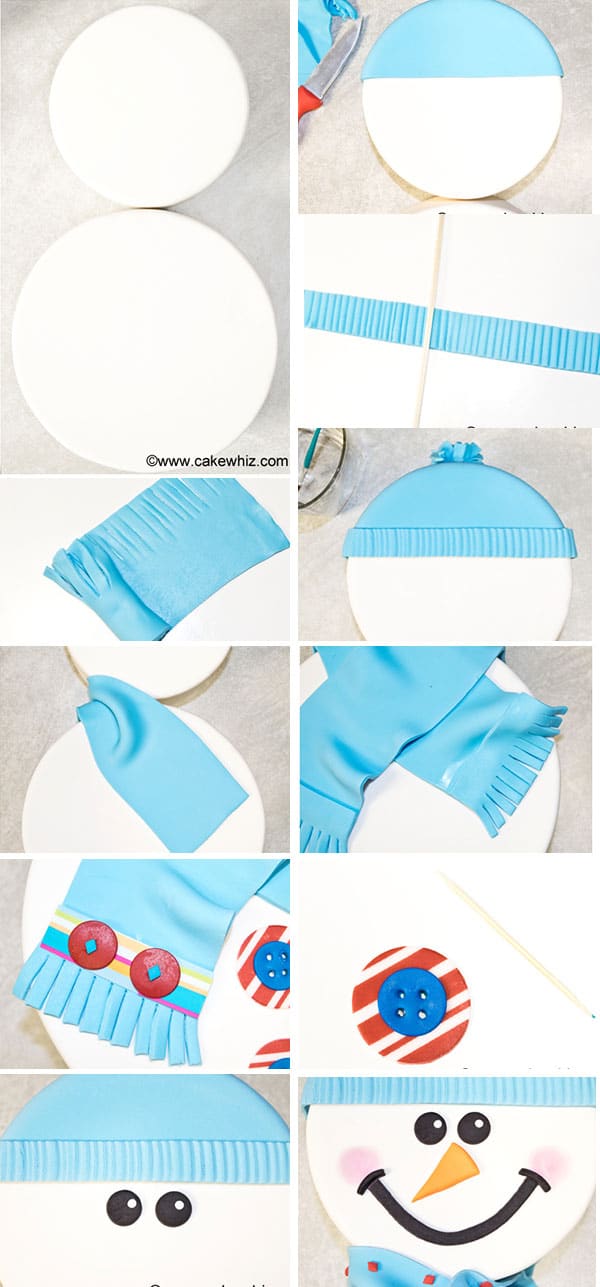
Here is a collage with step by step instructions.
Storage of decorated cake
Refrigerate– Leftovers can be stored in a sealed container in the fridge for up to 3 days. Please note that fondant decor will become a little sticky due to moisture found in refrigerators.
Freeze– This is not recommended because when the cake thaws, condensation beads will make the fondant decorations sticky. However, you can make the cake and frosting ahead of time and freeze separately in sealed containers for up to 1 month. When you are ready to make this cake, thaw to room temperature and decorate as per instructions below.
Room temperature- Decorated cake without any perishable fillings can be stored at room temperature for 4-5 days, away from moisture and direct sunlight.
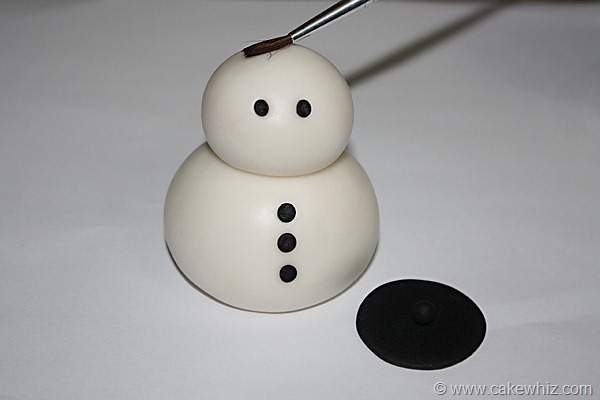
Another Idea- Fondant snowman topper
You can make a simple round cake, ice it smoothly and then add this topper to finish it off. This figure can be made weeks in advance. Once it dries and becomes hard, you can store it safely, away from direct heat and moisture in a cardboard box until you are ready to use it. Instead of fondant, you can use gum paste or modeling chocolate.
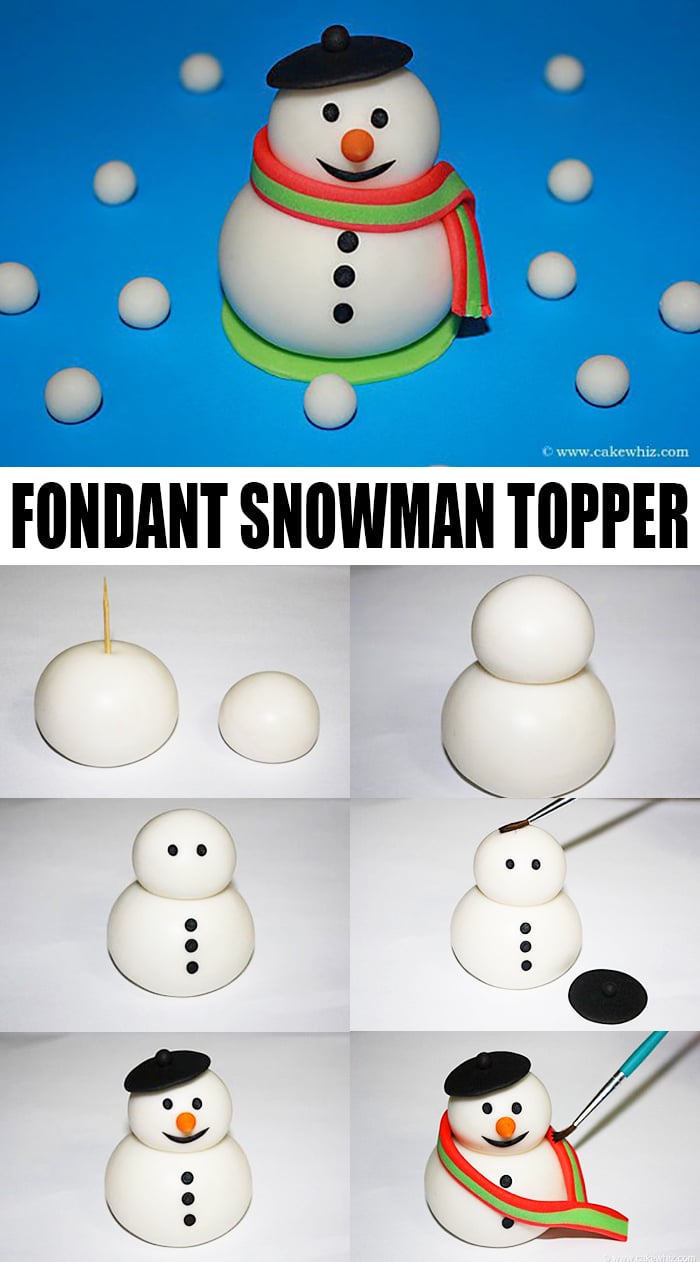
Step 1:
Roll out two balls of white fondant. One should be bigger than the other. The big one will be the body and the small one will be the head.
Stick a toothpick into the center of the big ball. You can also use an uncooked spaghetti instead of a toothpick.
Note: If you are using a toothpick, break off the sharp point of the toothpick after sticking it into the body... I forgot to take a picture of that.
Step 2:
Place the small ball on top of the toothpick until the body and head are in place and not wobbling around.
Step 3:
Roll out 5 small black balls. Two of these will be eyes and three of them will be buttons.
Press three balls onto the body with your finger. No water needed.
Now, press the remaining two black balls onto his face to make eyes. Again, no water needed.
Step 4:
For the hat, roll out two black balls of fondant. One ball should be bigger than the other. Flatten the big ball with your finger. Leave the small ball as is.
Brush some water on the center of the flattened circle.
Place the small ball on top of this water mark and gently press to hold it in place. The hat is ready!
Brush some water on top of the head.
Place the hat on the water mark and and hold in place for a few seconds until it sticks.
Step 5:
For the lips, roll out black fondant into a “smiley” shape.
Press it into the face of the snowman with your finger to make a smile. Again, no water needed.
Note: You can also use black royal icing (thick consistency) or black edible marker to make the smile, eyes and even buttons.
Step 6:
Gently press the cone on the water mark until the nose holds in place.
Step 7:
For the scarf, roll out long snakes of red and green fondant. Place them side by side and using your rolling pin, roll on them until they stick to each other.
Wrap the scarf around the neck and brush some water to secure it in place.
More Winter desserts
- Nutter Butter Penguin Cookies
- Snowflake Cookies
- Snowflake Cake
- Snowflake Cupcakes (Winter Cupcakes)
- Snow Ice Cream
- Penguin Cake
Recipe
Easy Snowman Cake
Want to Save This Recipe?
Enter your email & I'll send it to your inbox. Plus, get great new recipes from me every week!
By submitting this form, you consent to receive emails from CakeWhiz
Ingredients
- 2 Red velvet cake Round, Dimensions: 6x3 and 8x3
- 6 cups Cream cheese frosting
- 4 cups Marshmallow fondant White, light blue, black, orange
- 3 tablespoon Corn syrup Or water
Instructions
- Bake the cakes and allow them to coom completely.
- While the cakes are baking and cooling, make the frosting.
- Cut each cake in half lengthwise and spread a thin layer of icing with a spatula.
- Place the other halves of the cakes on top and press gently to secure into place.
- Place these cakes on round cake boards (same size as the cakes).
- Ice each cake smoothly in cream cheese frosting.
- Roll out white fondant and spread it over these iced cakes.
- Cut off excess fondant around the baseof each cake with a pizza cutter.
- Use a fondant smoother to smooth out the fondant on top and the sides of the cake.
- Place the 2 cakes on a large rectangular cake board. The smaller cake should be on top and the bigger one should be positioned below it. Stick them into place with tape.
- Roll out light blue fondant and use a knife to cut a straight line near the bottom. Gently lift the fondant and place it over the top portion of your small cake. You can secure it in place by brushing some water. Cut off excess fondant around the cake with a knife or pizza cutter.
- Roll out blue fondant again and cut out a thin strip. Use a toothpick or wooden skewer to create a striped pattern along the entire length of the strip. Stick the strip near the base of the cap, by brushing some water. Cut off excess fondant with a knife.
- Let's make the fuzzy ball for the top of the cap. Roll out blue fondant again and cut a rectangular strip. Use a knife to make half cuts along the strip. Roll this strip of fondant and squeeze the base. Use a knife to cut off excess from the base. Stick this fuzzy ball in place with corn syrup or water. You will have to hold it in place for a little while until it sticks securely.
- Stick some red diamond sprinkles all over the cap, with corn syrup.
- Let's make the scarf now. Roll out blue fondant and use a knife to cut two rectangular pieces. Brush some water around the neck area. Lay these two pieces down but be sure to create some folds so that it doesn't look totally perfect. Stick some red diamond sprinkles all over this scarf. Brush some water near the ends of the scarf and stick the edible pattern sheets. Use scissors to snip the ends of the scarf to make it look realistic.
- Use the edible dots as buttons and stick them on the body with water. You can also make buttons out of fondant and toothpick, if you don't have these pre-made dots.
- Add facial details. Use orange triangle piece for a nose and round black fondant circles for eyes, and a black fondant strip for a smile.
- Brush a small amount of pink edible lustre dust powder for cheeks.
- Stick some sugar snowflakes on the board around the snowman. Enjoy.
Notes
- Read all my tips above.
- Leftovers can be stored in a sealed container in fridge for up to 3 days. However, please note that fondant decorations will become a still sticky from the moisture that's found in refrigerators.
Nutrition
An automated tool is used to calculate the nutritional information. As such, I cannot guarantee the accuracy of the nutritional information provided for any recipe on this site.
Uru
Do you want to build a snowman takes on whole new meaning now!
Abeer Rizvi
hahaha! so true!
Jessica
Omg, this cake is absolutely ADORABLE! I wish I had the patients to make something like this! Lol, amazing job!
Jessica
Omg, this cake is absolutely ADORABLE! I wish I had the patience to make something like this! Lol, amazing job!
Abeer Rizvi
Thanks! I never thought I could pull off this cake. I made a sketch of it first and it seemed a little overwhelming...lol. But once I started working, everything just came together perfectly
Peter
So fun. I appreciate all the effort you put into making this treat.
Abeer Rizvi
Thanks! I hope you give it a shot
Diane
Wow, that is really cute. Your post is great.
Abeer Rizvi
Thanks!
Patricia
Can't even tell you how amazing this is! So adorable!!!
Abeer Rizvi
Awww... Thanks! It was so adorable that I couldn't cut it or eat it...heheh
Angela
This is the cutest snowman ever!!! Your step by step tutorial is awesome!!!! Thanks for the giveaway too!!!!
Abeer Rizvi
Thanks for your sweet comment Angela! It made me so happy!
Lori Vachon
I seriously love this cake!!! Excellent job!!!
Abeer Rizvi
Thanks Lori!
Heather H
You are so talented! Thank you for sharing your tips, mine came out adorable too!! Thank you so much!
Sharina
Made this on my little brother's birthday (it was his request), and he loves it! It was an adorable snowman cake, it taste sooo good also. We'll surely have this again.
Journa Liz Ramirez
My kids were full of joy and energy when we made this cute snowman cake! It turned out so decadent and satisfying. They can't wait to make this again, thanks for this wonderful recipe Abeer!