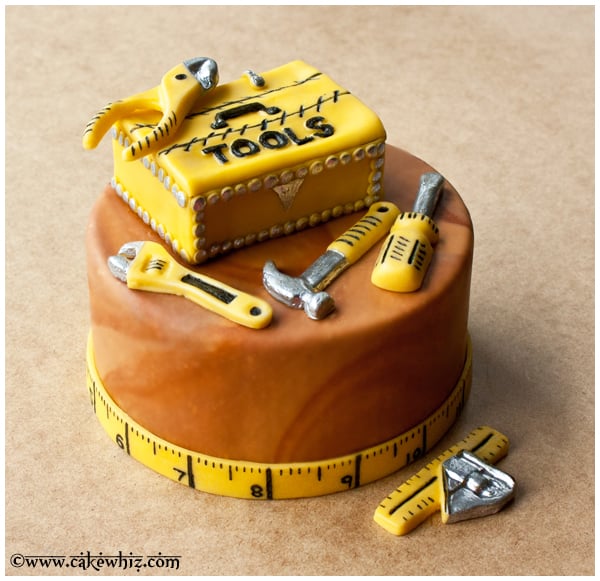
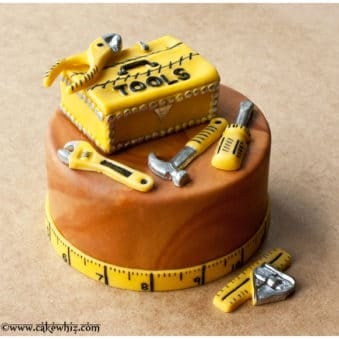
Learn how to make easy homemade Father's Day cake (tool box cake) with simple ingredients. This chocolate cake is covered in chocolate frosting, fondant and decorated with edible handyman tools.
These Father's Day Cupcakes (Shirt Cupcakes) are always such a hit on this holiday. I decided it was time to make a cake that's just as special for the wonderful Dads in our lives. The use of a chocolate mold made this design possible and it also made the process very simple.
Want to Save This Recipe?
Enter your email & I'll send it to your inbox. Plus, get great new recipes from me every week!
By submitting this form, you consent to receive emails from CakeWhiz
How to make Father's Day cake? How to make tool box cake?
- Bake cakes- A Guinness beer cake was perfect for this occasion.
- Let them cool- Until room temperature.
- Make icing- Add some beer in that too, if you like.
- Assemble– Place one cake on cake stand, ice the top, then, place the other cake on top and then, ice the whole cake.
- Spread marbled brown fondant- And cut off excess along the base of the cake.
- Make fondant measuring tape- And stick that along the base of the cake.
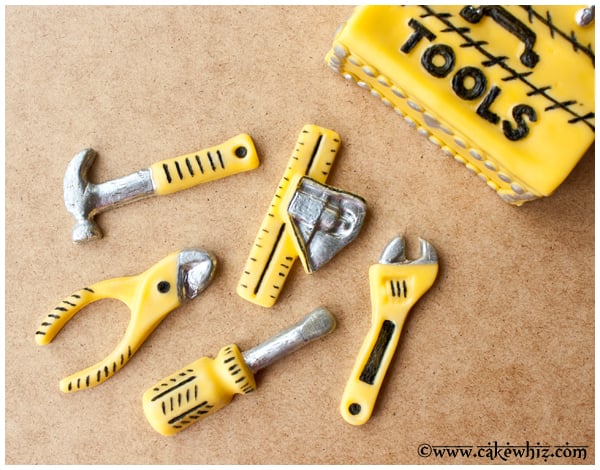
- Make gum paste tools- And let them dry until hard.
- Add details– With black and silver edible paint.
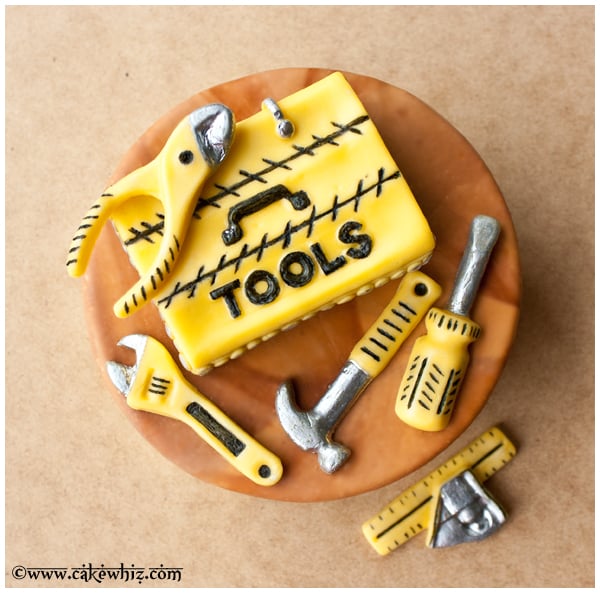
- Decorate- Place the tool box and tools on top of the cake.
Variations for happy father's day cake design
Try different color combinations- I kept the theme fairly neutral but you can get creative and can use any colors you like.
Try other cake flavors– Such as Moist Triple Chocolate Cake (From Scratch) or Chocolate Coffee Cake.
Pair with other frosting flavors- Such as Peanut Butter Frosting or Chocolate Ganache Frosting.
Make a larger tiered cake- Add an additional bottom tier that's 10 inches wide. Make more gum paste tools and scatter them on that tier.
Make a taller layer cake- This cake only has 2 layers but you can make it as high as you want. Just remember to use dowels for support.
Tips and Techniques
Don’t frost or decorate warm cakes- Because the warmth will cause the icing and fondant to melt and make a sticky mess.
Melted chocolate vs. Gum paste for molds- Either can be used. Chocolate will obviously set and harden quicker than gum paste. However, I find it harder to paint details on chocolate.
Do not use fondant in the mold- Because it's hard to remove from molds and it also takes very long to dry.
Grease or dust powdered sugar in cavities of molds- Because this allows the pieces to be easily removed. If you are greasing, use shortening and not oil.
Homemade marshmallow fondant vs. Store-bought fondant- Either can be used. I prefer homemade fondant because it tastes and smells really good. Also, you can buy pre-colored fondant, which means less work for you.
Allow the tool box pieces to completely dry- This is very important because if they are still soft, they will bend and break and you can't assemble it properly.
Drying time for gum paste pieces will vary- Because it depends on the moisture in your area. Higher moisture and humidity = slower drying time.
Storage for daddy birthday cake/ birthday cake for father
Room temperature- Decorated cake can be left at room temperature for 24 hours as long as there is no fruit filling that requires refrigeration.
Refrigerate- Leftovers can be stored in a sealed container in the fridge for up to 3 days. However the fondant decorations will become slightly sticky and tacky from the moisture in the fridge.
Freeze- Unfrosted cakes and frostings can be stored separately in a sealed container for up to 1 month. When you are ready to enjoy it, let it thaw in the fridge overnight and then, decorate as per instructions below.
Make ahead instructions- This cake can be baked and decorated 1 day in advance and stored at room temperature until you are ready to serve.
More Homemade Father's Day Cake Ideas
- Tie Dye Shirt Cake
- Shirt Cake
- Easy Pokemon Cake (Poke Ball Cake)
- Easy Sushi Cake
- Easy Star Wars Cake (Death Star Cake)
- Ice Cream Cake
- Cookies and Cream Cake (Oreo Cake Tower)
- Easy Galaxy Cake
- Pull Apart Football Cupcake Cake
Recipe
Father's Day Cake (Tool Box Cake)
Want to Save This Recipe?
Enter your email & I'll send it to your inbox. Plus, get great new recipes from me every week!
By submitting this form, you consent to receive emails from CakeWhiz
Ingredients
- 2 Guinness beer cake Round, Dimensions: 8x2 each
- 4 cups Chocolate cream cheese frosting
- 3 cups Marshmallow fondant Brown, yellow
- 1 cup Gum paste
Instructions
- Bake cakes and allow them to cool completely.
- Prepare frosting.
- Assemble the cake by placing one cake on a serving plate.
- Use a spatula to spread icing on top.
- Place the other cake on top of the frosting and press gently to secure into place.
- Ice the entire cake smoothly.
- Spread out brown marshmallow fondant and do the marbling technique. Follow this tutorial: How to Marble Fondant.
- To make a measuring tape border around the cake, roll out yellow fondant into a long strip. Use a pizza cutter to cut a 1 inch wide strip, long enough to cover around the base of the cake completely.
- Brush some water around the base of the cake and and stick this measuring tape strip. Add all the numerical details with a fine tip black edible marker.
- Keep this cake aside.
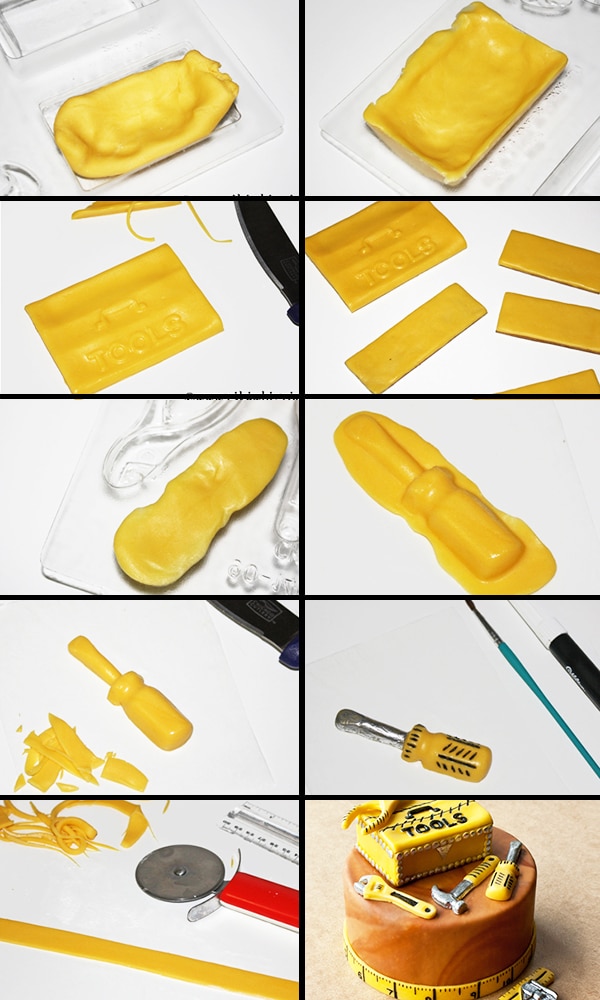
- Bring out your tool box chocolate mold. I made the tool box first. To do that, rub some shortening in the cavities. Press some yellow gum paste into the cavity for the lid of your tool box. Use your fingers to smooth it out until the entire cavity is filled up. Some of the gum paste will "ooze" out but don't worry about it. Then, gently peel your gum paste from the cavity and place it on a sheet of wax paper.All the details from the cavity should have gotten embossed onto your gum paste. Use a sharp knife to cut out the sides and you will end up with a rectangle.
- Measure the sides of that piece you just made. Now, roll out some yellow gum paste and cut out the relevant sizes for the sides of this tool box. Allow these pieces to dry until hard. This can take up to 24 hours.
- Use melted yellow chocolate or some gum paste glue or yellow royal icing to stick all the pieces together and then paint all the details. Use a fine tip black edible marker for all the black details.For silver details, mix some clear vanilla extract with CK Nu-Silver luster dust and use that to paint silver, where needed.
- To make tools, rub some shortening into the cavities. Place a chunk of yellow gum paste into the cavity and start pressing with your fingers.Flip the mold and press down until the mold is lying flat on your table. Flip your mold back again.Gently, peel your gum paste out of the cavity and place it on a sheet of wax paper. Use a sharp knife to cut out all the excess and smooth out all the sides and corners with your fingers.
- Once again, use a fine tip black edible marker to draw out all the black details. To add silver details, mix clear vanilla extract and CK Nu-Silver luster dust and paint silver where needed. Make as many tools as you need. Allow them to dry for 24 hours.
- Once all the pieces are dry, just place your tool box and tools on top of the cake and you are done.
Notes
- Read all my tips above.
- Leftovers can be stored in a sealed container in the fridge for up to 3 days.
Nutrition
An automated tool is used to calculate the nutritional information. As such, I cannot guarantee the accuracy of the nutritional information provided for any recipe on this site.

kashis
Such a thoughtful and delicious way to celebrate Dad! This Father’s Day cake is sure to make him feel extra special.
tteddy
It was the best cake ever for my dads birthday. I did two layered cake.
Yesenia
Where can I buy the tool box and tools mold??
Abeer Rizvi
I ordered from Amazon.
Mike
My 2 year old son loves tools. I’m not a baker but I’d love to buy this cake for him. Any recommendations near Chicago? Thx.
Abeer Rizvi
I am sorry but I really can't help there. I only share cake decorating tutorials here. Maybe ask around or even check on Yelp. I am sure there are some amazing bakeries that would make this cake for your son.