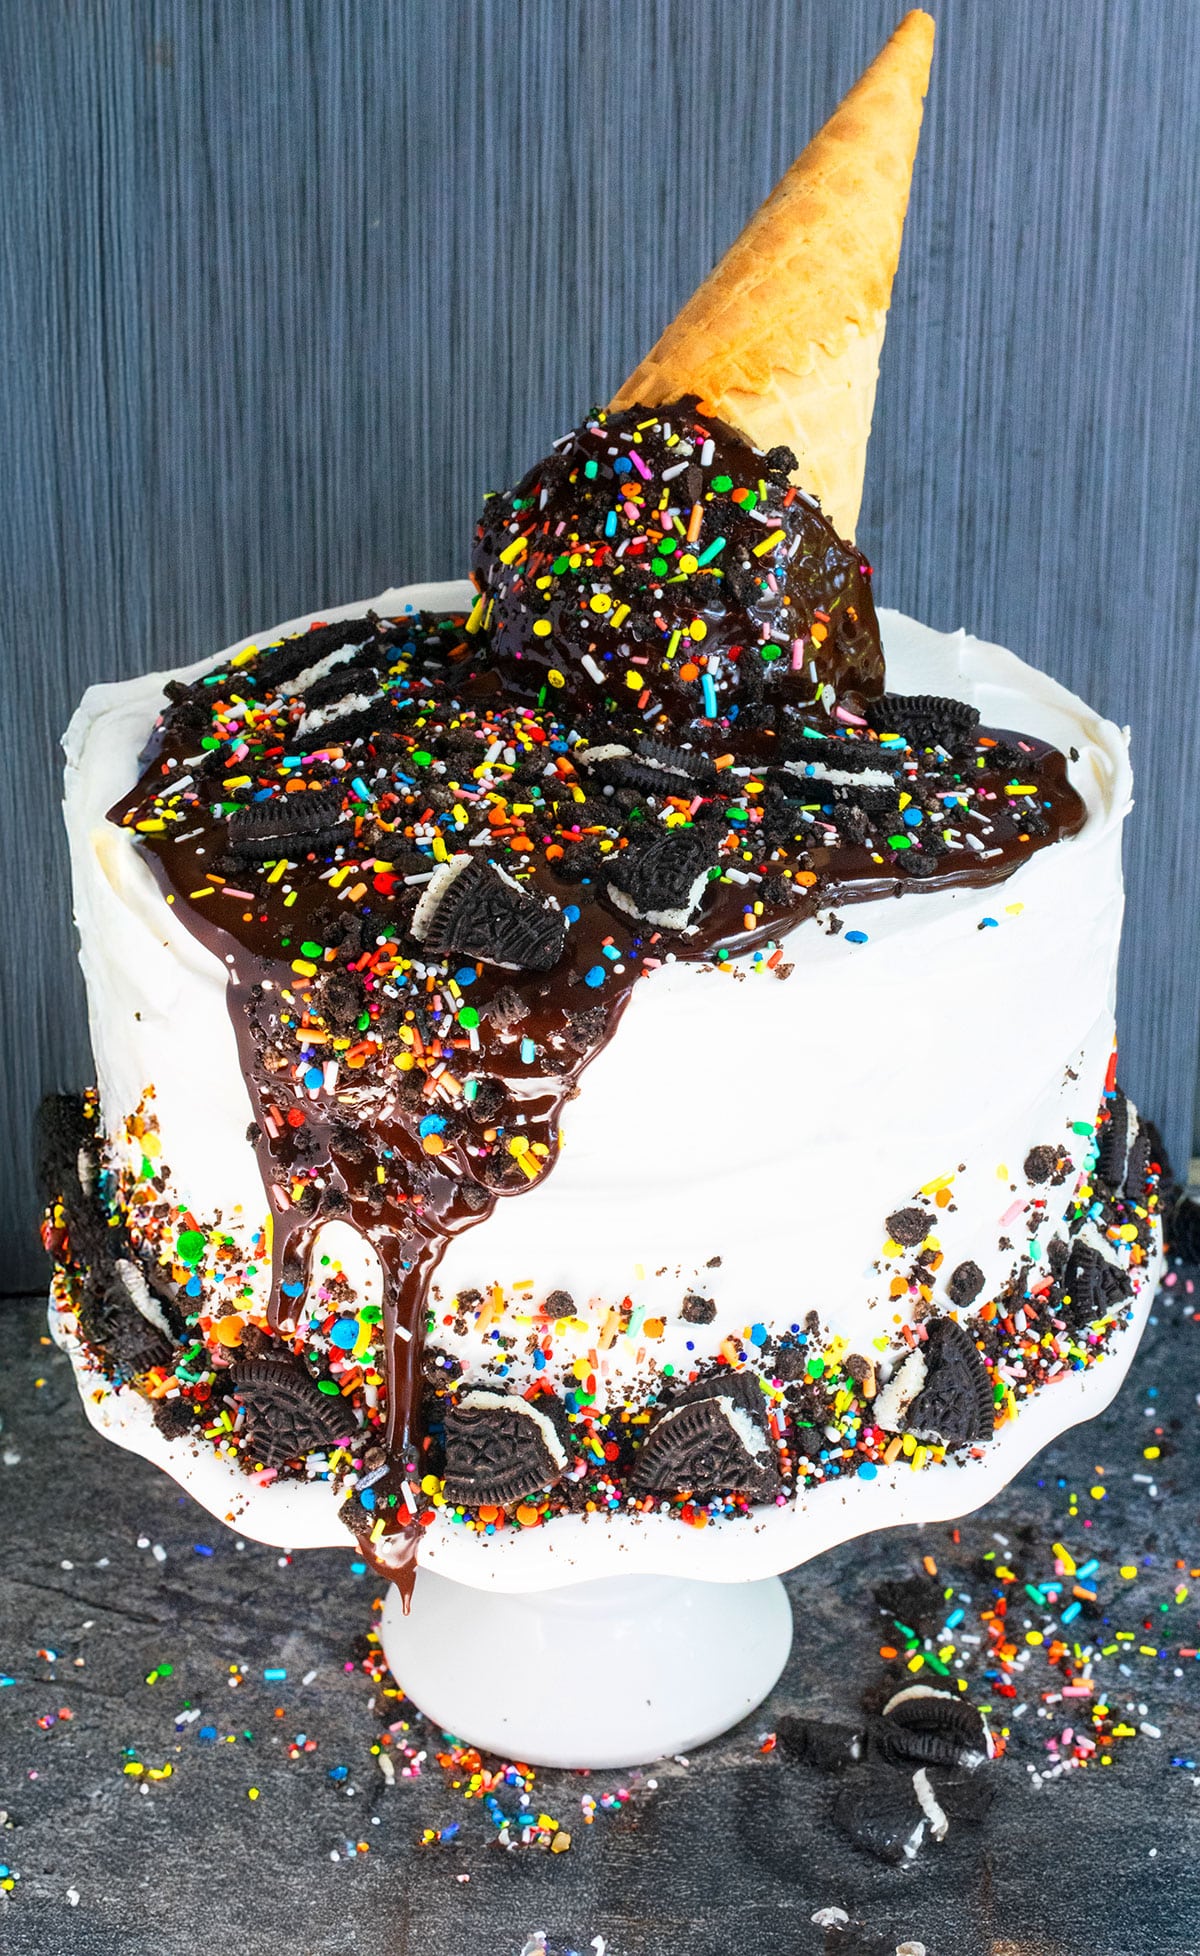
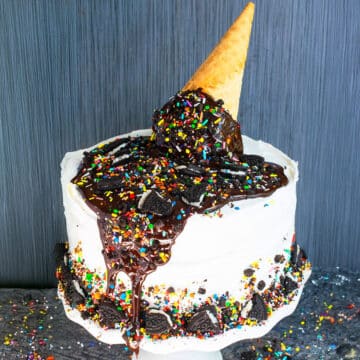
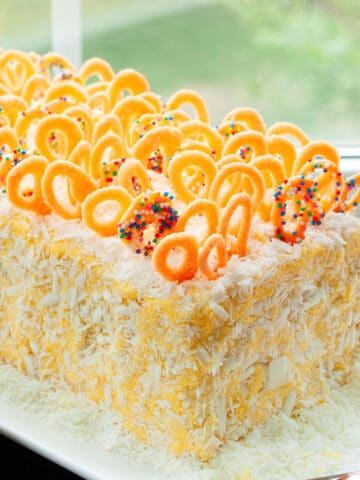
Easy ice cream cake recipe, homemade with simple ingredients. This decadent layer cake is composed of two layers of chocolate cake. Those are sandwiched between a layer of ice cream. Then, it's covered in vanilla whipped cream and decorated with melting ice cream cone and sprinkles.
*Thank you Albertsons Companies for sponsoring today’s post so that I can share this recipe with all of you. As always, all opinions are mine.*
Want to Save This Recipe?
Enter your email & I'll send it to your inbox. Plus, get great new recipes from me every week!
By submitting this form, you consent to receive emails from CakeWhiz
When I think of classic, traditional, nostalgic, old fashioned desserts, this would definitely be on that list along with my Ice Cream Cone Cupcakes and this Pineapple Upside Down Cake. Obviously, I took today's dessert over the top with my decorations since I wanted to create the illusion of melting ice cream. I love it! Best of all, it tastes so much better than any store-bought version plus it's made at a fraction of the cost. Definitely better than Baskin Robbins or Dairy Queen to, in my opinion.
Jump to:
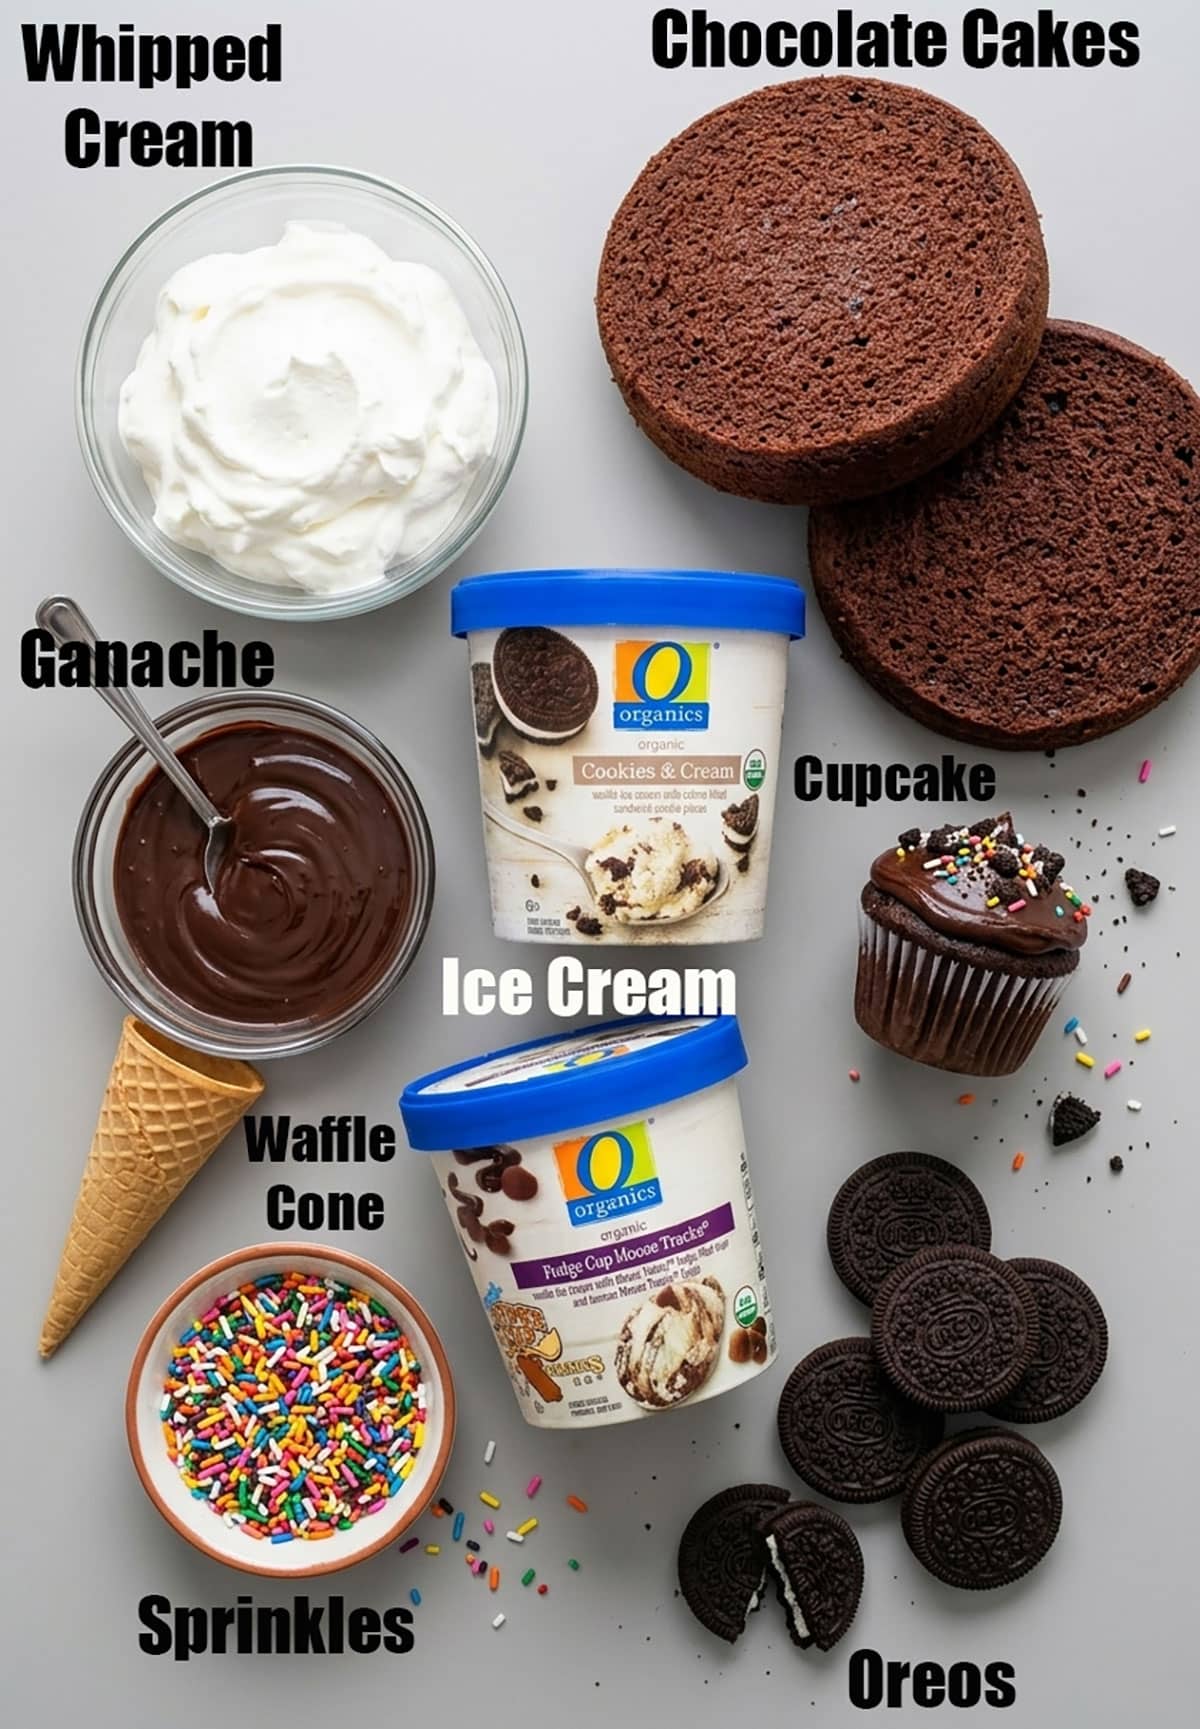
Key ingredients
- Whipped cream- I used a stabilized option that is great for frosting.
- Chocolate cake- You will need to prepare two 8 inch round cakes.
- Chocolate ganache- This gives the fun effect of melting ice cream.
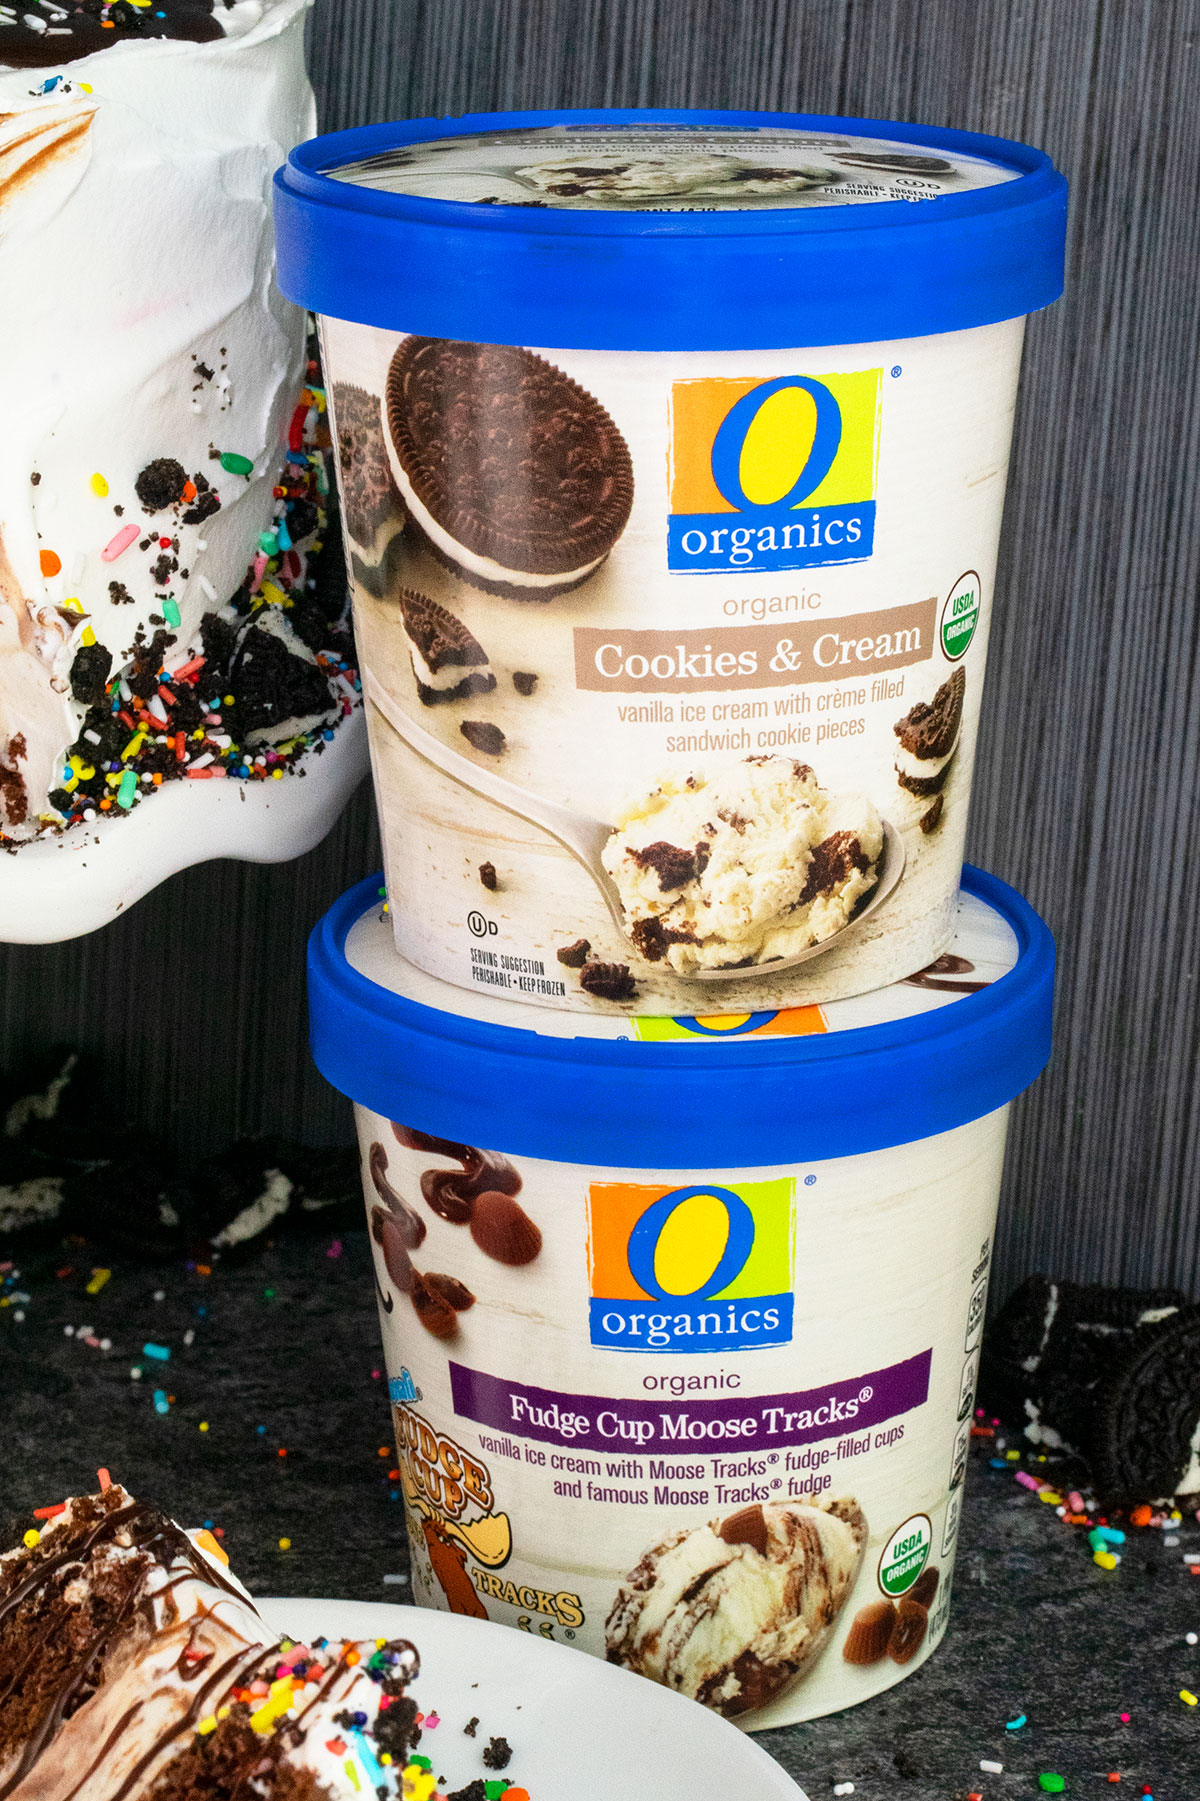
- Ice cream- I like to use a pint of cookies and cream and a pint of moose tracks.
- Waffle cone- This is used as a cute topper.
- Sprinkles- This really brings in a splash of color, which is great for birthdays.
- Oreos- For decorating, texture, flavor, and appeal.
- Cupcakes- Made to look like ice cream in the cone.
How to make easy homemade ice cream cake?
- Prepare ice cream layer- Spread softened ice cream in a round pan and freeze.
- Bake 2 round cakes- Let them cool.
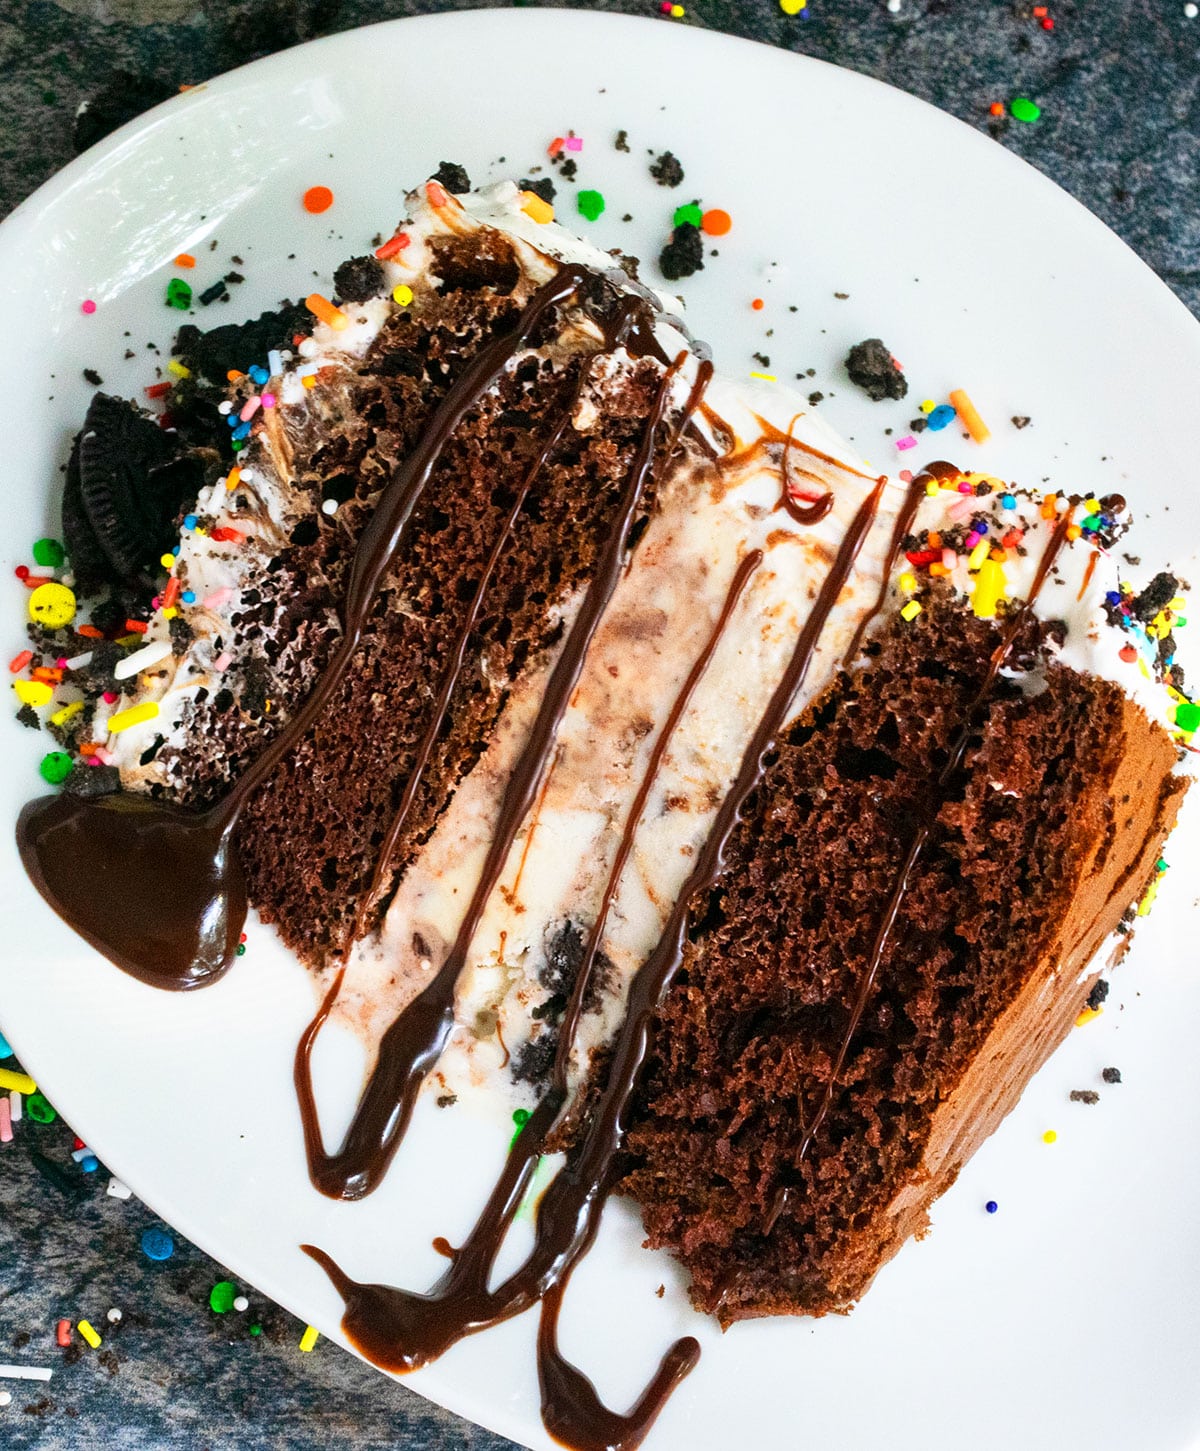
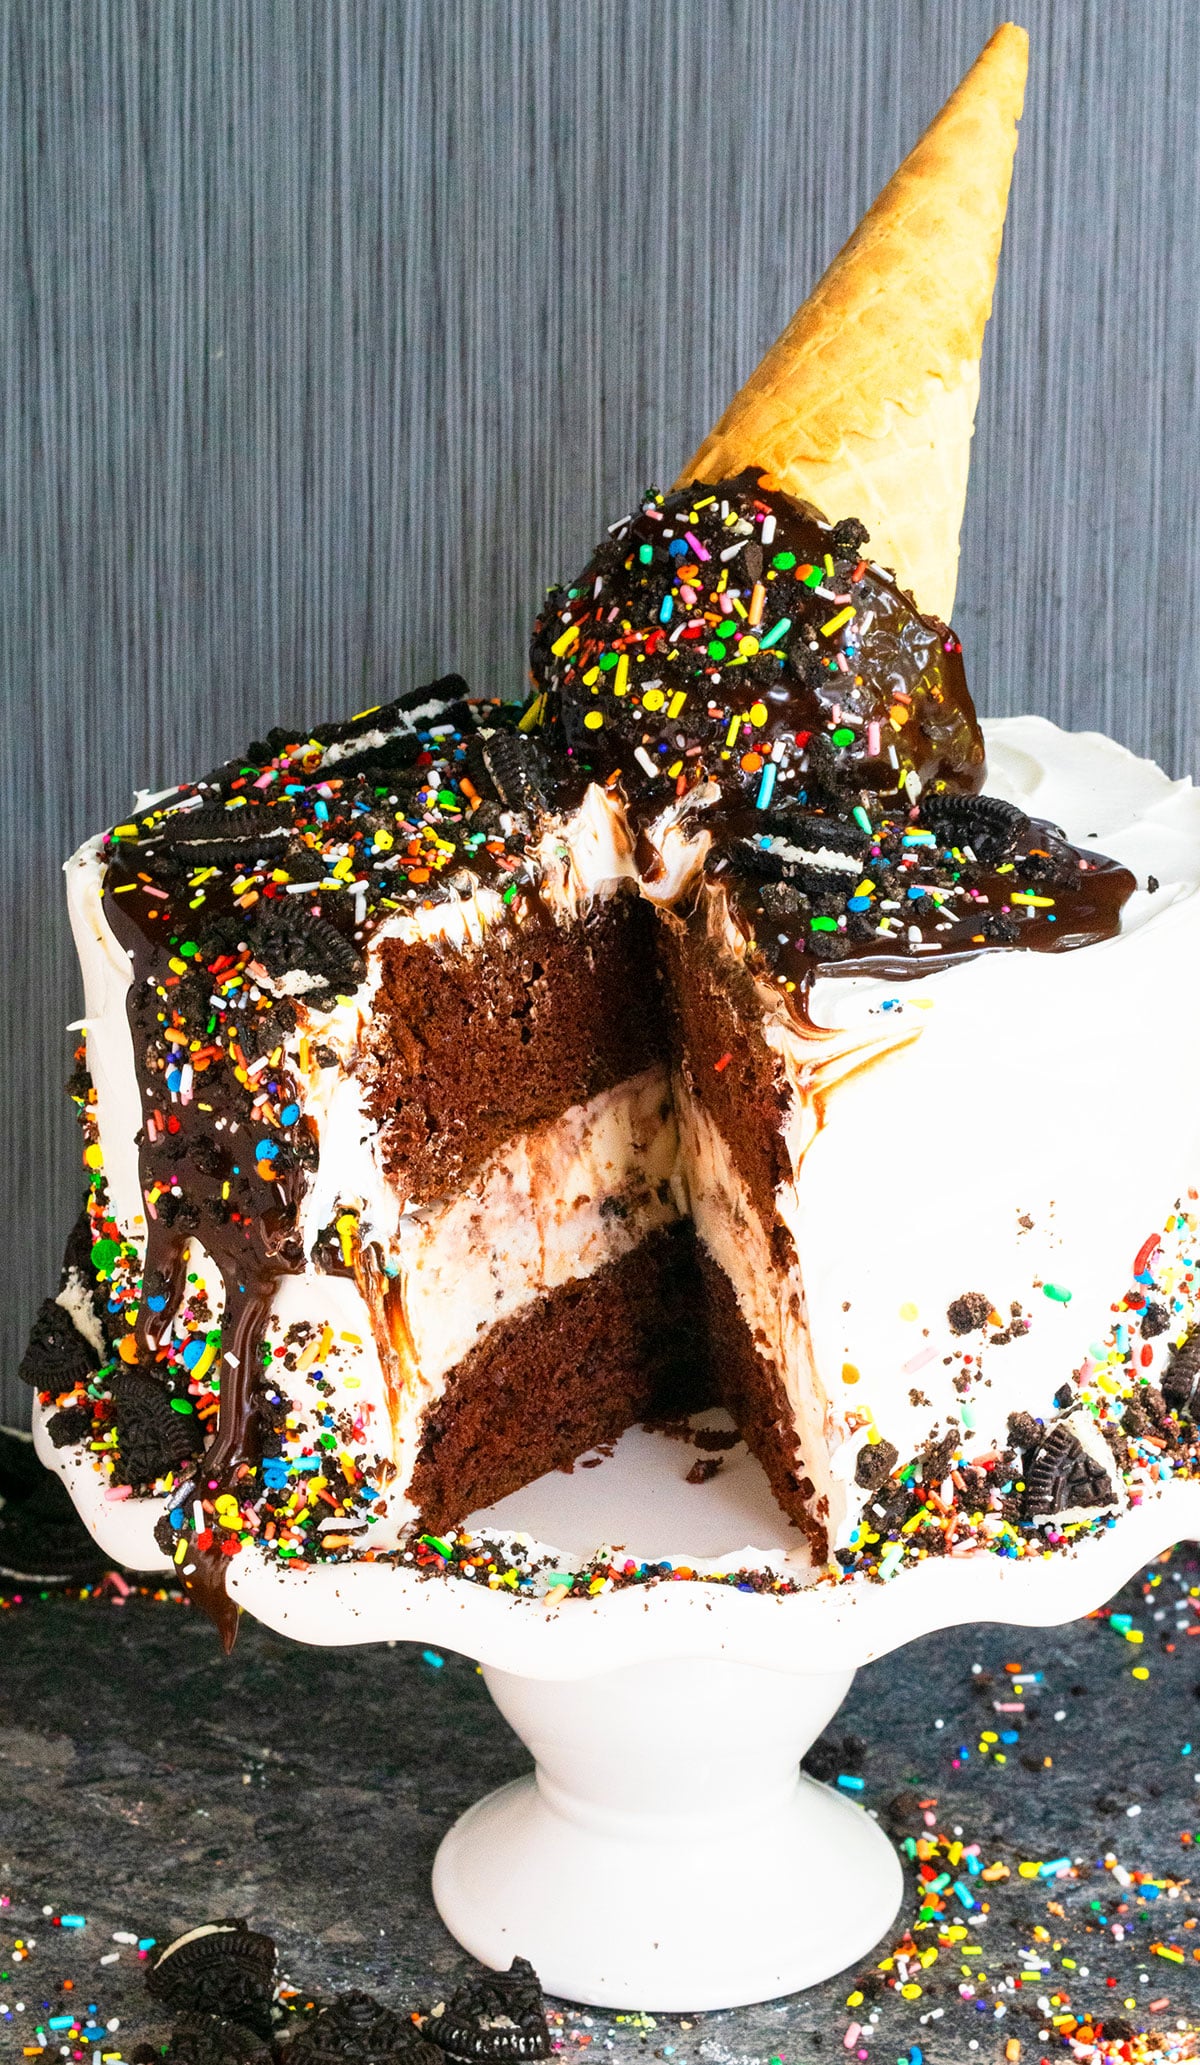
- Assemble- With layers of cake and frozen mixture.
- Frost cake completely- In whipped cream.
- Decorate- With an upside down cone, ganache, sprinkles, Oreos.
Variations
- Rainbow birthday version- Add sprinkles in the ice cream. Also use my Funfetti Cake. Decorate the cake with sprinkles and top it off with mini candles and colorful candies. You can even pair with this Funfetti Frosting.
- Oreos cookies and cream flavor- Use Oreo ice cream and Oreo frosting and decorated with chopped up Oreos.
- Strawberry shortcake version- Use strawberry ice cream or just mix finely chopped strawberries in vanilla ice cream. Also, decorate the cake with slices of fresh strawberries or Macerated Strawberries. You can also use large buttermilk biscuits instead of cake.
- Red velvet idea- Use Red Velvet Cake instead of chocolate cake.
- Cookie cake option- Bake 2 Chocolate Chip Cookie Cakes and use those to sandwich the frozen layer.
- Black forest flavor- Bake my Black Forest Cake, pair with the Maraschino Cherry Frosting, and use Cherry Pie Filling swirled in with vanilla ice cream to make this fun flavor option.
- Brownie version- Use two round 8 inch Fudgy Brownies instead of the two cakes.
- Use colored whipped cream- Add some gel coloring to make a colorful icing.
- Try different types of white frostings- Such as Seven Minute Frosting or White Chocolate Buttercream Frosting or even American Buttercream Frosting.
- Add other drizzles- Such as warm peanut butter, Nutella Syrup, Chocolate Hot Fudge Sauce, Caramel Sauce, ganache, or Dulce de Leche.
Tips and Techniques
- Ice cream must be softened- Because that makes it easier to spread evenly in a pan. It should be soft and spreadable and not an ice cream soup.
- Use sharp knife for slicing– This makes really clean-cut slices and prevents the layers from digging into each other.
- All layers must be same size- In order for the best professional appearance. Use the same sized pans for everything.
- Don’t assemble or decorate a warm cake– Make sure everything is at room temperature. This will prevent the ice cream from melting.
- Let frozen cake sit at room temperature for 10-15 minutes- This would allow it to thaw, just enough, so that it's easier to slice.
- You can also assemble this in a springform pan- Which makes it super easy to release from the cake pan.
Recipe FAQs
Make sure your pan is lined with foil paper or saran wrap that has been greased with oil.
No. Since the middle layer is an ice cream, it will melt in the fridge. It needs to be frozen.
It is likely that the ice cream is a bit too frozen. It should actually be a more soft texture so that it is easier to spread and less likely to bring up crumbs or large chunks of cake as you spread it.
Storage
- Refrigerate- This cannot be refrigerated because the ice cream will melt.
- Freeze- Place in a sealed container for up to 1 week.
- Room temperature- Do not leave out for more than 30 minutes at most and keep out of direct sunlight because ice cream will melt.
- Make ahead- This can be made 1-2 days in advance.
I used two O Organics® ice cream flavors in this recipe today: Cookies and Cream as well as Fudge Cup Moose Tracks. They are both so rich and creamy and my family (especially my kiddo) is obsessed with them. O Organics ice creams are available in my area exclusively at Jewel-Osco and the quality is exceptional. They are USDA-certified organic and feature premium ingredients, and are available in all Albertsons Companies family of stores.
More frozen desserts
- Snow Ice Cream
- Chocolate Banana Ice Cream
- Watermelon Ice Cream (2 Ingredients)
- Ice Cream Float
- Ice Cream Sandwiches
Recipe
Easy Ice Cream Cake
Want to Save This Recipe?
Enter your email & I'll send it to your inbox. Plus, get great new recipes from me every week!
By submitting this form, you consent to receive emails from CakeWhiz
Ingredients
- 2 Chocolate cakes 8 inch cakes
- 1 pint Cookies and Cream Ice Cream Softened, I used the O Organics brand
- 1 pint Fudge Cup Moose Tracks Softened, I used the O Organics brand
- 1 cup Chocolate chips Semisweet
- 1 cup Heavy cream
- 1 tablespoon Butter Unsalted
- 4-5 cups Whipped cream
- 1 Waffle cone
- 1 Chocolate cupcakes
- ¼ cup Sprinkles Rainbow color
- 10 Oreos Roughly chopped
Instructions
- Make cake batter and divide into two round cake pans (Dimensions: 8x2). Bake and let these cakes cool down completely.
- While they are baking and cooling, prepare ice cream layer by spreading softened cookies and cream ice cream in a round pan (same size as the cake pan), lined with plastic saran wrap or foil paper that's been gently greased with oil. Freeze for 10 minutes. Then, spread softened Fudge Cup ice cream on top. Freeze until this layer solidifies.
- While that layer is chilling, make chocolate ganache: In a microwave-safe bowl, add chocolate chips, heavy cream and butter. Heat in the microwave at 30 second increments, mixing after each interval. Continue doing this until you have a smooth and creamy mixture. Keep aside.
- Place one cake on a cake stand.
- Remove ice cream layer from the saran wrap and place that on top of the cake.
- Place final cake on top and gently press it to secure it.
- Frost entire cake in whipped cream.
- Use melted chocolate to stick chocolate cupcake on top of an ice cream cone. You can trim the sides of the cupcake with a knife to create a rounder appearance. Flip it upside down on top of the cake.
- Pour ganache on top of the cupcake until some of it starts dripping along the sides of the cake.
- Toss sprinkles and chopped Oreos on top and near the base of the cake. Enjoy!
Notes
- You can skip the melting ice cream cone decoration if you don't want that.
- Try other cake and ice cream flavors. Get creative!
- Make a taller layer cake by doubling all the ingredients. You will need dowel support to prevent the cake from leaning and falling apart.
- Keep cake frozen. When you are ready to serve, remove from freezer and let it sit at room temperature for 10-15 minutes to make it easier to slice.
- Read additional variations and tips above.
- Leftovers can be stored in a sealed container in the freezer for up to 1 week.
Nutrition
An automated tool is used to calculate the nutritional information. As such, I cannot guarantee the accuracy of the nutritional information provided for any recipe on this site.

Leave a Reply