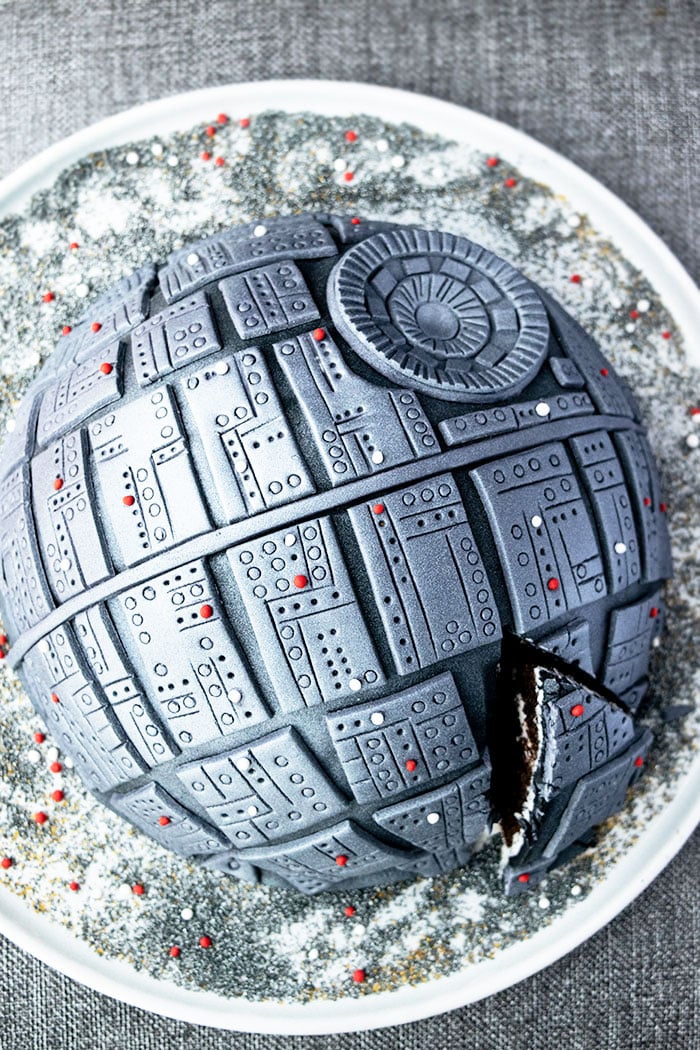
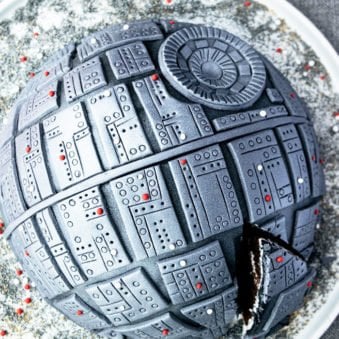
Easy Star Wars cake recipe and tutorial (Death Star cake)- Homemade with simple ingredients. It's a chocolate cake with vanilla buttercream and decorated in marshmallow fondant.
This is still my family's Best Birthday Cake ever but since my son is crazy about Star Wars, I made this star cake for him instead.
Want to Save This Recipe?
Enter your email & I'll send it to your inbox. Plus, get great new recipes from me every week!
By submitting this form, you consent to receive emails from CakeWhiz
After sketching a lot of complicated Star Wars cake ideas, I decided that the one I am about to share below, would be the easiest.
You can enjoy this cake beyond birthdays. It will make a great grooms cake or a unique wedding cake too.
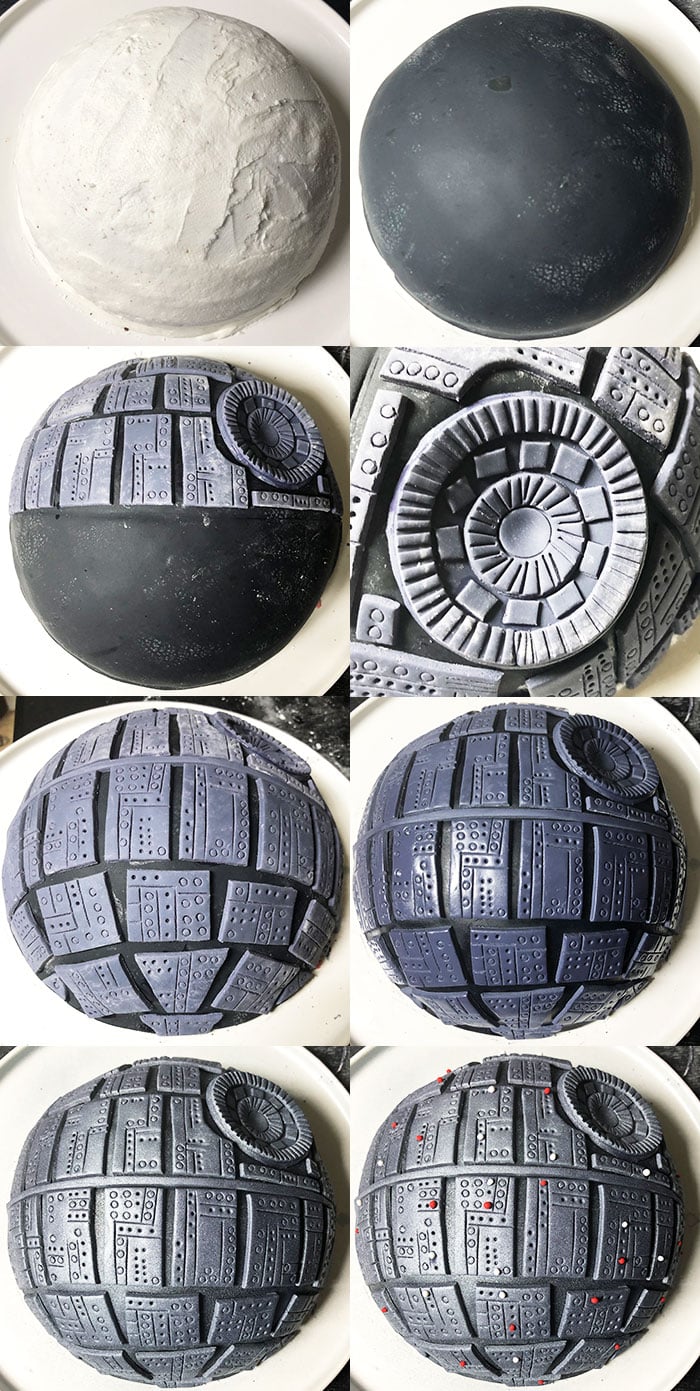
How to make Star Wars birthday Cake (Death Star Cake)?
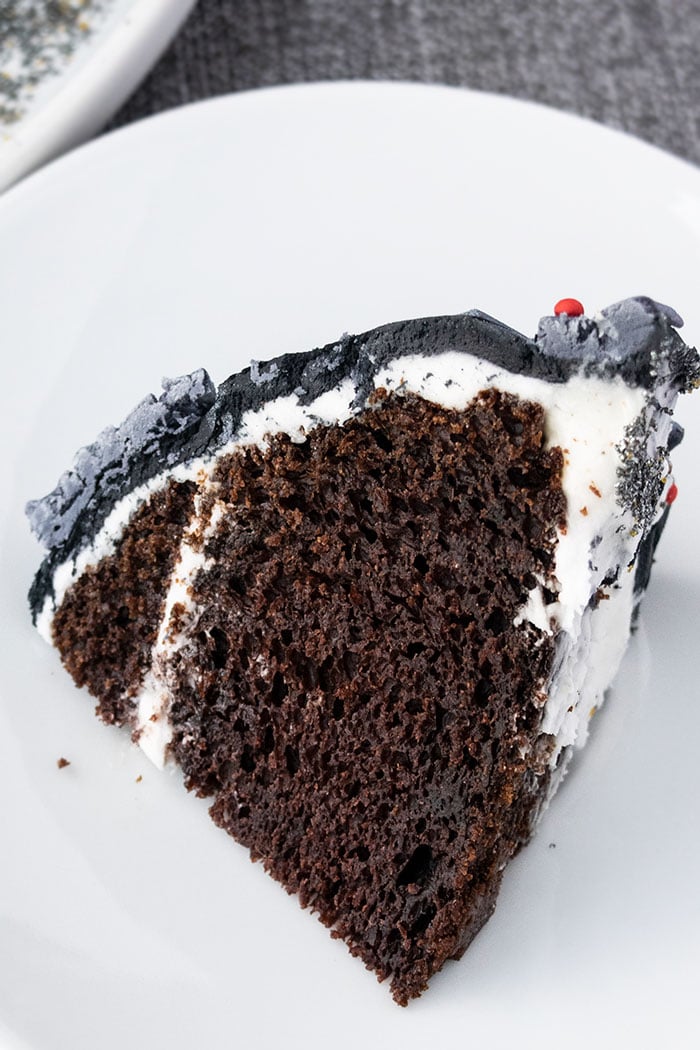
- Bake chocolate cake- Let it cool completely.
- Make frosting- Use it to fill and frost your dome cake.
- Roll out black fondant- Spread it over the cake and cut off excess along the sides.
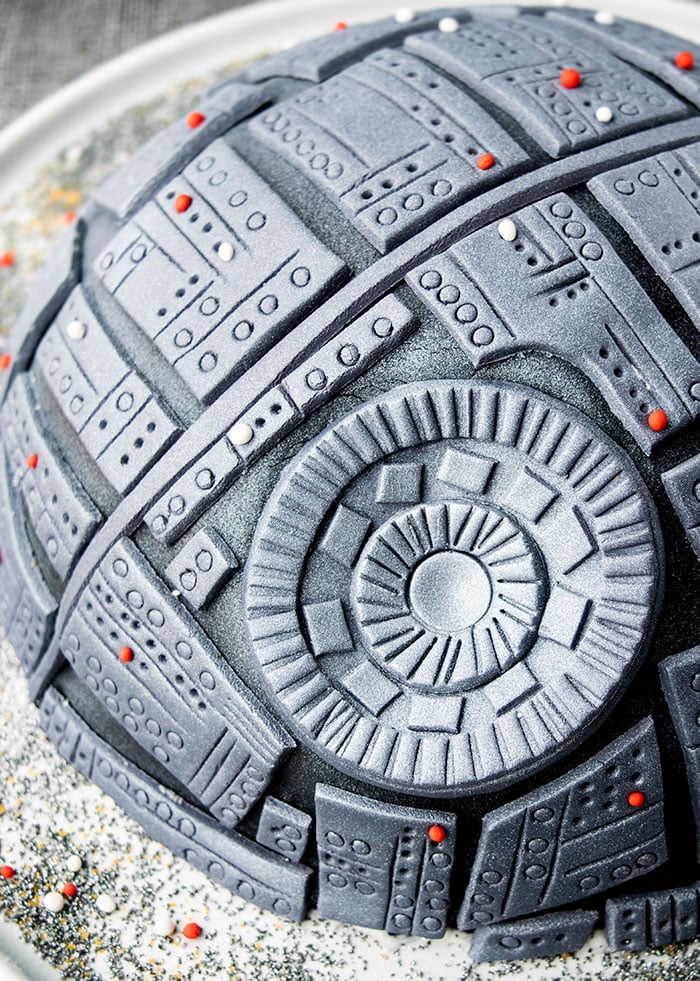
- Roll out gray fondant - Cut out a circle piece and add details to it with knife and some small circles and square pieces.
- Make an indentation- Use the back of a spoon or your fingers to gently dig into the top side of the cake and stick the circle piece here with some water.
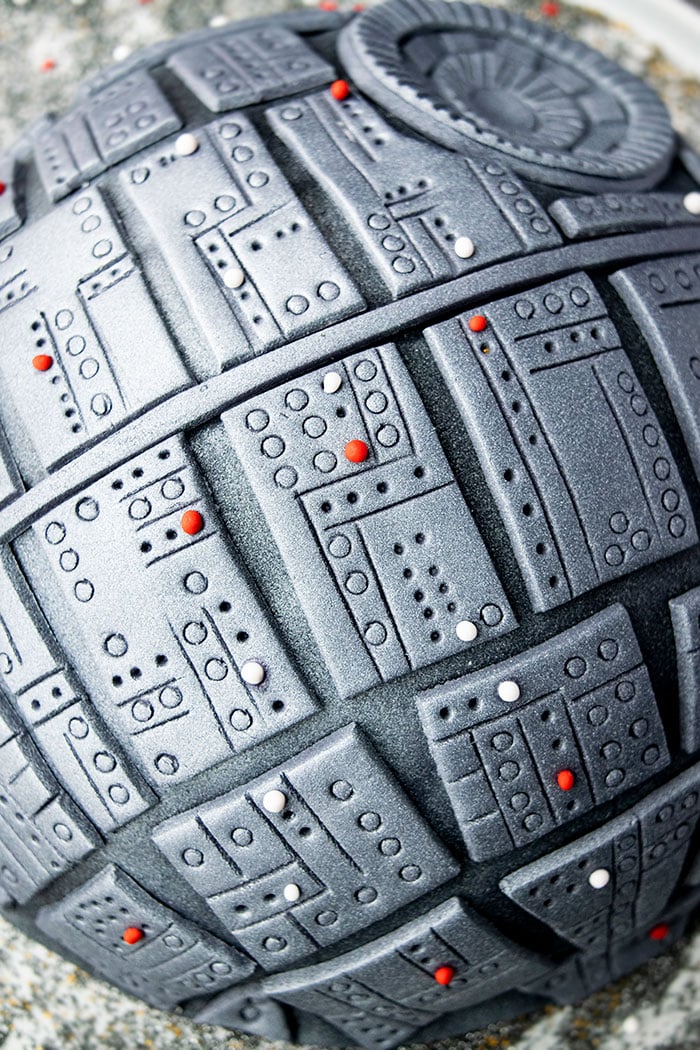
- Roll out gray fondant again- Cut out rectangle pieces.
- Add details- Use a sharp knife and various sizes of circle decorating tips to create indentations on each rectangle piece.
- Stick them to the cake- Use a paintbrush and some water to secure them.
- Steam cake- This dissolves all the powdered sugar residue and secures all the fondant pieces even more securely in place.
- Spray the cake- Use silver edible spray to create a metallic finish.
- Add little lights- Roll out tiny balls of red and white fondant and randomly stick them on the cake.
- Enjoy- You are finally done!
Variations
Use other cake flavors- Such as Vanilla Cake, Ginger Cake, Banana Chocolate Chip Cake or even Red Velvet Cake.
Try other frostings- Such as Caramel Frosting, Mint Frosting or even Peanut Butter Frosting.
Add star wars cake toppers- You can buy small lego toys at stores and just stick them around the cake and that would really take it over the top.

Storage
Room temperature- Once the cake is ready, I recommend storing it at room temperature away from humidity, moisture, sunlight for up to 24 hours until you are ready to serve. These would also be my "make ahead" instructions.
Fridge- Leftovers can be stored in a sealed container in the fridge for up to 3 days. Just note that the fondant will deteriorate a bit and become slightly soft and sticky over time.
Freeze- Leftovers should not be frozen because fondant does not thaw well.
Tips and Techniques
Homemade Marshmallow fondant vs. Store-bought fondant- Either can be used. I used my homemade version because it tastes the best.
Can I decorate the cake with frosting only? No! You can use the frosting to fill and ice the cake. But, you need to use fondant to add all the panels and details on this cake. Frosting will not give the same professional results.
Do not skip the edible silver spray- Because that adds the perfect metallic appearance.
Ice the cake when it cools down- If you frost a warm cake, the icing will melt and make a sticky mess.
Dome cake pan vs. Carving a dome- I recommend using a dome pan because it's quick and easy. You don't have to waste time carving, which is also quite messy with crumbs everywhere.
Use steam iron- When you have stuck all the fondant pieces on the cake, you will notice there will be a lot of powdered sugar residue. Use a steam iron from a 1 foot distance to steam the cake. This will dissolve the residue and leave a clean, shiny effect.
Do not spray silver color on a freshly steamed cake- Once the cake is steamed, it will be slightly wet for about 10 minutes. Be patient. Spray the cake once it dries or else it will make puddles on the cake.
Do not chill the prepared cake- The moisture and cool temperature from the fridge can lead to condensation and tiny water droplets to appear on the cake as it sits at room temperature.
Buy black fondant- Making black colored fondant (just like red fondant) at home is very hard. It takes a few days for the color to develop and even then, it's never a true black shade. Read this post for more info on coloring fondant, if you have never done that before: How to Color Fondant.
Use lots of powdered sugar- Sprinkle it on your work area to prevent the fondant from sticking to your table, rolling pin, knife e.t.c. Powdered sugar or cornstarch makes it easier to work with fondant.
Use very little water- Water is used for sticking fondant pieces on the cake. Use a paintbrush and very thin coating of water or else you would end up with a sticky mess.
More Birthday Cake Recipes
- Easy Monster Cake
- Peacock Cake
- Butterfly Cake
- Galaxy Cake
- Tie Dye Shirt Cake
- Cake Ball Cake
- Crying Baby Cake
- Mini Sushi Cake
Recipe
Star Wars Birthday Cake
Want to Save This Recipe?
Enter your email & I'll send it to your inbox. Plus, get great new recipes from me every week!
By submitting this form, you consent to receive emails from CakeWhiz
Ingredients
- 1 batch Chocolate cake
- 2 cups American buttercream frosting
- Black fondant
- Gray fondant
Instructions
- Bake chocolate cake in a 9 inch dome pan and let it cool completely.
- While it's cooling, make frosting.
- Once the cake has fully cooled down, slice it in half.
- Fill it will frosting.
- Then, ice the entire cake as smoothly as possible.
- Roll out black fondant and spread it over the cake. Cut off excess along the sides with a knife or pizza cutter.
- Roll out gray fondant and cut out a circle piece (about 3 inches) and add details to it with knife and some small circles and square pieces. Keep aside.
- Use the back of a spoon or your fingers to gently dig into the top side of the cake and make an indentation.
- Stick the circle piece here with some water.
- Roll out gray fondant again but this time, cut out rectangle pieces.
- Add details with a sharp knife and various sizes of circle decorating tips to create indentations.
- Use a paintbrush and some water to stick them on the cake.
- Steam the cake (with a steam iron) from a 1 foot distance and let it dry for about 10 minutes.
- Use silver edible spray to create a metallic finish.
- Roll out tiny balls of red and white fondant and randomly stick them on the cake for lights. Enjoy!
Notes
- Read all my tips above.
- Leftovers can be stored in a sealed container in the fridge for up to 3 days. Please note that the fondant may become slightly soft and sticky during this time, as it deteriorates in the fridge.
Nutrition
An automated tool is used to calculate the nutritional information. As such, I cannot guarantee the accuracy of the nutritional information provided for any recipe on this site.
Nicole Blomerus
Hi there! I’m just in the middle of making this cake for my son’s 25th birthday. I’m using Rice Krispie treat on the bottom hemisphere so the shape will hold better, but I’m still wondering how you place the dome so that it doesn’t roll off the plate/counter….? It’s only my 2nd time using fondant so wish me luck!
Abeer Rizvi
The Rice Krispie treat at the bottom is not required at all for the shape. The dome cake will hold its shape on its own.
Lorraine Tall
How many portions would this make?
I'm needing to do one for 20 people.
I'm thinking if I made two and made the cake a ball would that be enough?
Abeer Rizvi
This was a 9 inch cake and I got about 12 slices. You can either use a larger pan and make a bigger cake OR make 2 cakes instead of just 1.
Terri
I know this is an old post but I LOVE this cake. Can you tell me what size is your dome pan you used? And can I fully decorate this cake the night before and leave it on the counter, with all the fondant? I've never worked with fondant before, so any help will be much appreciated.
Abeer Rizvi
This was a 9 inch dome pan. Yes, you can decorate the night before and leave at room temperature away from direct heat and moisture.
Jenny
How did you decorate your cake board? It looks awesome!
Abeer Rizvi
I used a combination of silver and black sanding sugar with some tiny red round sprinkles.
Susannah Wilson
Hi there,
I plan on baking this for my partners birthday.
Could you tell me how much fondant I will need please? I have 500g of black and 500g of grey - will this be enough?
Thank you.
Abeer Rizvi
That should be enough. It's not a huge cake. Hope your partner likes the cake.