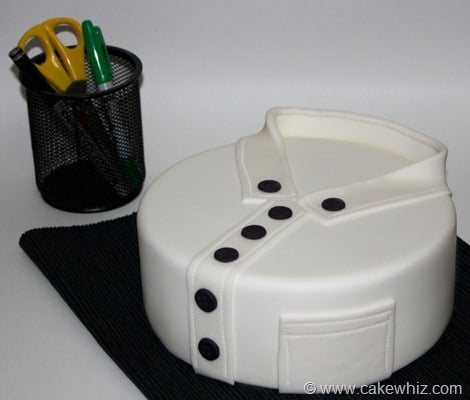
Learn how to make easy shirt cake, homemade with simple ingredients and supplies. This round cake is decorated in fondant. Perfect for Father's day or Dad's birthdays.
Most shirt cakes I have seen are rectangular in shape and they are very difficult to cover in fondant smoothly, especially the sides. It definitely requires a lot of practice and patience. Round cakes, on the other hand, are much easier to decorate. This Tie Dye Shirt Cake and these Shirt Cupcakes are another spin on today's design.
Want to Save This Recipe?
Enter your email & I'll send it to your inbox. Plus, get great new recipes from me every week!
By submitting this form, you consent to receive emails from CakeWhiz
How to make easy shirt cake?
- Bake cakes- A chocolate Oreo cake was the perfect choice.
- Let them cool- Until room temperature.
- Make icing- Chocolate cream cheese frosting paired perfectly with the cake flavor.
- Assemble– Place one cake on cake board, ice the top, then, place the other cake on top and then, ice the whole cake.
- Spread white fondant- On top of the cake.
- Cut off excess fondant- Along the base of cake.
- Add details– Such as collar, pockets and buttons, using black and white fondant and water.
Variations for round shirt cake design
Try other colors- I made a classic black and white shirt but feel free to get creative with different colors and different patterns.
Make a larger cake- A 10 inch or 12 inch cake would feed more people. The same instructions would apply to those sizes too.
Try other cake flavors– Such as Guinness Beer Cake or Marble Cake.
Pair with other frosting flavors- Such as Peanut Butter Frosting or Coconut Cream Chocolate Frosting.
Tips and Techniques
Don’t frost or decorate warm cakes- Because the warmth will cause the icing and fondant to melt and make a sticky mess.
Fondant vs. Gum paste- For this cake, fondant must be used. Gum paste dries hard and is typically used for small decorations and cake/ cupcake toppers.
Homemade marshmallow fondant vs. Store-bought fondant. Either can be used. I prefer homemade fondant because it tastes and smells really good.
Buy black fondant- It is really hard to make truly dark and perfect black colored fondant at home. You have to use a lot of gel coloring. It's messy and I highly recommend just buying it.
Use very little water to stick pieces- I highly recommend using a paintbrush, dipping it in water and tapping it on the side of a bowl or cup to get rid of excess water. Using too much water makes fondant sticky and messy.
Storage
Room temperature- Decorated cake can be left at room temperature for 24 hours as long as there is no perishable fruit filling that requires refrigeration.
Refrigerate- Leftovers can be stored in a sealed container in the fridge for up to 3 days. However the fondant decorations will become slightly sticky and tacky from the moisture in the fridge.
Freeze- Unfrosted cake and frosting can be stored separately in a sealed container for up to 1 month. When you are ready to enjoy it, let it thaw in the fridge overnight and then, decorate as per instructions below.
Make ahead instructions- This cake can be baked and decorated 1 day in advance and stored at room temperature until you are ready to serve.
More Father's Day Cake Ideas or Dad's Birthday Cake Ideas
- Father's Day Cake (Tool Box Cake)
- Easy Pokemon Cake (Poke Ball Cake)
- Easy Sushi Cake
- Easy Star Wars Cake (Death Star Cake)
- Easy Galaxy Cake
- Pull Apart Football Cupcake Cake
Recipe
Easy Shirt Cake
Want to Save This Recipe?
Enter your email & I'll send it to your inbox. Plus, get great new recipes from me every week!
By submitting this form, you consent to receive emails from CakeWhiz
Ingredients
- 2 Chocolate oreo cakes Dimensions: 8x2 each
- 4 cups Chocolate cream cheese frosting
- 4 cups Fondant White and black
Instructions
- Bake the cakes and and let it cool completely.
- Place one cake on a cake board and use a spatula to spread icing on top.
- Place the other cake on top of the frosting and press gently until secure.
- Ice the entire cake smoothly in frosting.
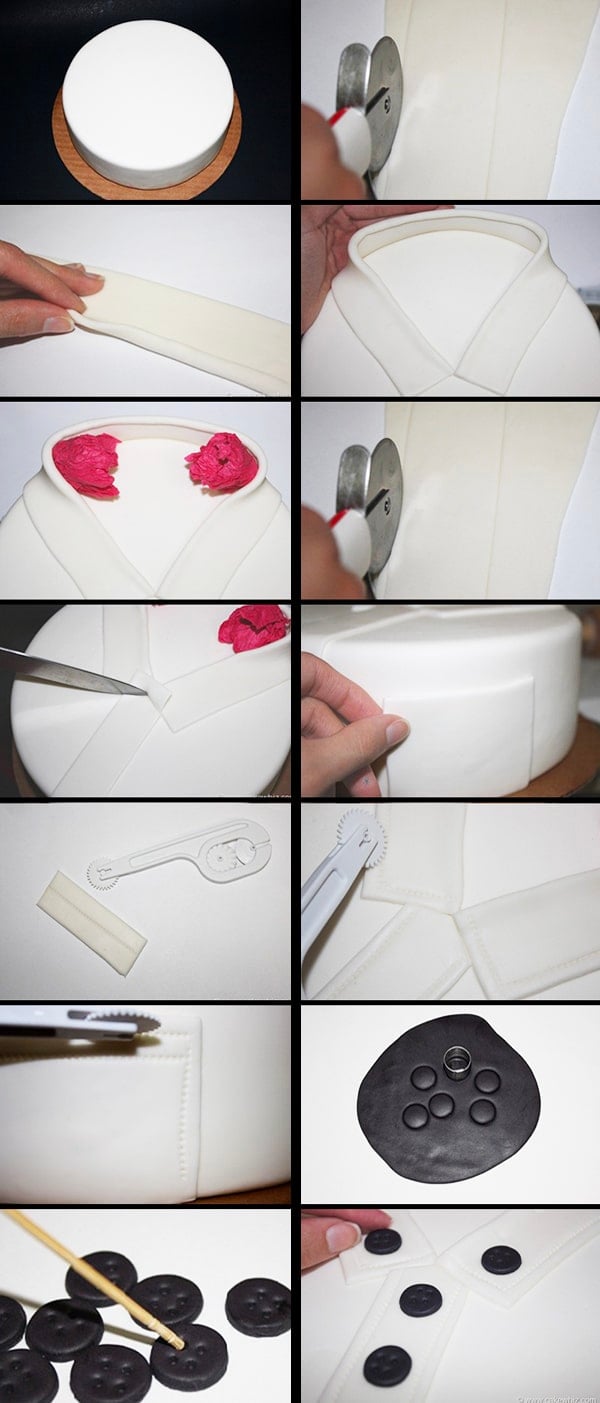
- Roll out white fondant.
- Spread it over the frosted cake smoothly.
- Cut off excess around the base of the cake with a pizza cutter.
- Cut a white fondant strip which is 2 inches wide and about 20 inches long.
- Fold one side of the strip slightly inward. This will be the shirt’s collar.
- Using some water and a paintbrush, stick this strip around the top of the cake, where you want the collar to be positioned.
- Get some gift wrapping tissue paper and crumple it up. Place these in the middle and along the sides of the collar so that it doesn’t lose its shape.
- Cut another white strip which is also 2 inches wide and about inches 20 long.
- Stick this piece below the collar, along the center with some water. This will be the button line.
- Cut off excess fondant on the top and bottom of this strip with a knife.
- Cut a rectangular piece of white fondant (mine was roughly 3 by 2 inches). This will be the shirt’s pocket.
- Use water to stick this piece on the side of the cake or wherever you want this pocket to be positioned.
- Use Wilton’s cutter/embosser tool to make stitch marks around the collar, the button line and even the pocket.
- For the buttons, cut out a few circles using a small cookie cutter.
- Use a toothpick to make 4 tiny holes in these buttons
- Use some water to stick these along the button line and collar and you are done. Enjoy!
Notes
- Read all my tips above.
- Leftovers can be stored in a sealed container in the fridge for up to 3 days but the fondant decorations will become slightly sticky.
Nutrition
An automated tool is used to calculate the nutritional information. As such, I cannot guarantee the accuracy of the nutritional information provided for any recipe on this site.

anncoo
Regret for not coming here earlier. This is amazing!! I have always wanted to learn fondant and thank you much for sharing. I want to add you in my blogroll
Kim
Love this!! I have no patience to make this though. I wish I were that precise, but I just tend to "wing it" more often than I should in projects like this. Simply amazing! I've just sent it to my cake decorating friend!!!
Native
Wow! that shirt cake looks really cool. Also looks like a ton of work. Good job, and thanks for checking us out!
Lin Ann
That is so cool!
Laurie
this cake is beautifully done!
Natalie
This is so cute. Will be perfect for fathers day. Only problem is that whenever I make such a cute cake I hate to cut it!
Frenzy
Such an amazing talent. This is great! Thanks for sharing the step by step process.
Tiffany
AMAZING! This totally looks like a shirt. You make it look so simple... but deep down inside I have a feeling it's not
Mom Chef
I bow to your greatness. That cake is absolutely amazing. However, can you please do one in flannel? That's the kind of shirt my Hubby wears. I don't remember the last time I saw him in a white shirt.
Lori
That cake is awesome! I love your attention to the details of the 'stitching' and the button holes! Well done!
Barbara
You are so talented! What a fun cake!
thoma
I'M SPEECHLESS. THIS IS FABULOUS. and you make it sound so easy!! superb work Abeer. do put it up in flickr!
Bee
Very fantastic, ur hands are blessed darlyn. Tnx for sharing. Ur a motivator
tonia
This is sweet. tHANKS FOR SHARING THIS. It's quite informative.
Batia
I have been looking for hours for a shirt cake, thank you so much for this tutorial. Its beautiful !!
peace
Wow! Awesome! I was jst thinking of how I'd use my circle pan to make a shirt cake for my brother n Now this!? God bless u dear, tnx for sharing. N u make it look soooo simple I feel like I've done it alraedy and it came out Perfect!!