Learn how to make easy fondant flowers with this step-by-step tutorial and simple ingredients. Great for decorating cakes and cupcakes. No fancy tools or cutters needed. Easy enough for beginners!
These edible flowers are fantasy-based but still so pretty. Use them to decorate cakes, cupcakes, cookies, brownies or any other dessert you like. Make them in different sizes and colors to suit any occasion and theme. Fore more inspiration, be sure to check out all of these other simple tutorials, starting with this post on How to Make Easy Fondant Roses (Ribbon Roses) and this tutorial on How to Make Royal Icing Flowers (Sugar Flowers) plus this guide on How to Make Buttercream Flowers (Russian Piping Tips). If you are still not satisfied, check out these Fondant Daisies and these Easy Wafer Paper Flowers.
Want to Save This Recipe?
Enter your email & I'll send it to your inbox. Plus, get great new recipes from me every week!
By submitting this form, you consent to receive emails from CakeWhiz
How to make Easy Fondant Flowers?
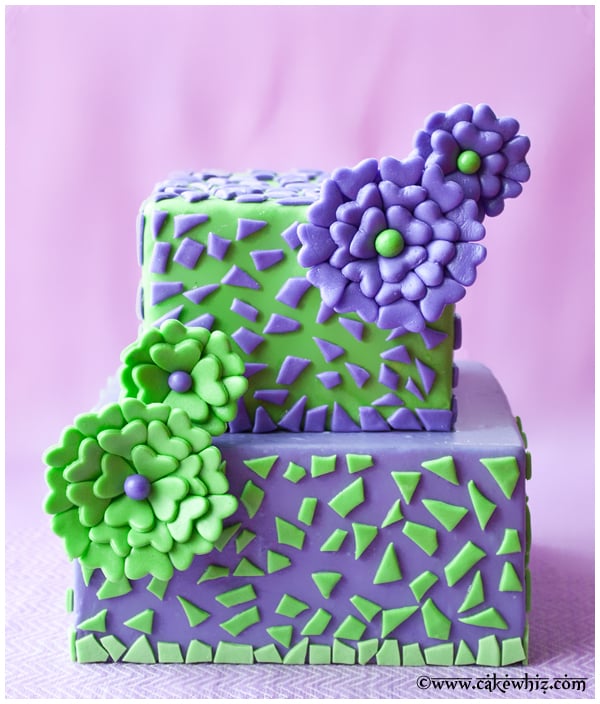
- Bake cakes- The bottom tier was chocolate and the top tier was vanilla.
- Let them cool- Until room temperature.
- Make icing- American buttercream frosting was the best choice.
- Assemble bottom tier– Cut cake in half. Place one chocolate cake on cake board, ice it, place other cake on top, ice entire cake smoothly. Cover it in purple fondant.
- Assemble top tier- Cut cake in half. Place one vanilla cake on cake board, ice it, place other cake on top, ice entire cake smoothly. Cover it in green fondant.
- Final assembly- Place this prepared top tier on top of the bottom tier with dowel support.
- Make flowers– And let them dry overnight.
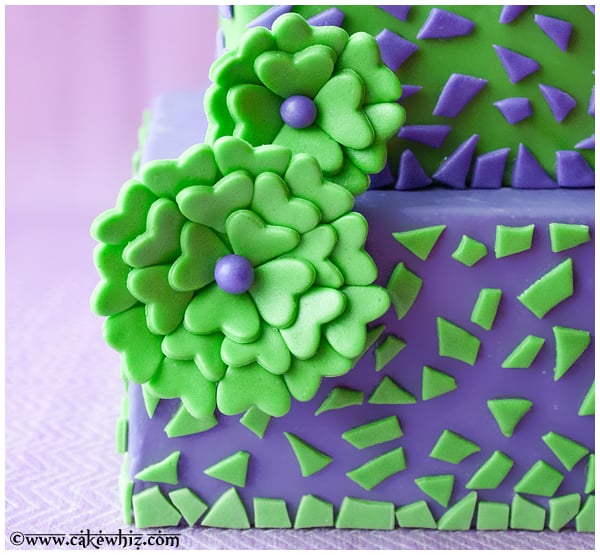
- Final decoration– Stick abstract purple and green fondant cut-outs on both tiers. Then, stick the dry flowers on cake.
Can you make fondant flowers ahead of time? Are they edible?
Yes, this is actually recommended because it can take up to 24 hours for flowers to dry and harden. Yes, they are completely edible.
Is it better to use gum paste or fondant?
Both can be used. The only difference is that gum paste dries hard and also dries quicker than fondant.
Variations for sugar paste flowers
Try other color combinations- I chose purple and green but the possibilities are endless.
Use other cutters- I used the heart shape but you can use oval or circle to make a different flower design. The same instructions will apply.
Try other cake flavors- Such as German Chocolate Cake or Cherry Cake.
Try other frosting flavors- Such as Maraschino Cherry Frosting or Cooked Flour Buttercream (Ermine Frosting).
Fill cake- With jams and preserves, Homemade Caramel Sauce or Dulce De Leche or nut butters. You can also add fresh berries or chopped up nuts or candy bars.
Flavor fondant- Use extracts. Make sure the flavor you choose compliments the cake and frosting flavors too.
Consider a different cake shape- I made square cakes but you can bake classic circle cakes.
How to fix fondant bubbles, bumps and tears? Try this little trick: Cut out some weird and irregular shapes of fondant. Start sticking them on to your cake randomly to cover all the flaws.
Tips and Techniques
Homemade marshmallow fondant vs. Store-bought fondant- Either can be used. Homemade version definitely tastes better but store-bought version is convenient since it can be bought pre-colored.
Don't decorate warm cakes- Because the heat will cause the icing and fondant to melt and become sticky.
Don't roll fondant too thick- Because that will make the blossoms too heavy and they will fall off the cake or damage the cake.
Add support- Since this is a tiered cake, dowels or bubble tea straws should be used for support to prevent the cakes from collapsing onto each other.
Use gel colors for coloring fondant- This works much better than liquid colors because gel colors are thicker and more concentrated and will not make the fondant wet and sticky.
Drying time for flowers may vary- Too much moisture and humidity in air = Slower drying time. Speed up the drying time by placing a table fan pointed directly on the flowers.
Don't use a lot of water- Water is being used as a glue to stick fondant pieces together. Adding too much will create puddles and make fondant very sticky to work with. It will also increase the drying time considerably.
Flowers must be completely dry before being glued onto the cake- This is very important because if they are not dry, they will lose their shape and bend over and look odd.
Storage
Room temperature- Decorated cake can be left at room temperature for up to 24 hours as long as there is no fruit filling that requires refrigeration.
Refrigerate- Leftovers can be stored in a sealed container in the fridge for up to 3 days. However the fondant decorations will become slightly sticky and tacky from the moisture in the fridge.
Freeze- Unfrosted cakes and frostings can be stored separately in a sealed containers for up to 1 month. When you are ready to enjoy this dessert, let them thaw in the fridge overnight and then, decorate as per instructions below.
Make ahead instructions- This cake can be baked and decorated 1 day in advance and stored at room temperature until you are ready to serve.
More Decorated Cakes
- Peacock Cake (And Cupcakes)
- Lord of The Rings Cake (Sauron Eye Cake)
- Easy Emoji Cake (Poop Cake)
- Erupting Volcano Cake (With Dry Ice Smoke)
- Easy Shoe Cake (Sneaker Cake)
Recipe
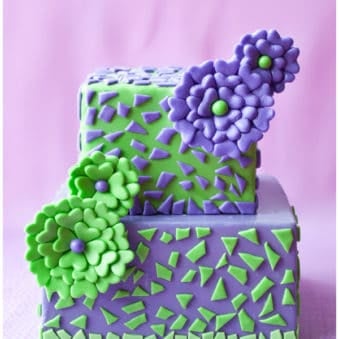
Easy Fondant Flowers
Want to Save This Recipe?
Enter your email & I'll send it to your inbox. Plus, get great new recipes from me every week!
By submitting this form, you consent to receive emails from CakeWhiz
Ingredients
- 2 Chocolate cakes For bottom tier, Two 8x2 inch square cakes
- 2 Vanilla cakes For top tier, Two 6x2 inch inch square cakes
- 6 cups American buttercream frosting
- 4-5 cups Marshmallow fondant Purple, Green
Instructions
- Bake cakes and allow them to cool completely.
- While cakes are baking and cooling, prepare frosting.
- Trim the domes and sides of the cakes, if necessary.
- Prepare bottom tier: Place one chocolate cake on a cake board. Use a spatula to spread icing on top. Place the other cake on top and press gently to secure into place. Use a spatula to cover the entire cake smoothly in frosting. Roll out purple fondant and spread it smoothly over the iced cake. Cut off excess along the bottom with a pizza cutter. Keep aside.
- Prepare top tier: Place one vanilla cake on a cake board. Use a spatula to spread icing on top. Place the other cake on top and press gently to secure into place. Use a spatula to cover the entire cake smoothly in frosting. Roll out green fondant and spread it smoothly over the iced cake. Cut off excess along the bottom with a pizza cutter. Keep aside.
- Assemble both tiers: Place the prepared vanilla cake on top of the prepared chocolate cake. Make sure to stick dowels or bubble tea straws into the bottom tier for support. Cut out small random shapes of green and purple fondant and stick them on the cakes to create a mosaic pattern. Keep this whole cake aside as you work on the flowers.
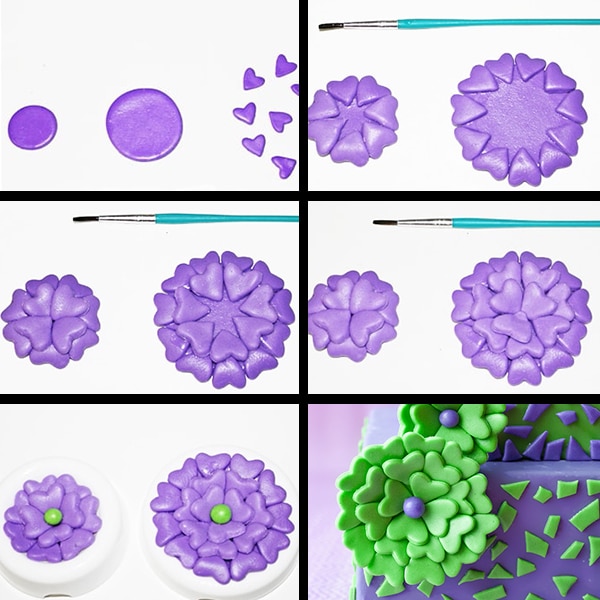
- Roll out purple fondant. Cut out 1 big and 1 small circular piece. Also, cut out many small heart pieces.
- Brush water on the outer edge of the circle pieces. Stick the heart pieces in a circular formation until you have a row of hearts.
- Brush some water on the inside of the circle.Stick more heart pieces here, until you have another row of hearts.
- Brush water on the inside of the circle again. Stick more heart pieces here, until you have another row of hearts.
- Make two little balls of green fondant. Stick them in the center of each flower with some water.
- Place these fantasy flowers in flower forming cups and let them dry overnight or until they harden.
- Stick them on the cake with thick royal icing or melted chocolate. Enjoy!
Notes
- Read all my tips above.
- Leftovers can be stored in a sealed container in the fridge for up to 3 days.
Nutrition
An automated tool is used to calculate the nutritional information. As such, I cannot guarantee the accuracy of the nutritional information provided for any recipe on this site.

Abeer
@ Cakegirl's Kitchen... I never thought i had patience before i started cake decorating. Give it a shot... you would be surprised at the patience that suddenly takes over you...lol
Cakegirl
I love this.... I wish I had the patience.
Abeer
@ Asmita... Awww. I would have gladly shared whatever I know with you
Asmita
You are so talented! I wish I could come over and learn how to make all these fancy things.
Abeer
@ iWilkerson...Thanks. I am just keeping my fingers crossed and hoping people continue to like what I share
I Wilkerson
Well deserved--your cakes are gorgeous!
zaib
Thanks alot
Abeer
Hey zaib, I don't refrigerate my cakes after covering them in fondant. I have heard some people have successfully been able to do this but it hasn't worked for me. Any time i have kept my fondant covered cake in the fridge, the fondant started "sweating" and melting AFTER i took it out and it became a disaster.
This is what i would suggest.... Bake your cakes and prepare your icings ahead of time. Also, try to make all your fondant decorations in advance. That way, on the day of the party... All you have to do is assmeble your cake and decorate it. Keep it at room temperature.
Good luck
zaib
Hi abeer ! Love ur blog . Just a quick question ...i will be making a birthday cake for my son and it will be my first fondant cake . Would u recommend refrigerating the cake after its covered with fondant or leaving it out ? Such conflicting info out there ! Thanks .
Abeer
@ Jacquee...Awwww, Thanks! You are absolutely right... fantasy flowers are the best. One can do whatever he or she pleases and the end result is remarkable