Use this tutorial to learn how to make cake pops and cake balls. Quick and easy, made with simple ingredients with various flavors, decorations.
This the best way to use up leftover cake scraps. I have been making them for years now and learned a lot and sharing all the tips and tricks I have learned along the way.
Now, I am not Bakerella by any means, who started this trend and is incredibly talented. Even some cafes and bakeries sell them. My son loves those cute Starbucks cake pops.
Want to Save This Recipe?
Enter your email & I'll send it to your inbox. Plus, get great new recipes from me every week!
By submitting this form, you consent to receive emails from CakeWhiz
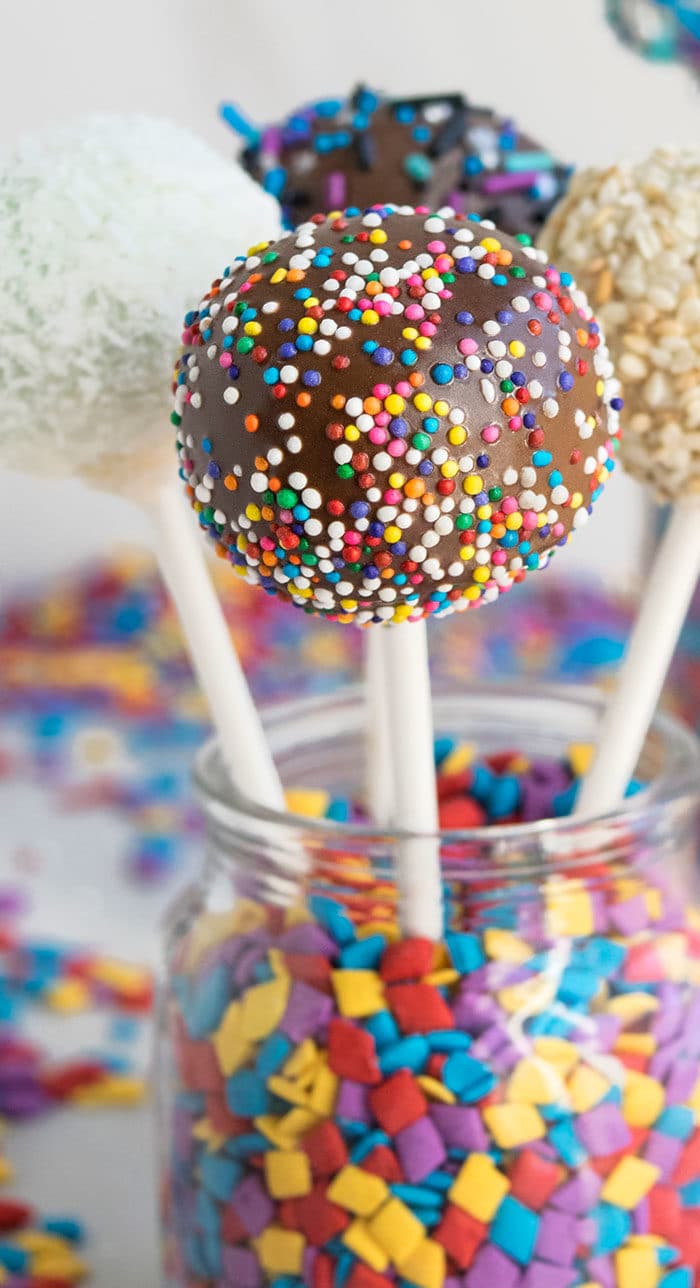
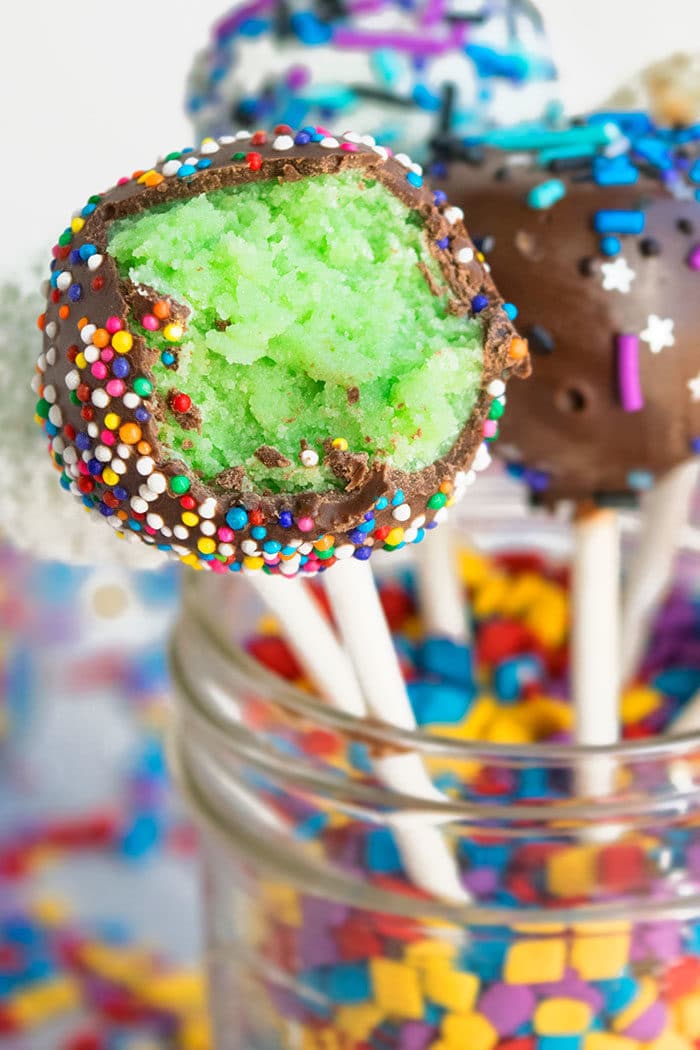
You can use whatever leftover cake you like. I used leftover Pistachio Cake for these pops. The color makes them fun for kids and a perfect dessert for St.Patrick's Day.
How to make cake pops?
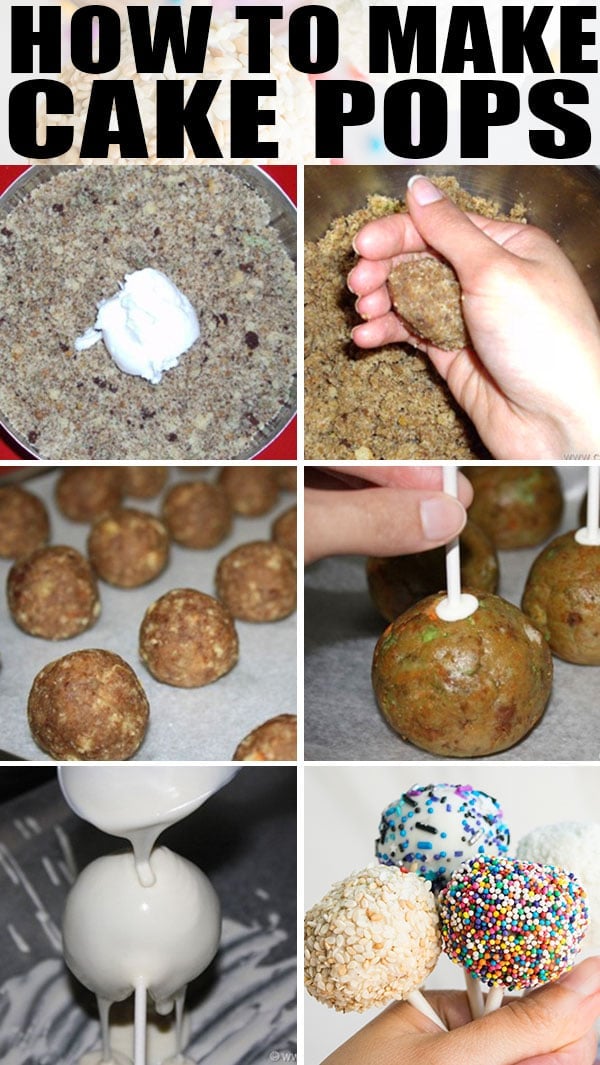
- Bake cake.
- Crumble cake.
- Mix in frosting.
- Roll into balls and insert sticks.
- Chill.
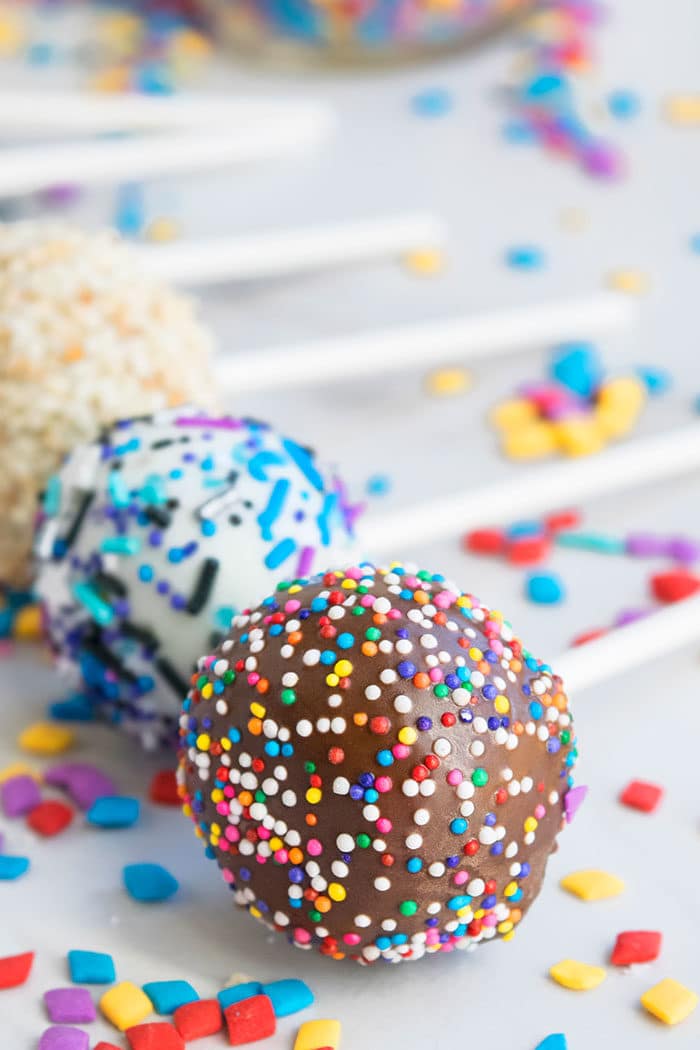
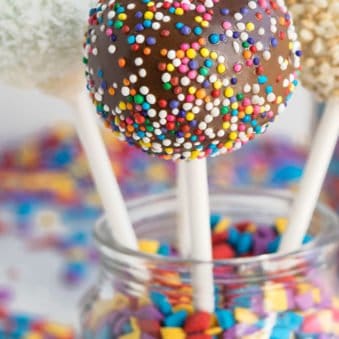
- Dip in chocolate.
- Decorate with sprinkles.
- Chill again and enjoy.
How to make cake balls?
The steps are very similar:
- Bake cake.
- Crumble cake.
- Mix in frosting.
- Roll into balls.
- Chill.
- Dip in melted chocolate, using a fork and tap off excess.
- Place on a cookie tray, lined with wax paper.
- Decorate with sprinkles.
- Chill again and enjoy.
Can I make cake pops ahead of time?
Yes, you can make them 2 days ahead of time. Keep them in the fridge until you are ready to serve. Same applies for cake balls too.
Tips for cake pop recipe
- Cakes, especially fresh cakes are already very moist and if you add a lot of frosting to the crumbs, they will not be able to hold their round shape. So, go easy on the frosting! Add a little at a time.
- Cake mixture is ready when it's crumbly but still soft and moist to hold its shape. Shape a few balls each time you mix in a little frosting to see if it's easy for you to shape balls.
- Mixture can be combined with your hands, spoon, fork or even a hand-held mixer or stand mixer.
- The number of pops you get from this recipe depend on how big or small you make them.
- Store bought or homemade cake can be used.
- Store bought or homemade frosting can be used.
- To ensure all the pops are the same size, use an ice cream scooper or measuring spoons.
- Don't skip the freezing steps because that allows the cake ball to firm up and hold its shape and not fall off the stick when you are covering it in melted chocolate.
- To ensure the nice round shape, gently push the chocolate dipped pops into a block of styrofoam or box with tiny holes.
Variations
- Oreo cake pops- Instead of cake mixture, crumble Oreos and mix in frosting and use that mixture to make small balls.
- Red velvet pops- Push a stick into these Red Velvet Truffles and dip them in melted chocolate.
- Vanilla and chocolate cake pops- Probably the two most popular flavors. Use either chocolate cake mix or yellow cake mix. Use either chocolate frosting or vanilla frosting.
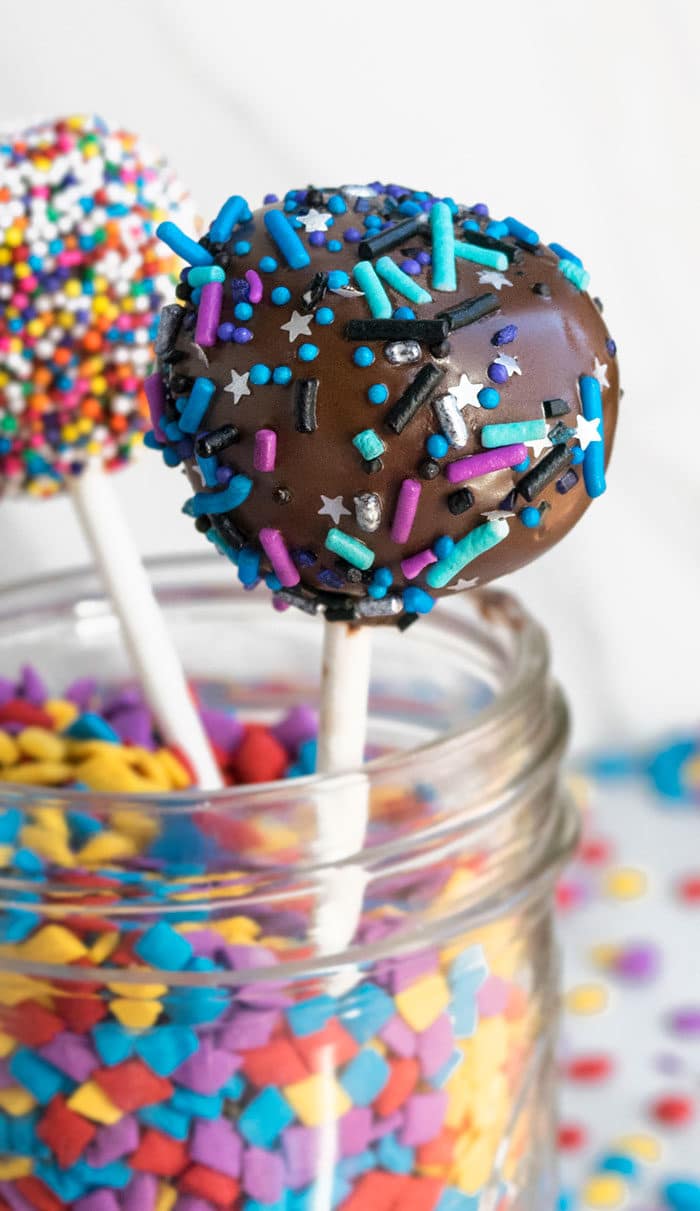
- Use seasonal sprinkles and candies to decorate Holiday pops for Easter, Christmas Halloween, Thanksgiving e.t.c.
- Unicorn or birthday pops- The best way to get this look is through the use of bright and colorful sprinkles.
- Wedding cake pops- Use white cake, vanilla frosting, white chocolate and decorate in white edible pearls, white sprinkles. These look very classy and elegant and also make a great party favor or dessert.
Supplies and ingredients needed
- Cake- Can be any flavor and can be fresh or simply leftovers.
- Frosting- Can be any flavor.
- Cake pop sticks- Lollipop sticks or even popsicle sticks work very well too. They can be ordered online or you can get them at Wal Mart, Michaels or Hobby Lobby or even Amazon.
- Cake pop maker or molds and rollers- I never needed to order these/ However, some people love the molds for making different shapes instead of just simple round pops and they loved the rollers to make little balls. I just use my hands.
- Cake pop stand or holder- I haven't purchased these either because I typically use a styrofoam block or a DIY stand, which is cheaper. You can also decorate the styrofoam in wrapping paper and ribbons for dessert tables.
Other desserts on sticks
Recipe
Homemade Cake Pops Recipe
Want to Save This Recipe?
Enter your email & I'll send it to your inbox. Plus, get great new recipes from me every week!
By submitting this form, you consent to receive emails from CakeWhiz
Ingredients
- 1 box Cake mix Baked according to box instructions into a 9x13 cake
- ½- ¾ cup Buttercream frosting
- 2 cups Chocolate Melted, White or Semisweet
- Decoration Sprinkles, Shredded coconut, Chopped nuts, Sesame seeds e.t.c.
Instructions
- Bake cake, as per box instructions and let it cool down OR bring out all of your leftover cake scraps too. It can be one flavor or multiple flavors, as long as they work together.
- Crumble the cake in a deep mixing bowl. Use your hands or a potato masher, a fork or even a mixer.
- Start adding a little frosting a (2 tablespoons at a time), while mixing. The amount of icing will depend on how moist your cake is. Typically, you need to more icing to dry cakes and less icing to moist cakes. The cake mixture should eventually be moist and slightly crumbly but still hold a ball shape.
- Use a small ice cream scooper or spoon to remove small portions of this mixture and roll into tight balls.
- Place these balls on a cookie tray lined with wax paper.
- Dip the dip of cake pop sticks in melted chocolate and insert them halfway into the cake balls.
- Freeze tray for about 20 minutes until the pops become firm.
- Remove cake balls from freezer and hold the pop in one hand and use your other hand to pour melted chocolate over it OR you can dip your cake pop into a bowl of melted chocolate. Swirl and tap on the edge of the bowl gently to let excess chocolate drip off.
- Toss sprinkles or any other decoration now, before chocolate sets up. Work quickly!
- Then, push this decorated cake pop into a styrofoam and freeze for about 5-10 minutes or until chocolate sets. Enjoy!
Notes
- Read all my tips above.
- Leftovers can be stored in a sealed container in the fridge for up to 2 days.
Nutrition
An automated tool is used to calculate the nutritional information. As such, I cannot guarantee the accuracy of the nutritional information provided for any recipe on this site.
Until next time, tata my lovelies!
basmah
I SEE UR HANDS 😛 very niceeeee 😉
paisley
Have you ever tried getting candy coating for them? they turn out shinier and prettier and then they come in more colors
You can buy them at Michael's, Joannes, and you can buy off brand ones that say "ALMOND BARK" but it's just candy melts. That's what me and my mom have been doing. and then if needed you can mix colors
Abeer Rizvi
I have used Almond bark too. Candy melts are still my favorite to use because they come in such fabulous colors!
Amy Urian
Thank you so much for your detailed instructions. It makes these ideas come to life. I am in the mist of doing cake pops. I have the cake pop pan but my last attempt did not fair so well. I am going to use your instructions above but use the pan to form the balls. Your butter cream icing is also fabulous. And is my new fav. Thank you for your kitchen experimentation.
Abeer Rizvi
Thanks for your sweet comment Amy! I hope your cake pops turned out well with this tutorial
Angela Walker
What type of chocolate icing was used ?
Thanks
Abeer Rizvi
I dipped them in melted chocolate with some desiccated coconut mixed in.
This is the chocolate frosting you can use in the crumbled cake: https://cakewhiz.com/chocolate-buttercream-icing/
K8lin
When i cup the balls it's easier to shape the dough.
Cindy
Thank you for your detailed instructions! Mine turned out great. My family loved them but I thought they were too sweet. I'm going to just use cream cheese the next time to mix with the cake instead of frosting. I didn't make my own frosting and the store bought wasn't nearly as good, thus the reason they were so sweet I believe. Thank you again!!
Abeer Rizvi
Using just cream cheese would really help cut down the sweetness. Happy to hear you found the instructions helpful.
Vicki Dorst
I found a cake pops stand at Walmart for 3.50. Works great and is reusable. Definitely worth it. Better than styrofoam or anything else I have tried.