Learn how to make easy homemade gingerbread house for Christmas. Recipe for hard gingerbread cookies and royal icing included plus tips for construction and decoration.
A few years ago, my mom and I played around with a few ingredients and we came up with the recipe for these gingerbread cookies. We were very disappointed with the result. These cookies were very hard but they tasted good. Then we realized that cookies being hard is not always a bad thing since they can be used for building edible structures. Honestly, assembling this house was much harder than I had anticipated and time-consuming as well. I am sure there are tips and tricks which I don’t know yet, but it was still fun. If you like the spiced ginger flavor as much as me, then check out these Jumbo Gingerbread Men Cookies, Gingerbread Cupcakes {With Cake Mix}, and this Easy Gingerbread Recipe {Gingerbread Cake}.
Want to Save This Recipe?
Enter your email & I'll send it to your inbox. Plus, get great new recipes from me every week!
By submitting this form, you consent to receive emails from CakeWhiz
Table of contents
- How to bake homemade gingerbread house cookies recipe from scratch?
- How to construct easy Christmas gingerbread house? How to assemble/ build it?
- Gingerbread house icing (How to stick cookie pieces?)
- How to decorate DIY gingerbread house
- More gingerbread house ideas (Variations)
- Tips and techniques
- Storage
- More classic Christmas desserts
How to bake homemade gingerbread house cookies recipe from scratch?
- Mix ingredients- This includes butter, brown sugar, corn syrup, milk, cinnamon powder, grated ginger and baking soda.
- Add flour- Mix again.
- Knead the dough- Into a ball.
- Roll out dough- Between two sheets of parchment paper.
- Cut house shapes- Using a template.
- Bake- Then cool.
How to construct easy Christmas gingerbread house? How to assemble/ build it?
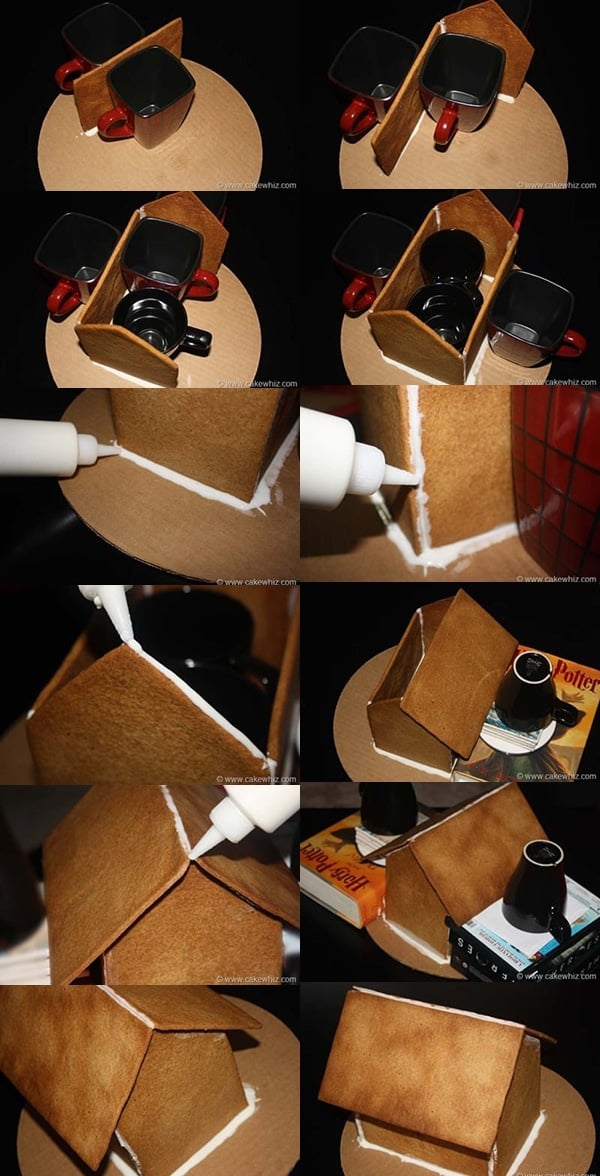
- Pour a line of thick royal icing on the cake board- Place one of your side walls on top of it. To support the wall, place something heavy like mugs on either side.
- Repeat this- For the remaining 3 walls. Pour some icing between the two walls for extra support.
- To prevent the walls from collapsing- Pour more icing around the base of the four walls and between them.
- Let it dry- For an hour or two.
- Add roof- Pour a line of icing along the top of the walls. Add roof panels with icing between both.
- Let it dry- For 6-12 hours.
- Decorate it- Using candies.
Gingerbread house icing (How to stick cookie pieces?)
I used royal icing for assembling the house because it’s the “glue” that holds everything together. This thick Easy Glace Icing {Sugar Cookie Icing} can also work as glue, if you prefer. Then, use American Buttercream Frosting Recipe to decorate details on the assembled house. You can use food coloring to make it whatever color, or colors you like for your creation!
How to decorate DIY gingerbread house
Candies- Such as marshmallows, candy canes, gum drops, mints, m&ms, Twizzlers, Jolly Ranchers, pop rocks e.t.c.
Pre-made sugar items- Like gingerbread men, Santa, Mrs.Claus, elves, snowmen, reindeer, or Christmas trees.
Non-candy items- Such as sprinkles, cinnamon sticks, cereal (so many different shapes and colors), coconut, sugar, nuts, dried fruits, crumbled cookies, pretzels.
Snowflake decorations- Such as the snowflakes from this Chocolate Snowflake Cake and these Snowflake Cookies.
Fondant decor- These can be homemade or store-bought. You can use cookie cutters to get the relevant shapes.
Add decorative windows- Using these Easy Stained Glass Cookies as the windows. You can also bake small square cookie pieces and decorate them with icing to look like a window and stick it to the house. Another idea is to emboss the window design on the cut out pieces with a knife, prior to baking.
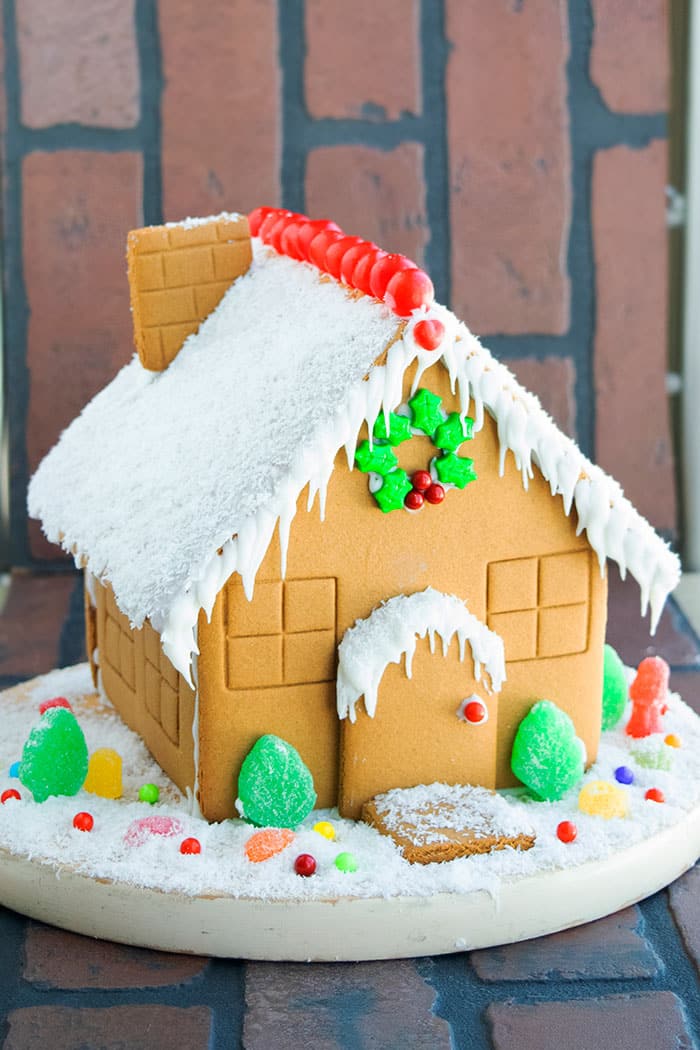
Snow effect- Use powdered sugar, desiccated coconut, white sprinkles, white edible pearls, sanding sugar or even granulated sugar.
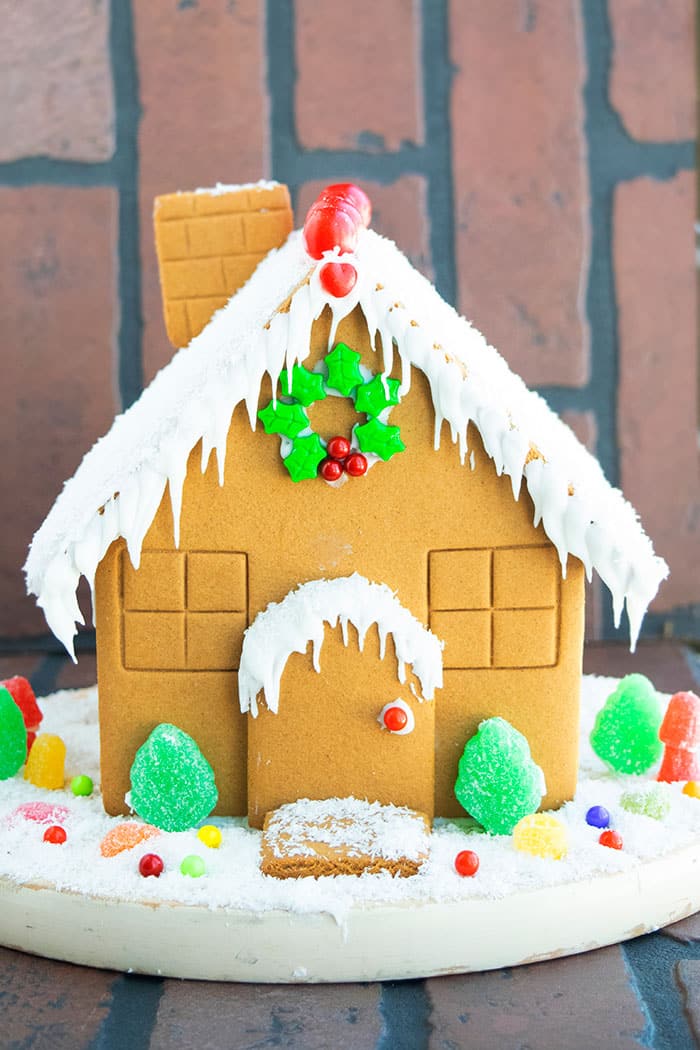
Add different cookie features for the house- Like windows, door, chimney, fence, trees. Go as simple as you like or as detailed as you like.
Add icicles- Use royal icing and let it pour down along the edges and harden.
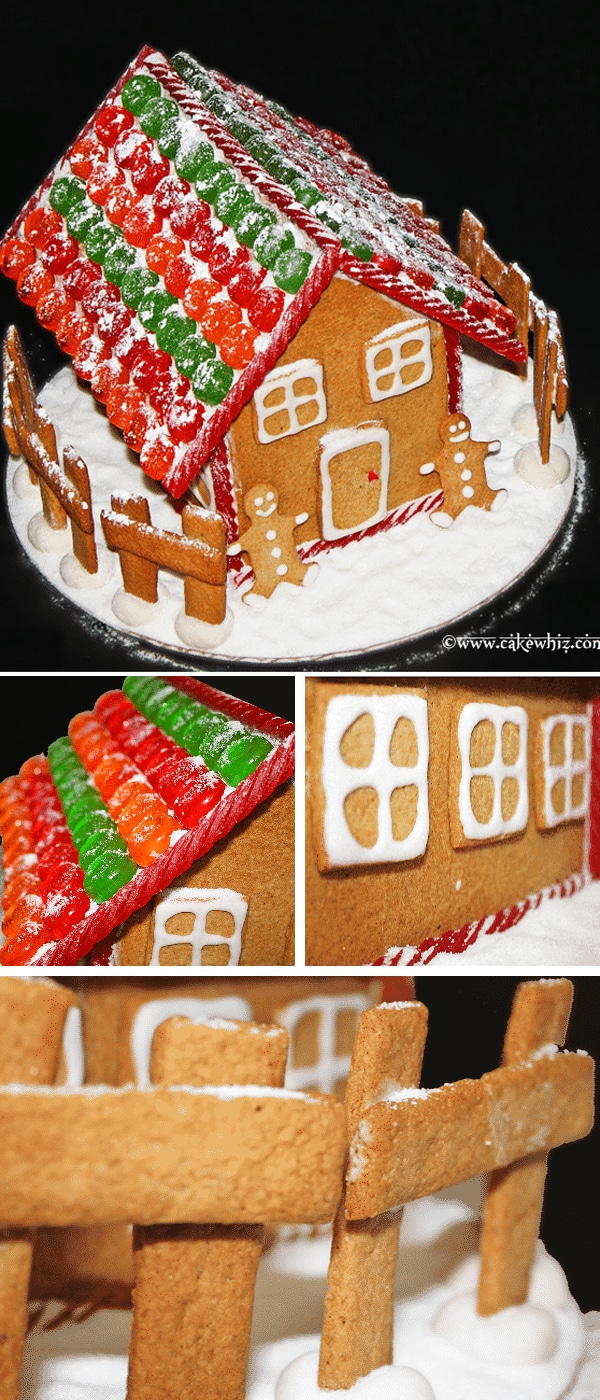
Add a fence around the house- My initial plan was to use pretzels to make them but I forgot to buy them at the store. So, I ended up using rectangular shaped cookies.
More gingerbread house ideas (Variations)
Halloween haunted house- Add marshmallow ghosts, and use green, black, and purple icing to create a spooky feel.
Log cabin- Use pretzel rods to create a log cabin house, and use Chex cereal as shingles.
Cottage- Dye desiccated coconut green and add it for moss or grass coverings on and around the house.
Leprechaun’s hideout- Add shamrock shaped windows, and use gold edible paint, along with green candies and chocolate coins to decorate this house.
Make pop tart house- Use pop tarts as the walls for a whimsical version.
Graham cracker house- They are a little more fragile, but are great for big groups of kids.
Mini Christmas village- Make lots of small houses and create a holiday scene.
Mansion- Make a larger scale version by printing out a bigger template.
Grinch house- Add lots of green candy, and a red heart in place of a wreath on the front of the house.
Candy land house- Add lollipops for trees, and use pastel colors to create a candy land feel.
Barn house- Cover it in red Twizzlers to make the red barn, and add candy or chocolate animals.
Fairy house- Add candy flowers, and colorful candies to make an edible fairy house instead of one for the garden. Cut out a fairy cookie to decorate for even more magic.
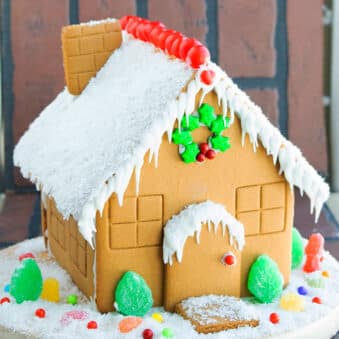
This house below is the first house I ever made years ago. It was a major learning curve and I enjoyed every minute of it. The hardest part was developing a hard cookie recipe that could withstand the decoration weight and hold its shape and not fall apart. Obviously, that meant typical soft and chewy cookies like Chocolate Chip Cookies were not an option.
Tips and techniques
Use white fondant to secure the fence- For some reason, my fences were not sticking to the cake board with royal icing. They were not standing upright and kept falling over. It was so annoying ! To fix this problem, I rolled small balls of white fondant and pushed the base of the fences in them and placed them on the cake board. It worked beautifully.
Adjust the amount of spices- As you can tell, I have not used a high quantity of spices. I prefer mine not too spicy. You can increase them according to your preference. You can also add some nutmeg if you desire.
The royal icing consistency must be thick- Because it holds the structure together best this way.
Don't use candy decorations that are too heavy, especially on the roof- Because that can cause the house to collapse.
Use a very sturdy base board- If you are using cardboard cake board, make sure you stick a few together to make it super firm. The house becomes heavy after all the decorations and you need a firm base to support all that weight. You can also use wooden cake stand or wooden tray.
The key to hard cookies is to use a very small amount of leavening agent- Use the least amount of baking powder or baking soda possible.
Recipe can be doubled- To make a bigger house or multiple houses.
Does the dough need to chill? I don't chill this dough but if you are working in a hot kitchen and the dough has become sticky, you should chill it for 30-45 minutes to make it easier to roll. This allows the cookies to hold their shape better.
Use unsalted butter- To prevent the cookies from becoming too salty.
What kind of corn syrup to use? I used light corn syrup for this recipe.
Can I use ground ginger instead of fresh? You can, but it will be much less flavorful and aromatic. I love the taste of fresh grated ginger in these cookies. If you can, I highly suggest using fresh.
Roll dough between 2 sheets of parchment paper- Because this prevents the dough from sticking to the rolling pin and makes it easier to cut out.
Cool cookies completely before assembling the house- Because warm cookies are more fragile and will crack when handled.
Storage
Room temperature- A decorated house can be stored away from moisture and heat for up to 1 week.
Refrigerate- Baked cookie pieces (once cooled) can be packed tightly in saran wrap and refrigerated for up to 3 days. Refrigerating a decorated house is not recommended because the moisture in the fridge can cause the candies to become sticky and bleed color all over the cookies.
Freeze- Baked cookie pieces (once cooled) can be packed tightly in saran wrap and frozen for up to 1 month. Thaw to room temperature and then, assemble as per instructions below. I don't recommend freezing a decorated house because the candies might bleed color upon thawing/ condensation and become messy and sticky.
More classic Christmas desserts
- Christmas Cookie Boxes (Homemade Gift)
- Christmas Fruit Cake (With Cake Mix)
- Snowman Cookies (Snowman Oreos)
- Christmas Tree Cookies
- Christmas Pinwheel Cookies
- Christmas Tree Brownies (Bites)
- Poinsettia Cupcakes
- Santa Hat Brownies
Recipe
Easy Gingerbread House Recipe
Want to Save This Recipe?
Enter your email & I'll send it to your inbox. Plus, get great new recipes from me every week!
By submitting this form, you consent to receive emails from CakeWhiz
Ingredients
- 2 cups All-purpose flour
- ½ cup Butter Unsalted
- ½ cup Brown sugar
- ¼ cup Corn syrup Light
- 2 tablespoon Whole milk
- 1 tablespoon Cinnamon powder
- ½ teaspoon Ginger Freshly grated
- ½ teaspoon Baking soda
Decoration
- 4 cups Royal icing
- 2 cups Candies and sprinkles
Instructions
- Add butter, brown sugar, corn syrup, milk, cinnamon powder, grated ginger and baking soda in a bowl. Mix until you have a smooth mixture.
- Add flour and mix again. At this point, it may be easier to mix with hands.
- Knead the dough into a ball.
- Roll out the dough between two sheets of parchment paper. This dough does not require any freezing or cooling in the refrigerator. Quite a time saver. Don’t you think?
- Use your house templates to cut out different shapes. There are a bunch of templates available online.
- Bake them for 10- 15 minutes at 350 degrees F.
- When the cookies cool, you can assemble your house!
- Pour a line of thick royal icing on the cake board and place one of your side walls on top of it. To support the wall, place something heavy like mugs on either sides.
- Pour another line of icing on the cake board and place your back wall on it. Adjust the positioning of the mug to support this wall. Also pour some icing between the two walls for extra support.
- Pour a line of icing on your cake board and place your front wall on top of it. Support this wall with something heavy too. Don’t forget to pour icing between the walls!
- Your walls are almost positioned! Pour a line of royal icing on the cake board and place your final wall on top of it. Support the wall with another mug.
- To prevent the walls from collapsing, pour some more icing around the base of the four walls.
- Pour some icing between the four walls too. Let the icing on these walls dry for an hour or two before putting up the roof. I felt that this made the walls secure enough to hold the weight of the roof.
- Time to put the roof! Pour a line of icing along the top of the walls.
- Gently, place one of your roof panels on top of the icing. Support it with books and other things. By the way, don’t forget to take out your mugs from inside the house walls. You can also fill your house with candies. It would be a nice surprise for people.
- Do the same for the second roof panel and then, pour some icing in the joint between the two roof panels.
- Let it all dry for 6-12 hours and don’t move anything. This is what the house looked like the next day. See how it is standing on its own!
- Next comes the best part- decorating! For the roof, I used candy drops. I also used licorice for the borders of the roof. I felt that it gave it a very refined look. I stuck everything in place with thick royal icing. Finally, to give the house a “snowy” effect, I sprinkled sugar all over the cake board and also sprinkled some over the window sills, fences and the roof. I am sure you can use royal icing for this snowy effect but I felt this was easier. For the windows and also the door, I used square shaped cookies and just piped details using royal icing. I pasted them onto the walls using royal icing too.
Notes
- Read all my tips above.
- Leftovers can be stored in a covered box at room temperature or fridge for up to 1 week.
Nutrition
An automated tool is used to calculate the nutritional information. As such, I cannot guarantee the accuracy of the nutritional information provided for any recipe on this site.
Karen
One tip that I strongly suggest is decorating your walls and roof first before assembling! Makes it so much easier!
Abeer Rizvi
That's a great tip. Thanks!
Gypsy Brokenwings
Once the cookies are cooled, use a fine grater to make your edges line up together (take off rounded edges).
To stick pieces together quickly, make caramel and dip edges in it. It takes less than a min. To dry and you don't have to use coffee cups, etc. To hold it together. Then when done use icing around the edges.
Abeer Rizvi
Wow! Those are some incredible tips. I have never used caramel to stick them together but I can't wait to try that out. Thanks!
Anabel
I myself have never made a gingerbread house either. Sound like a great idea for the kids to make!