Learn how to make easy homemade sugar cubes with 3 simple ingredients! Any shape, size and color is possible! Use it to decorate cakes, cupcakes. Great for tea parties.
Cubes of sugar were easily available at grocery stores when I was growing up but they are not that commonly available now. A friend showed me how to make them and it's very simple. It's a fun sugar craft, just like these Royal Icing Flowers (Sugar Flowers) or these Sugared Cranberries (Candied Cranberries) or even these Homemade Sprinkles.
2 ingredients for DIY sugar cubes:
- Sugar
- Water
- Food coloring (Optional)

Want to Save This Recipe?
Enter your email & I'll send it to your inbox. Plus, get great new recipes from me every week!
By submitting this form, you consent to receive emails from CakeWhiz
How to make sugar cubes from scratch?
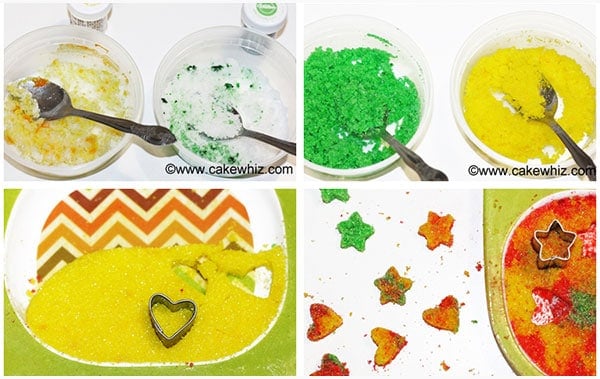
- Make sugar mixture- By mixing together granulated sugar and water.
- Color mixture- This is optional.
- Make shapes- This can be done with mini cutters or a candy mold.
- Let it dry- Until the cubes harden.
- Enjoy- Keep away from moisture and heat.
Uses
- Sweetening beverages- Like tea, coffee, champagne and cocktails.
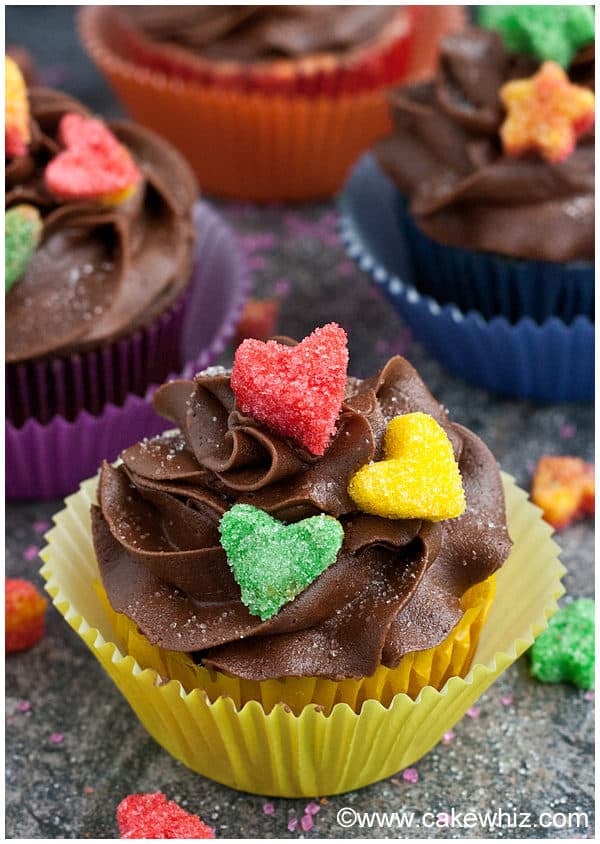
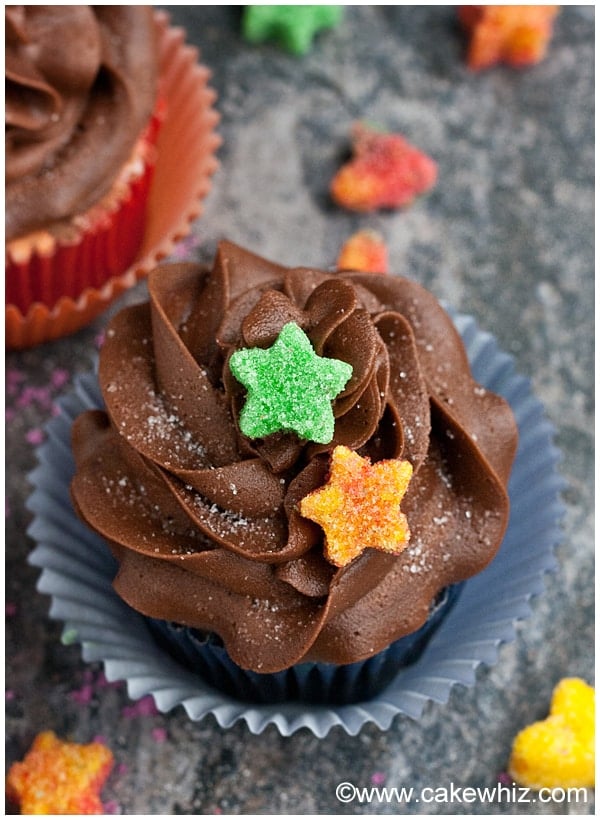
- Decorating desserts- Like cakes, cupcakes, brownies and bars.
- Homemade gifts- Pack them in a fancy box for a beautiful edible gift.
- Serving at parties- Such as fancy tea parties or at cocktail hour.
Variations
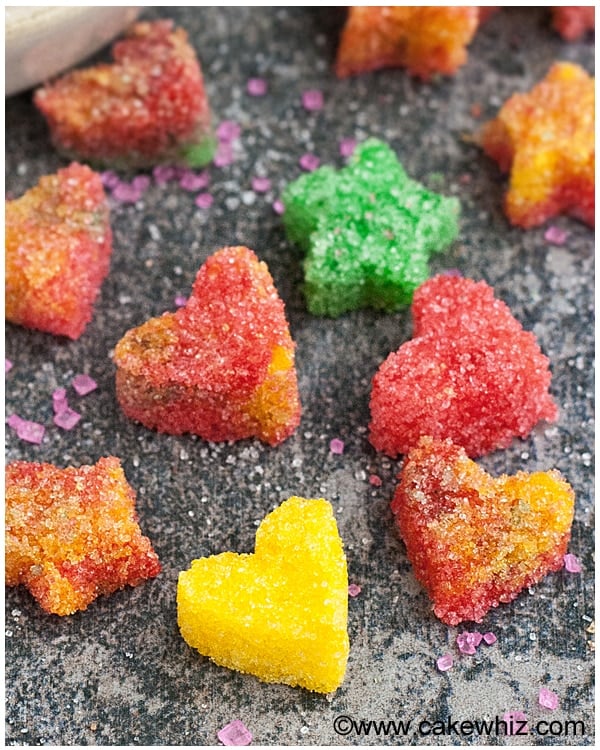
- Make other shapes and sizes- This can easily be accomplished with various shapes of of molds and small cookie cutters. We made sugar hearts and sugar stars but you can get super creative!
- Try other colors- Liquid food coloring can dissolve the sugar. So, I highly recommend using gel colors, which are thicker and more concentrated and vibrant as well.
- Add extracts- This will add flavor to the sugar. Try vanilla, almond, mint, peppermint e.t.c.
- Add zests- Such as orange zest, lemon zest or lime zest.
- Make rainbow colored cubes- By mixing different colors of sugars together partially. Then, use your hands to pack the sugar down tightly and then use cutters to cut out pieces or simply use a mold.
- Use to decorate desserts- They must be completely dry and firm before they are used on cakes and cupcakes.
Tips and Techniques
- Measure ingredients properly- Don't eyeball anything. If you add too much water, the sugar will dissolve and you won't end up with a crumbly mixture.
- Cutters vs. Molds- Either can be used. Molds are much easier. If using cutters, make sure they are mini cutters.
- Water quantity may vary- Depending on where you live and your weather conditions, you might need to add more or less water. I usually start off with 1 tablespoon water and use a dropper to add 1 drop of water at a time, until I end up with a chunky mixture.
- Let them dry completely- These pieces are very fragile when they come out of the cutter. So, don’t try to move them too much or else they will break. If you are using a mold, let the sugar mixture dry completely in the mold and then flip it over gently onto a sheet of wax paper/ parchment paper and they should fall out easily.
- How to thicken sugar mixture- Mix in more sugar.
- How to make sugar mixture thinner- Mix in more water.
- Granulated sugar vs. Brown sugar vs. Powdered sugar- Either brown or granulated sugar can be used. Brown sugar can obviously not be colored. Powdered sugar as well as artificial sweeteners cannot be used at all.
- For classic shape- Use cube candy mold.
Storage
- Room temperature- In a covered box away from heat and moisture for up to 1 month.
- Refrigerate- This is not recommended since the moisture can ruin the shape of the cubes and can cause them to dissolve partially.
- Freeze- This is also not recommended since the moisture can ruin the shape of cubes.
More Kid Friendly Desserts
Recipe
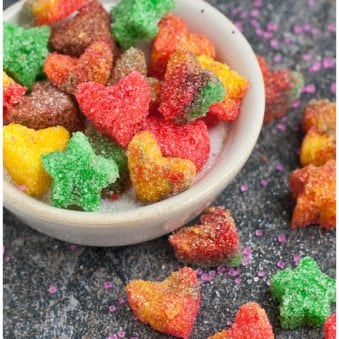
Homemade Sugar Cubes (Hearts and Stars)
Want to Save This Recipe?
Enter your email & I'll send it to your inbox. Plus, get great new recipes from me every week!
By submitting this form, you consent to receive emails from CakeWhiz
Ingredients
- 1 cup Sugar Granulated
- 1 tablespoon Water
- Gel coloring Optional
Instructions
- Add sugar and water in a small bowl and mix everything until you have a rough,chunky mixture.
- Divide the sugar mixture into separate small bowls and add different gel colorings into each bowl.
- Mix the color thoroughly into the sugar mixture with a spoon.
- Spread the sugar mixture on a cookie tray. Use your hands to really push down the mixture tightly. Then, press your small cutters into this mixture.
- Now, remove the cutter from the mixture and gently place it on a sheet of wax paper. Tap the cutter lightly and the sugar piece will just come out.
- Let the pieces dry overnight on the sheet of wax paper or until they harden. Once they are hard, you can store them in a plastic container away from moisture, humidity and sunlight.
- Instead of cutters, you can use a small candy mold. Fill the molds with crumbly sugar mixture and let it dry completely (overnight is best) at room temperature. Then, flip it over gently onto a sheet of wax paper/ parchment paper and the cubes should fall out easily. Enjoy!
Notes
- Read all my tips above.
Nutrition
An automated tool is used to calculate the nutritional information. As such, I cannot guarantee the accuracy of the nutritional information provided for any recipe on this site.
Lana Alexander
So Sorry I hit the post button to soon, duh! Anyways I have subscribed to your blogs, I luved the pages i have read so far! cant wait to get'em ! I do have a question, on making your fondant does it matter if your marshmallows are stale or should they be fresh? Also do you have a tutorial on decorating & covering a cake with fondant? Thanks for your help & sharing!!
Lana
Abeer Rizvi
I made fondant once with stale marshmallows and it was a disaster. Stale marshmallows are harder than fresh marshmallows. They take longer to melt and don't melt properly at all. You end up with little pieces of unmelted marshmallow chunks. So, when you make fondant with that chunky melted marshmallows, your fondant also ends up having little bits and pieces in them. It's not smooth and horrible to work with. I really don't recommend using stale marshmallows.
I am about to do a tutorial for covering a cake with marshmallow fondant coz I have been getting so many requests for it. The posting will probably go live early next month
Lana Alexander
OMGosh so cute! I am so glad I ran across this pin on Pinterest, I'm trying to learn the "how to's" on fondant, cake pops & cake decorating, your tutorials are great & I have pinned them all, thanks for sharing
Abeer Rizvi
It's so nice to hear you are enjoying my blog and tutorials. If you ever need any help or have any questions, feel free to send me an email or leave a message
Carissa
What a fun idea. The shape possibilities are endless.
Abeer Rizvi
You are right! With all the cute cutters out there, you can make these sugar decorations in any shape you like!
Jaclyn Anne
This looks like a fun activity! Thank you for sharing the idea & recipe!
Abeer Rizvi
Glad to hear you enjoyed the idea!
Annette
Those are so cute. I've never seen these before. They would be cute for a birthday party.
Abeer Rizvi
Oh yes! They would make such beautiful party favors!
Heather
Wow! Those are awesome! I think little helpers are the best. I think my kids would get a kick out of this too!
Abeer Rizvi
Yup... little helpers are the best with their little hands hard at work...heheh
Anne Campbell
These are really pretty! I'm pinning this so I'll remember to try this for Valentine's Day.
Abeer Rizvi
Thanks for pinning! A box of the heart shapes would make a very pretty Valentine's day gift.
RavieNomNoms
WOW those are really impressive!!!
Abeer Rizvi
Thanks Raven! And they are soooooo easy to make minus all the mess...lol.
Btw, I hope married life is treating you well