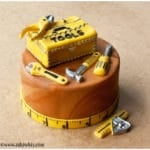
Father's Day Cake (Tool Box Cake)
Learn how to make easy homemade Father's Day cake (tool box cake) with simple ingredients. This chocolate beer cake is covered in chocolate frosting, fondant and decorated with edible handyman tools.
Servings: 9 Slices
Calories: 889kcal
Ingredients
- 2 Guinness beer cake Round, Dimensions: 8x2 each
- 4 cups Chocolate cream cheese frosting
- 3 cups Marshmallow fondant Brown, yellow
- 1 cup Gum paste
Instructions
- Bake cakes and allow them to cool completely.
- Prepare frosting.
- Assemble the cake by placing one cake on a serving plate.
- Use a spatula to spread icing on top.
- Place the other cake on top of the frosting and press gently to secure into place.
- Ice the entire cake smoothly.
- Spread out brown marshmallow fondant and do the marbling technique. Follow this tutorial: How to Marble Fondant.
- To make a measuring tape border around the cake, roll out yellow fondant into a long strip. Use a pizza cutter to cut a 1 inch wide strip, long enough to cover around the base of the cake completely.
- Brush some water around the base of the cake and and stick this measuring tape strip. Add all the numerical details with a fine tip black edible marker.
- Keep this cake aside.
- Bring out your tool box chocolate mold. I made the tool box first. To do that, rub some shortening in the cavities. Press some yellow gum paste into the cavity for the lid of your tool box. Use your fingers to smooth it out until the entire cavity is filled up. Some of the gum paste will "ooze" out but don't worry about it. Then, gently peel your gum paste from the cavity and place it on a sheet of wax paper.All the details from the cavity should have gotten embossed onto your gum paste. Use a sharp knife to cut out the sides and you will end up with a rectangle.
- Measure the sides of that piece you just made. Now, roll out some yellow gum paste and cut out the relevant sizes for the sides of this tool box. Allow these pieces to dry until hard. This can take up to 24 hours.
- Use melted yellow chocolate or some gum paste glue or yellow royal icing to stick all the pieces together and then paint all the details. Use a fine tip black edible marker for all the black details.For silver details, mix some clear vanilla extract with CK Nu-Silver luster dust and use that to paint silver, where needed.
- To make tools, rub some shortening into the cavities. Place a chunk of yellow gum paste into the cavity and start pressing with your fingers.Flip the mold and press down until the mold is lying flat on your table. Flip your mold back again.Gently, peel your gum paste out of the cavity and place it on a sheet of wax paper. Use a sharp knife to cut out all the excess and smooth out all the sides and corners with your fingers.
- Once again, use a fine tip black edible marker to draw out all the black details. To add silver details, mix clear vanilla extract and CK Nu-Silver luster dust and paint silver where needed. Make as many tools as you need. Allow them to dry for 24 hours.
- Once all the pieces are dry, just place your tool box and tools on top of the cake and you are done.
Notes
- Read all my tips above.
- Leftovers can be stored in a sealed container in the fridge for up to 3 days.
Nutrition
Calories: 889kcal | Carbohydrates: 154g | Protein: 7g | Fat: 33g | Saturated Fat: 9g | Sodium: 996mg | Potassium: 515mg | Fiber: 3g | Sugar: 109g | Vitamin A: 4IU | Calcium: 153mg | Iron: 6mg