Easy Gingerbread House Recipe
Learn how to make easy homemade gingerbread house for Christmas. Recipe for hard gingerbread cookies and royal icing included plus tips for construction and decoration.
Servings: 6 Cookies
Calories: 2421kcal
Ingredients
- 2 cups All-purpose flour
- ½ cup Butter Unsalted
- ½ cup Brown sugar
- ¼ cup Corn syrup Light
- 2 tablespoon Whole milk
- 1 tablespoon Cinnamon powder
- ½ teaspoon Ginger Freshly grated
- ½ teaspoon Baking soda
Decoration
- 4 cups Royal icing
- 2 cups Candies and sprinkles
Instructions
- Add butter, brown sugar, corn syrup, milk, cinnamon powder, grated ginger and baking soda in a bowl. Mix until you have a smooth mixture.
- Add flour and mix again. At this point, it may be easier to mix with hands.
- Knead the dough into a ball.
- Roll out the dough between two sheets of parchment paper. This dough does not require any freezing or cooling in the refrigerator. Quite a time saver. Don’t you think?
- Use your house templates to cut out different shapes. There are a bunch of templates available online.
- Bake them for 10- 15 minutes at 350 degrees F.
- When the cookies cool, you can assemble your house!
- Pour a line of thick royal icing on the cake board and place one of your side walls on top of it. To support the wall, place something heavy like mugs on either sides.
- Pour another line of icing on the cake board and place your back wall on it. Adjust the positioning of the mug to support this wall. Also pour some icing between the two walls for extra support.
- Pour a line of icing on your cake board and place your front wall on top of it. Support this wall with something heavy too. Don’t forget to pour icing between the walls!
- Your walls are almost positioned! Pour a line of royal icing on the cake board and place your final wall on top of it. Support the wall with another mug.
- To prevent the walls from collapsing, pour some more icing around the base of the four walls.
- Pour some icing between the four walls too. Let the icing on these walls dry for an hour or two before putting up the roof. I felt that this made the walls secure enough to hold the weight of the roof.
- Time to put the roof! Pour a line of icing along the top of the walls.
- Gently, place one of your roof panels on top of the icing. Support it with books and other things. By the way, don’t forget to take out your mugs from inside the house walls. You can also fill your house with candies. It would be a nice surprise for people.
- Do the same for the second roof panel and then, pour some icing in the joint between the two roof panels.
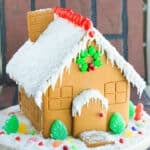
- Let it all dry for 6-12 hours and don’t move anything. This is what the house looked like the next day. See how it is standing on its own!
- Next comes the best part- decorating! For the roof, I used candy drops. I also used licorice for the borders of the roof. I felt that it gave it a very refined look. I stuck everything in place with thick royal icing. Finally, to give the house a “snowy” effect, I sprinkled sugar all over the cake board and also sprinkled some over the window sills, fences and the roof. I am sure you can use royal icing for this snowy effect but I felt this was easier. For the windows and also the door, I used square shaped cookies and just piped details using royal icing. I pasted them onto the walls using royal icing too.
Notes
- Read all my tips above.
- Leftovers can be stored in a covered box at room temperature or fridge for up to 1 week.
Nutrition
Calories: 2421kcal | Carbohydrates: 372g | Protein: 28g | Fat: 95g | Saturated Fat: 59g | Cholesterol: 247mg | Sodium: 1460mg | Potassium: 453mg | Fiber: 11g | Sugar: 174g | Vitamin A: 2835IU | Calcium: 281mg | Iron: 13.1mg